In this tutorial I will show you how I have implemented a zero downtime deployment (blue-green like) of a small web application which is running on a DigitalOcean Droplet. The cool thing is, that this deployment is fully automated. After pushing a code change to the web application code a CI/CD-Pipeline will be executed which does the following tasks:
- build a new version of the web application
- put that web application into a docker image
- push the docker image to an external docker registry
- create the infrastructure which consists of :
- two droplets (on one we will have the updated version of our web application and on the other we will have the pre-update version as a fallback)
- one droplet which serves as the load balancer
- a floating IP-Address which will be used in the load balancer’s configuration to route user requests to the active droplet
- a domain (and a dns record) to tie the domain to the load balancer
- pull the latest version of the docker image of our web application from the docker registry
- start a container with the newest image
- wait until the application is up and running
- link the floating IP address to the droplet with the updated version of our web application container which thereby becomes our new production droplet
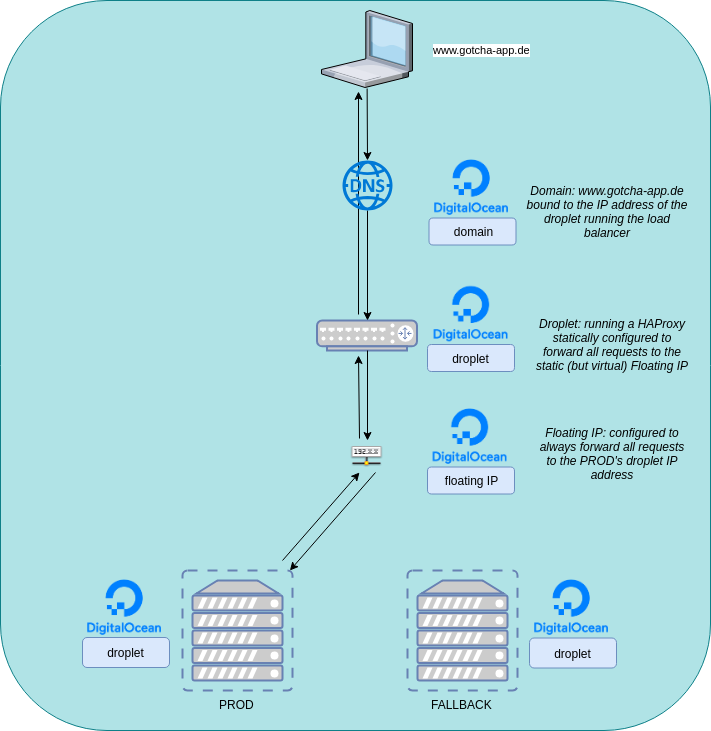
If we put the infrastructure into a diagram it will look like this:

You can find the complete source code here.
Tech-Stack
- Web application: a small „Hello World“-Vaadin-Application (with Spring Boot) which shows the current time when clicking a button.
- Repository/Docker Registry/CI/CD/Pipeline: gitlab.com
- Infrastructure/Cloud provider: DigitalOcean
- Infrastructure as code: Terraform (with an S3 bucket hosted in a DigitalOcean Space as the backend so that terraform knows which resources were already created during previous pipeline run. In fact: The infrastructure will be build a single time on the first pipeline run and from the second pipeline run there is no need to recreate everything – the only exception is when we modify the specs of our resources. Not only is there no need: We don’t WANT everything to be recreated because we don’t want any downtime).
- Configuration management: ansible (we will use a small ansible playbook to copy a script to our worker droplets and execute it on those. This script will do nothing more than pulling the newest docker image and stop the currently running container and replace it with a container of the pulled image)
Create the web application
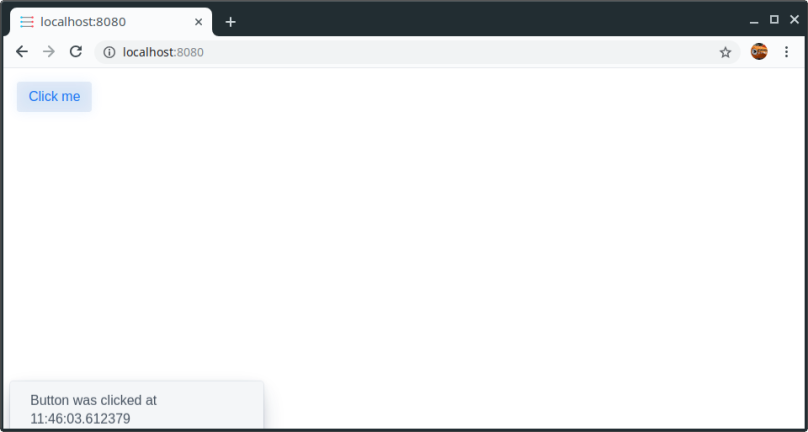
So, let us start with the web application. We will take a starter pack from https://vaadin.com/start/latest/project-base-spring which is a Spring Boot application (maven project) consisting of only a single button that displays the time when clicked.
Put the web application into a container (image)
As a next step we will put that web application into a container. Therefore let’s create a Dockerfile (at the top level of the vaadin project) which builds an image that takes the generated jar-File and executes it – it’s pretty straight forward:
FROM openjdk:11-jdk-oracle
RUN useradd --no-log-init -r codinghaus
USER codinghaus
WORKDIR /home/codinghaus
ADD target/my-starter-project.jar .
EXPOSE 8080
CMD java -jar /home/codinghaus/my-starter-project.jar
Before building the image we have to to a maven clean build so that the jar-file is generated (my-starter-project.jar). After a clean build we can generate the image. Navigate to the project and execute:
docker build . -t codinghaus/webgui:1
This will create an image called codinghaus/webgui with the tag 1 (for version 1).

Before we start to build our pipeline and automate everything, let us test if the container works:
docker run -d -p 8080:8080 codinghaus/webgui:1

After executing that command the container should run in the background and when calling http://localhost:8080/ the web application should be running.
Okay cool, we have a containerized web application now. Time to get it into the cloud.
Create the infrastructure (as code)
So, we want the app to be deployed into the cloud so that it is accessible for other users. The cloud provider of our choice is DigitalOcean. The resources that we want to have:
- 1 Domain (www.gotcha-app.de)
- 2 Droplets running our app (one droplet will serve as our production system where the latest version of our app is running. The other droplet will contain the previous version of our app – if an update of our app fails horrible we will be able to easily switch back to the previous version)
- 1 Droplet which serves as a load balancer
- 1 Floating IP which will be used in our load balancer configuration
The point of that setup is: We will have a domain http://www.gotcha-app.de. When a user enters http://www.gotcha-app.de the request will be redirected to the load balancer. The load balancer will take the request and forward it to the floating IP. A DigitalOcean Floating IP is static and we are able to bind one droplet (its ip) to that static IP. This is great because we can configure our load balancer to forward all requests to that static IP, but on the other hand we are able to dynamically switch the target behind that IP so later we can decide if requests to that IP will be forwarded to our droplet with the most current version of our web app running or to the droplet with the previous version.
Think about it: Later when we have a pipeline, which is executed when we updated the code of our web application, we will deploy the newest version of our web app to one of our droplets. During this time all user requests will be forwarded to the droplet running the pre-update version. The users won’t recognize that we are deploying an update to the second droplet. When the update is finished on the second droplet, we can then tell the Floating IP: „Hey, update finished. Stop forwarding user requests to the droplet running the old version and instead forward them to the droplet running the newest version“. As we are only changing the target behind the static Floating IP we don’t have to touch our load balancer’s configuration and so we don’t have to restart the load balancer. The users won’t recognize that their requests are now forwarded to another droplet.
But now it’s time for the infrastructure code. We use terraform to describe our infrastructure as code. There is a great DigitalOcean-Provider for terraform so we can describe everything we want to be created on DigitalOcean as code.
I will keep explanations on that code very short. There are enough sources on the internet if you are interested in learning terraform. Just a few words on how terraform works in general: What you will need (if you try this example yourself) is an account on DigitalOcean where you can create a token. With that token terraform will be able to create resources like droplets, domains, etc. on your account. It therefore will call API-endpoints from DigitalOcean. You will also need to put a ssh key to your DO-Account so that terraform will be able to connect to the created droplets.
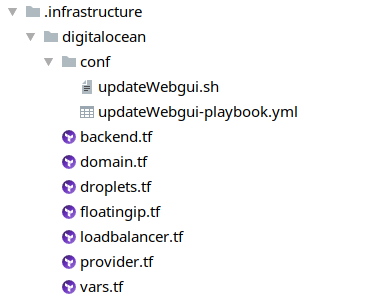
First, let us create an .infrastructure-folder to our project which will contain the complete code describing our wanted infrastructure (in terraform-syntax):
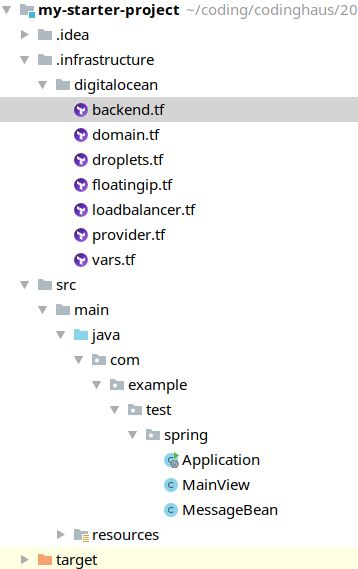
The digitalocean-folder contains everything that should be created on DigitalOcean.
- domain.tf: contains the domain to create
- droplets.tf: contains both worker droplets to create
- floatingip.tf: contains the floating IP to create
- loadbalancer: contains the droplet to create which will server as a load balancer
- provider: contains our DigitalOcean-Account-Credentials (our token)
- vars: defines all variables we need
- backend: here we define the space where we want terraform to save the current state of our infrastructure
This is really important as a backend serves as a location where terraform puts the current state of the infrastructure that it already created. We want those informations to be saved remotely (and not on our repository) and during each run of our pipeline we want terraform to check the current state so that our infrastructure won’t be created again and again with each pipeline run. Just think of what our idempotent CI/CD-Pipeline should do: Create the infrastructure if not already there, but if already there: only do the updates.
Info: During the creation of that blog post the digitalocean provider for terraform doesn’t support creating spaces programatically with terraform (but it will be possible with probably the next release – see https://github.com/terraform-providers/terraform-provider-digitalocean/pull/77). So – sadly – we have to create that space from the DigitalOcean-GUI but then at least we can use the manually created space in our terraform code and use it as a backend.
Let us have a look at the single files:
vars.tf
This file contains variables which in general contain credential stuff like keys/tokens/passwords that we don’t want to have hardcoded in our code (and in our repository). It also contains some configuration stuff like the number of worker droplets we want to be created, the size of each droplet, the location where to create the droplets, …. . Later when creating our pipeline you will see, that we will fill those variables using environment variables.
variable "DO_TOKEN" {}
variable "DO_SPACES_ACCESS_ID" {}
variable "DO_SPACES_SECRET_KEY" {}

variable "DO_PUBKEY_PLAIN" {}
variable "DO_KEYFINGERPRINT" {}
variable "DO_REGION" {}
variable "DO_SIZE" {}
variable "DO_WORKERCOUNT" {}

variable "DOCKER_REGISTRY_URL" {}
variable "DOCKER_REGISTRY_USERNAME" {}
variable "DOCKER_REGISTRY_PASSWORD" {}

variable "TAGS" {
  type = "list"
  default = ["PROD", "FALLBACK"]
}
provider.tf
In this file we tell terraform which provider to choose, so it knows what API-Endpoints to use to create/modify resources on DigitalOcean and what credentials to use to find and login to our account.
provider "digitalocean" {
  token = "${var.DO_TOKEN}"
}
droplets.tf
This is the first „real“ resource file. Here we describe the two droplets on which we will have our application running later. What we already do here: After creating the resource we connect to it (via ssh) and install docker there so we don’t have to do that later. The only purpose of those droplets is to run our container and therefore a docker installation is required – and why not already do this during the creating process? In the end we already login to our docker registry (we will cover that later during this blog post).
The last block („lifecycle“) is pretty important because we tell terraform here that it should not recognize if a droplet’s tag has changed. If we would not do this: Think of a second pipeline run. We don’t want terraform to do anything here, we just want to create a new image and update the running container. Without that block terraform would recognize (on the second pipeline run, during the deploy-infrastructure stage) that our two worker droplets have changed (their tags) and terraform would reset the tags again. But we want to handle the droplet’s tags without terraform – during our update stage.
resource "digitalocean_droplet" "droplets" {
  image = "ubuntu-16-04-x64"
  name = "${format("droplet%02d", count.index + 1)}"
  count = "${var.DO_WORKERCOUNT}"
  region = "${var.DO_REGION}"
  size = "${var.DO_SIZE}"
  tags = ["${element(var.TAGS, count.index)}"]
  private_networking = true
  ssh_keys = [
    "${var.DO_KEYFINGERPRINT}"
  ]
  connection {
    user = "root"
    type = "ssh"
    private_key = "${file("~/.ssh/id_rsa")}"
    timeout = "2m"
  }

  provisioner "remote-exec" {
    inline = [
      "sleep 10",
      "apt-get update",
      "apt-get install apt-transport-https ca-certificates curl software-properties-common -y",
      "curl -fsSL https://download.docker.com/linux/ubuntu/gpg | sudo apt-key add -",
      "add-apt-repository \"deb [arch=amd64] https://download.docker.com/linux/ubuntu $(lsb_release -cs) stable\"",
      "apt-get update",
      "apt-get install docker-ce -y",
      "usermod -aG docker `whoami`",
      "docker login ${var.DOCKER_REGISTRY_URL} --username ${var.DOCKER_REGISTRY_USERNAME} --password ${var.DOCKER_REGISTRY_PASSWORD}"
    ]
  }

  lifecycle {
    ignore_changes = ["tags"]
  }
}
floatingip.tf
The floating IP will be created after the droplets (have a look at the depends_on-attribute). During the creation process (which will probably only be executed once during our very first pipeline run) we will set the first of our two droplets as the target behind the floating IP (if you think about it: The target doesn’t matter during creation as both droplets are empty/plain and have no web application container running).
Pay attention to the lifecycle block again. Without it terraform would (during the second pipeline run) reattach droplet01 to the floating ip. We don’t want terraform to do anything after creating the infrastructure because we will handle that ourselves during the update stage).
resource "digitalocean_floating_ip" "floatingip" {
  droplet_id = "${element(digitalocean_droplet.droplets.*.id, 0)}"
  region     = "${element(digitalocean_droplet.droplets.*.region, 0)}"
  depends_on = ["digitalocean_droplet.droplets"]

  lifecycle {
    ignore_changes = ["droplet_id"]
  }
}
loadbalancer.tf
The load balancer droplet will be created after the floating IP. This is because we want to use the IP address of the floating IP in our load balancer config, so it must be already existent when creating/configuring the load balancer. As you can see we will use a HAProxy here and modify the haproxy.cfg to route all incoming requests to the IP of the floating IP and do a restart of the HAProxy after that.
resource "digitalocean_droplet" "loadbalancer" {
  image = "ubuntu-16-04-x64"
  name = "loadbalancer"
  region = "${var.DO_REGION}"
  size = "${var.DO_SIZE}"
  private_networking = true
  ssh_keys = [
    "${var.DO_KEYFINGERPRINT}"
  ]
  depends_on = ["digitalocean_floating_ip.floatingip"]

  connection {
    user = "root"
    type = "ssh"
    private_key = "${file("~/.ssh/id_rsa")}"
    timeout = "2m"
  }

  provisioner "remote-exec" {
    inline = [
      "apt-get update",
      "apt-get install jq -y",
      "apt-get update",
      "apt-get install haproxy -y",
      "printf \"\toption forwardfor\" >> /etc/haproxy/haproxy.cfg",
      "printf \"\n\nfrontend http\n\tbind ${self.ipv4_address}:80\n\tdefault_backend web-backend\n\" >> /etc/haproxy/haproxy.cfg",
      "printf \"\nbackend web-backend\n\tserver floatingIP ${digitalocean_floating_ip.floatingip.ip_address}:8080 check\" >> /etc/haproxy/haproxy.cfg",
      "/etc/init.d/haproxy restart"
    ]
  }
}
domain.tf
When the load balancer creation has finished, we are able to create (let terraform create) a domain on DigitalOcean. We will tie requests to that domain to the IP of the created load balancer droplet.
resource "digitalocean_domain" "domain-www" {
  name       = "www.gotcha-app.de"
  ip_address = "${digitalocean_droplet.loadbalancer.ipv4_address}"
  depends_on = ["digitalocean_droplet.loadbalancer"]
}
backend.tf
This last file is pretty important. It describes our terraform backend. A terraform backend is a remote location, where terraform saves the state of the created infrastructure. Without a backend terraform would recreate all described resources on each pipeline run because it doesn’t know that it already was created. But of course we want terraform to be idempotent and only create the resources if they don’t exist already. By default terraform saves those information locally in the same folder where it is executed (.infrastructure/digitalocean) but we don’t want it in our code and we don’t want it in our repository. Instead we will use a DigitalOcean Space (which is the same as AWS S3) for that (I read through https://medium.com/@jmarhee/digitalocean-spaces-as-a-terraform-backend-b761ae426086 to understand how to do that and can absolutely recommend that blog post)
terraform {
  backend "s3" {
    endpoint = "ams3.digitaloceanspaces.com"
    region = "us-west-1"
    key = "terraform-state"
    skip_requesting_account_id = true
    skip_credentials_validation = true
    skip_get_ec2_platforms = true
    skip_metadata_api_check = true
  }
}
Thanks to that code we can then use the following command, which ensures that terraform will always load the current state of our infrastructure before executing any command:
terraform init \
-backend-config="access_key=$TF_VAR_DO_SPACES_ACCESS_ID" \
-backend-config="secret_key=$TF_VAR_DO_SPACES_SECRET_KEY" \
-backend-config="bucket=$TF_VAR_DO_SPACES_BUCKET_NAME"
(taken from the mentioned blog post from @jmarhee, thanks!)
Nice, our infrastructure code seems complete. After creating a space manually on DigitalOcean, we can (for testing purposes) try out if everything works by first initiating the terraform backend:

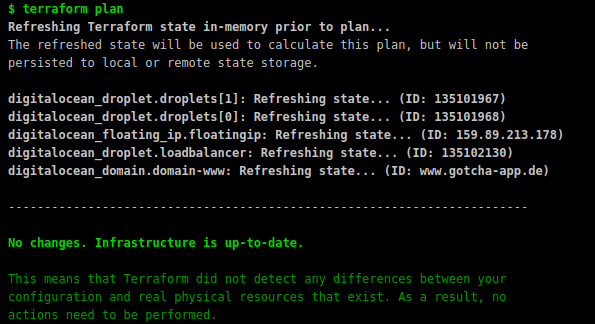
and then let terraform do its work. First we will run a „terraform plan“, to get an overview of what terraform is about to create:
terraform plan -var="DO_TOKEN=<value here>" -var="DO_SPACES_ACCESS_ID=<value here>" -var="DO_SPACES_SECRET_KEY=<value here>" -var="DO_PUBKEY_PLAIN=<value here>" -var="DO_KEYFINGERPRINT=<value here>" -var="DO_REGION=fra1" -var="DO_SIZE=s-1vcpu-1gb" -var="DO_WORKERCOUNT=2"
Seems good, so now let us terraform to do the magic:
terraform apply -var="DO_TOKEN=<value here>" -var="DO_SPACES_ACCESS_ID=<value here>" -var="DO_SPACES_SECRET_KEY=<value here>" -var="DO_PUBKEY_PLAIN=<value here>" -var="DO_KEYFINGERPRINT=<value here>" -var="DO_REGION=fra1" -var="DO_SIZE=s-1vcpu-1gb" -var="DO_WORKERCOUNT=2"
This will take some minutes. The result will then look like:

And if you have a look into the DigitalOcean-GUI you can see that all three droplets, the floating IP and the domain have been created.


If you have a further look into the bucket in your space, you will see that terraform has automatically uploaded a file there, which contains all informations on the current state of the created infrastructure. This ensures that if you now run a second terraform apply nothing will happen as all resources are already created (if you want to clear your infrastructure / remove all resources you can do a terraform destroy).

So let us just try a second terraform apply and ensure that nothing happens:

Perfect! Now that the automated infrastructure creation works, it is the right time to put the project into a repository and create a pipeline!
Create the CI/CD-Pipeline
We will host our project in a gitlab repository. Why gitlab? It offers everything we want.
- We will need a docker registry where our web applications image versions are pushed to / pulled from and gitlab has an integrated docker registry that we can use for that (no need to host an own registry on an additional server).
- We need a system, where our pipeline is executed (the pipeline will consist of different steps like „build the application“, „push the new image to the registry“, „build the infrastructure“, …). Gitlab offers non-cost shared runners which we can use for that. If we create a pipeline file in our repository the pipeline will automatically be triggered and executed on those shared runners (read on).
- I mentioned earlier that we will keep all the stuff we don’t want hardcoded in our repository (credentials, configuration, …) in environment variables: In Gitlab you are able to create environment variables (key/value pairs) that are available during the pipeline run on the shared runners automatically – great!!
I will skip the creation of a repository here and presuppose that you have done that already / will do that on your own.
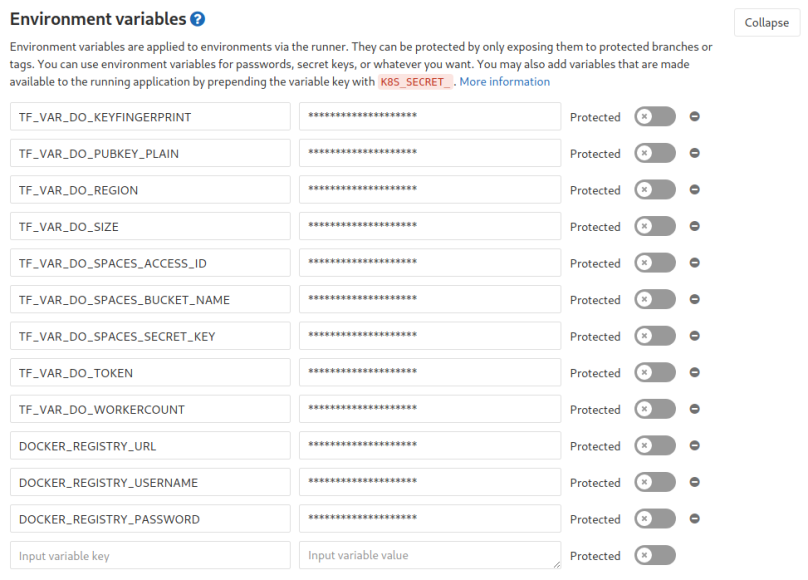
Now that we have a repository on gitlab, let us first create the environment variables which are needed for terraform. As you could see above when executing the terraform commands we appended lots of -var=“KEY=VALUE“ so that terraform has values for all variables defined in vars.tf. An alternative to that appending approach is to have environment variables which have the same names as the defined variables in vars.tf but with a prepended TF_VAR_. So what we have to do is create those environment variables in gitlab (Settings –> CI/CD –> Environment Variables). It should look like this in the end:

Awesome, now that everything is prepared let us finally define the pipeline. This is done by putting a file called „.gitlab-ci.yml“ at the root of our repository. In this file we define what the pipeline should do and when. We will define four stages:
- build – where the web application is built and packed
- push – where the web application is put into a docker image and pushed into our docker registry
- deploy-infrastructure – where all our DigitalOcean-resources are created by terraform if needed (what we did manually / by typing the terraform commands manually in the previous chapter)
- update – where we take one of the worker droplets, pull the newest image of our web application image, start a container from that newest image and then modify the Floating IP to point to that updated droplet (running the container with the updated image).
Let us have a look at each single stage and what exactly is done there. You will find the full file in the repository here.
build-stage
build:
  stage: build
  script:
    - mvn clean install
  artifacts:
    paths:
      - target/my-starter-project.jar
  only:
    - master
As we have a maven project in our repository we will use the maven base image for our pipeline (see full file in the example repository) so we can simply run a
mvn clean install
here as the only command in that stage. The „artifacts“ block ensures that the built jar file will be stored for the whole pipeline run so that other stages have access to that file (as we need it to build the docker image etc..). The „only“ block is pretty self explaining. It says that this stage should only be executed when something is pushed to the master branch of the repository.
push-stage
push:
  stage: push
  image: docker:latest
  before_script:
    - docker login $TF_VAR_DOCKER_REGISTRY_URL --username $TF_VAR_DOCKER_REGISTRY_USERNAME --password $TF_VAR_DOCKER_REGISTRY_PASSWORD
  script:
    - until VERSION=`docker run -v $(pwd):/app -w /app maven:3.6.0-jdk-11 mvn org.apache.maven.plugins:maven-help-plugin:3.1.1:evaluate -Dexpression=project.version -q -DforceStdout`; do echo "mvn command timed out...trying again..."; sleep 2; done
    - docker build --tag=$TF_VAR_DOCKER_REGISTRY_URL/$TF_VAR_DOCKER_REGISTRY_USERNAME/$DOCKER_REGISTRY_REPO_NAME/webgui:$VERSION .
    - docker push $TF_VAR_DOCKER_REGISTRY_URL/$TF_VAR_DOCKER_REGISTRY_USERNAME/$DOCKER_REGISTRY_REPO_NAME/webgui:$VERSION
  only:
    - master
The first thing we do here is to use the docker image for that stage instead of the maven image as we will mainly run docker commands here to build our image and push it to our gitlab docker registry. As you can see the first step (in the „before_script“ block) is to log into the docker registry. If you use the gitlab docker registry the URL is registry.gitlab.com and you can log into it with your normal gitlab account credentials. As we don’t wont these hardcoded in our repository we will instead use environment variables here again which we have to add in the CI/CD-Settings in our gitlab project as we did it with the other credential information for our infrastructure code (see above chapters).
Afterwards the first command in the „script“ block is for extracting the version number from our pom.xml to create a docker image tagged with the same version so there is always an image matching the version from our pom.xml (which is 1.0-SNAPSHOT for our current version). I put that command into a loop because it occasionally fails (I think because it lasts very long and so it sometimes runs into a timeout – which is bad as our pipeline fails if any command in the pipeline fails). Then we build the image, tag it and push it to the docker registry. No magic here.
deploy-infrastructure-stage
Time to put the terraform commands into our pipeline:
deploy-infrastructure:
  stage: deploy-infrastructure
  image:
    name: hashicorp/terraform:light
    entrypoint:
      - '/usr/bin/env'
      - 'PATH=/usr/local/sbin:/usr/local/bin:/usr/sbin:/usr/bin:/sbin:/bin'
  before_script:
    - mkdir -p ~/.ssh
    - echo "$PRIVKEY_PLAIN" | tr -d '\r' > ~/.ssh/id_rsa
  script:
    - cd .infrastructure/digitalocean
    - terraform init -backend-config="access_key=$TF_VAR_DO_SPACES_ACCESS_ID" -backend-config="secret_key=$TF_VAR_DO_SPACES_SECRET_KEY" -backend-config="bucket=$TF_VAR_DO_SPACES_BUCKET_NAME"
    - terraform plan
    - until terraform apply -auto-approve; do echo "Error while using DO-API..trying again..."; sleep 2; done
  only:
  - master
based on the hashicorp/terraform:light-image we will step into our digitalocean folder including our infrastructure code, init our terraform backend so terraform knows about the current state of our infrastructure (if there were previous pipeline runs) and then plan and apply the code. I put the „terraform apply“ command into a loop as sometimes there occur errors when talking to the DigitalOcean-API. Without the loop the whole pipeline would fail in that case but thanks to the loop it will be retried. Of course this can result in an endless loop if there are „real“ errors and not only „temporary“ ones but most of the times my pipeline runs fail are related to temporary api errors so in most cases that loop is more helpful than harming.
the before_script-block copies our private ssh key onto the gitlab runner so that the remote_exec-blocks of our terraform files are able to ssh connect to our created resources/droplets.
update-stage
update:
  stage: update
  before_script:
    - echo "deb http://ppa.launchpad.net/ansible/ansible/ubuntu trusty main" >> /etc/apt/sources.list
    - apt-key adv --keyserver keyserver.ubuntu.com --recv-keys 93C4A3FD7BB9C367
    - apt-get update
    - apt-get install wget software-properties-common -y
    - apt-get install ansible -y
    - apt-get install jq -y
  script:
    - mkdir -p /root/.ssh
    - echo "$PRIVKEY_PLAIN" | tr -d '\r' > ~/.ssh/id_rsa
    - chmod -R 700 ~/.ssh
    - VERSION=$(mvn help:evaluate -Dexpression=project.version -q -DforceStdout)
    - "FALLBACK_DROPLET_ID=$(curl -sX GET https://api.digitalocean.com/v2/droplets?tag_name=FALLBACK -H \"Authorization: Bearer $TF_VAR_DO_TOKEN\" | jq -c '.droplets[0]'.id)"
    - "FALLBACK_DROPLET_IP=$(curl -sX GET https://api.digitalocean.com/v2/droplets?tag_name=FALLBACK -H \"Authorization: Bearer $TF_VAR_DO_TOKEN\" | jq -c '.droplets[0].networks.v4[0]'.ip_address)"
    - "PROD_DROPLET_ID=$(curl -sX GET https://api.digitalocean.com/v2/droplets?tag_name=PROD -H \"Authorization: Bearer $TF_VAR_DO_TOKEN\" | jq -c '.droplets[0]'.id)"
    - "PROD_DROPLET_IP=$(curl -sX GET https://api.digitalocean.com/v2/droplets?tag_name=PROD -H \"Authorization: Bearer $TF_VAR_DO_TOKEN\" | jq -c '.droplets[0].networks.v4[0]'.ip_address)"
    - "FLOATING_IP=$(curl -sX GET https://api.digitalocean.com/v2/floating_ips -H \"Authorization: Bearer $TF_VAR_DO_TOKEN\" | jq -c '.floating_ips[0]'.ip)"
    - FALLBACK_DROPLET_IP="${FALLBACK_DROPLET_IP%\"}" # cut off leading "
    - FALLBACK_DROPLET_IP="${FALLBACK_DROPLET_IP#\"}" # cut off trailing "
    - PROD_DROPLET_IP="${PROD_DROPLET_IP%\"}" # cut off leading "
    - PROD_DROPLET_IP="${PROD_DROPLET_IP#\"}" # cut off trailing "
    - FLOATING_IP="${FLOATING_IP%\"}" # cut off leading "
    - FLOATING_IP="${FLOATING_IP#\"}" # cut off trailing "
    - echo $FALLBACK_DROPLET_IP > /etc/ansible/hosts
    - sed -i -- 's/#host_key_checking/host_key_checking/g' /etc/ansible/ansible.cfg
    - ansible-playbook .infrastructure/digitalocean/conf/updateWebgui-playbook.yml -e "registry_url=$TF_VAR_DOCKER_REGISTRY_URL username=$TF_VAR_DOCKER_REGISTRY_USERNAME repository=$DOCKER_REGISTRY_REPO_NAME version=$VERSION"
    - "curl -X DELETE -H \"Content-Type: application/json\" -H \"Authorization: Bearer $TF_VAR_DO_TOKEN\" -d '{\"resources\":[{\"resource_id\":\"'$PROD_DROPLET_ID'\",\"resource_type\":\"droplet\"}]}' \"https://api.digitalocean.com/v2/tags/PROD/resources\""
    - "curl -X DELETE -H \"Content-Type: application/json\" -H \"Authorization: Bearer $TF_VAR_DO_TOKEN\" -d '{\"resources\":[{\"resource_id\":\"'$FALLBACK_DROPLET_ID'\",\"resource_type\":\"droplet\"}]}' \"https://api.digitalocean.com/v2/tags/FALLBACK/resources\""
    - "curl -X POST -H \"Content-Type: application/json\" -H \"Authorization: Bearer $TF_VAR_DO_TOKEN\" -d '{\"resources\":[{\"resource_id\":\"'$PROD_DROPLET_ID'\",\"resource_type\":\"droplet\"}]}' \"https://api.digitalocean.com/v2/tags/FALLBACK/resources\""
    - "curl -X POST -H \"Content-Type: application/json\" -H \"Authorization: Bearer $TF_VAR_DO_TOKEN\" -d '{\"resources\":[{\"resource_id\":\"'$FALLBACK_DROPLET_ID'\",\"resource_type\":\"droplet\"}]}' \"https://api.digitalocean.com/v2/tags/PROD/resources\""
    - "curl -X POST -H \"Content-Type: application/json\" -H \"Authorization: Bearer $TF_VAR_DO_TOKEN\" -d '{\"type\":\"assign\",\"droplet_id\":\"'$FALLBACK_DROPLET_ID'\"}' \"https://api.digitalocean.com/v2/floating_ips/$FLOATING_IP/actions\""
  only:
    - master
Our aims for that stage are:
- Pull the most current image from the docker registry on the current FALLBACK-droplet
- remove the currently running container (with the outdated version) on our FALLBACK-droplet
- Yes, through our very first pipeline run there will be no container running
- start a new container with the updated version on the FALLBACK-droplet
- retag the current FALLBACK-droplet (from FALLBACK to PROD)
- retag the current PROD-droplet (from PROD to FALLBACK)
- update the floating IP to point to the new PROD-droplet
So first we are reading our droplet’s IDs and IPs (via the DigitalOcean-API and jq). Then we are using ansible to call a playbook which copies a script to the droplet that we want to update – which pulls the image, removes the current container and starts a new one.
After that we are updating (switching) the tags on our droplets again with the help of the DigitalOcean-API (because our FALLBACK-droplet becomes the PROD-droplet during the update and then the previous PROD-droplet becomes the FALLBACK-droplet which will be updated when the next pipeline is running).
At the end we update the target behind our floating IP again by using the DigitalOcean-API.
The playbook looks like the following:
- name: Transfer and execute a script.
  hosts: all
  remote_user: root
  vars:
    ansible_python_interpreter: /usr/bin/python3
    registry_url: "{{ registry_url }}"
    username: "{{ username }}"
    repository: "{{ repository }}"
    version: "{{ version }}"
  tasks:
      - name: Copy and Execute the script
        script: updateWebgui.sh {{ registry_url }} {{ username }} {{ repository }} {{ version }}
and the mini script (updateWebgui.sh) looks like:
#!/bin/bash
docker pull $1/$2/$3/webgui:$4
docker rm -f webgui || true
docker run -d -p 8080:8080 --name=webgui $1/$2/$3/webgui:$4
and both are located in the .infrastructure/digitalocean folder (subfolder conf):
First pipeline run
So – we are done – time to let the magic begin. On our initial push the deploy-infrastructure stage will create our infrastructure (which takes some time). Usually the initial pipeline run takes about 10 minutes.

(The three pipeline runs you see in the screenshot were all „first“ / initial runs as I always destroyed the infrastructure after each run)
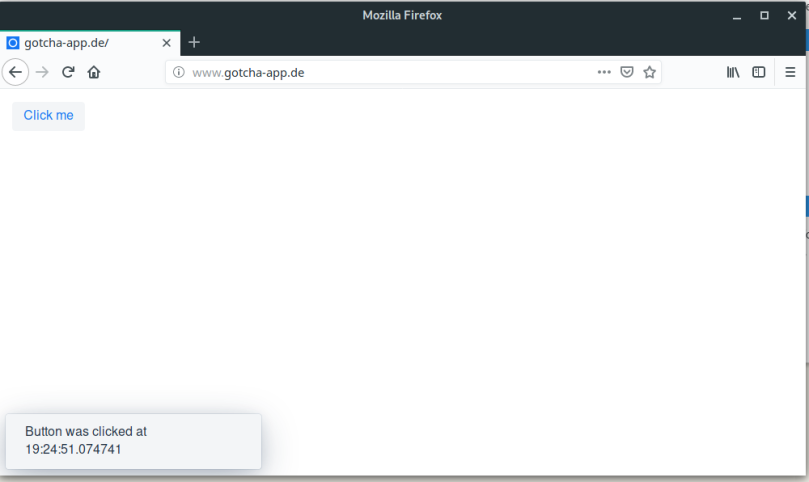
When the pipeline has finished we have a complete setup and are able to open a browser, enter http://www.gotcha-app.de and enjoy the first version of our web application.
Additionally let us ssh into our PROD-droplet and ensure that the right container is running:

Also we can see that during the pipeline run an image of our web application was pushed to the gitlab container registry:

I won’t paste screenshots of all the created resources here again, as I did that already in a previous chapter when we executed the terraform commands by hand. But here is just one screenshot of our droplets in the state right after the infrastructure creation (droplet01 = PROD, droplet02 = FALLBACK, floating IP tied to droplet01) and then right after the update stage (droplet01 switched to FALLBACK, droplet 02 switched to PROD and the floating IP now tied to droplet02).


second pipeline run
Now that everything is up and running, let us modify our web application. We will enhance the text displayed when the button is clicked (MainView.java) and update the version in our pom.xml to 1.1-SNAPSHOT (for the complete files please refer to the example repository containing the complete code).
MainView.java
public MainView(@Autowired MessageBean bean) {
    Button button = new Button("Click me",
            e -> Notification.show(bean.getMessage()
                    + " YAY THIS IS V1.1-SNAPSHOT!!!"));
    add(button);
}
pom.xml
<version>1.1-SNAPSHOT</version>
Cool, let us push that and wait for our pipeline to do its work.
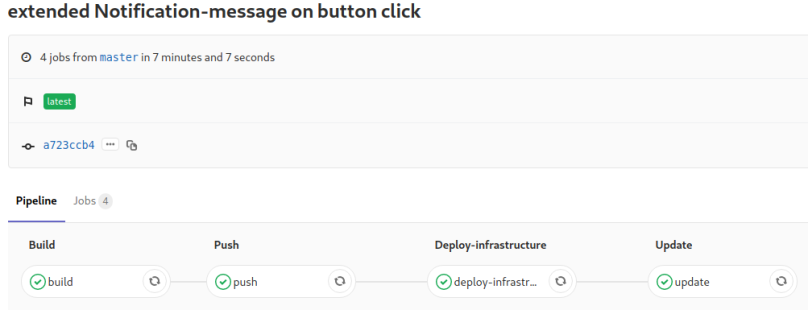
As you can see this time the pipeline only needed ~7 minutes. We saved time because the whole infrastructure was already existing and there was no need for terraform to do anything.
As you can see the droplet tags were switched again. This time we updated droplet01 and marked that one as PROD:

And after the pipeline run we are ready to retry our web application:
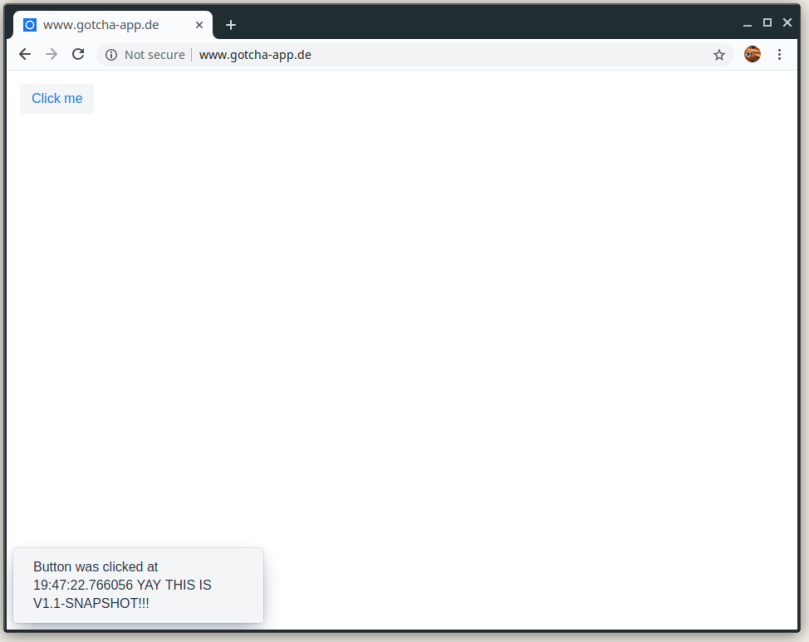
Let us have a look at the PROD-droplet again to check that the correct container is running:

If we had a big bug in our new version we could now just tie the floating IP to the FALLBACK-Droplet and all requests would be forwarded to the pre-update version of our web application.
If you want to try it out yourself and you don’t have a DigitalOcean account yet feel free to use my referral link which gives you 100$ credit to play around a bit 🙂
The full code is available on https://gitlab.com/mebbinghaus/codinghaus_20190302_dofloatingip
If you have any questions or feedback feel free to leave a comment or contact me via the form or email. Thank you for reading.
