Fully automated zero downtime deployments with Floating IPs on DigitalOcean Droplets

In this tutorial I will show you how I have implemented a zero downtime deployment (blue-green like) of a small web application which is running on a DigitalOcean Droplet. The cool thing is, that this deployment is fully automated. After pushing a code change to the web application code a CI/CD-Pipeline will be executed which does the following tasks:

  1. build a new version of the web application
  2. put that web application into a docker image
  3. push the docker image to an external docker registry
  4. create the infrastructure which consists of :
    1. two droplets (on one we will have the updated version of our web application and on the other we will have the pre-update version as a fallback)
    2. one droplet which serves as the load balancer
    3. a floating IP-Address which will be used in the load balancer’s configuration to route user requests to the active droplet
    4. a domain (and a dns record) to tie the domain to the load balancer
  5. pull the latest version of the docker image of our web application from the docker registry
  6. start a container with the newest image
  7. wait until the application is up and running
  8. link the floating IP address to the droplet with the updated version of our web application container which thereby becomes our new production droplet

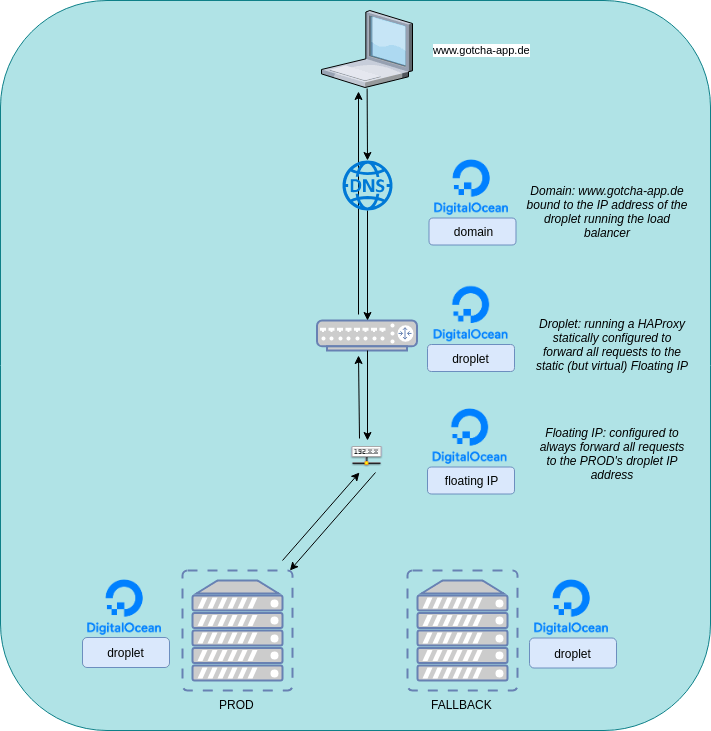
If we put the infrastructure into a diagram it will look like this:

floatingip (1)

You can find the complete source code here.

Tech-Stack

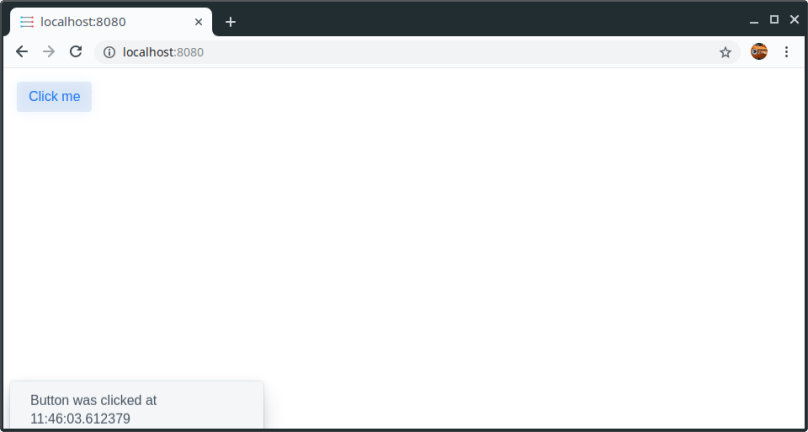
  • Web application: a small „Hello World“-Vaadin-Application (with Spring Boot) which shows the current time when clicking a button.
  • Repository/Docker Registry/CI/CD/Pipeline: gitlab.com
  • Infrastructure/Cloud provider: DigitalOcean
  • Infrastructure as code: Terraform (with an S3 bucket hosted in a DigitalOcean Space as the backend so that terraform knows which resources were already created during previous pipeline run. In fact: The infrastructure will be build a single time on the first pipeline run and from the second pipeline run there is no need to recreate everything – the only exception is when we modify the specs of our resources. Not only is there no need: We don’t WANT everything to be recreated because we don’t want any downtime).
  • Configuration management: ansible (we will use a small ansible playbook to copy a script to our worker droplets and execute it on those. This script will do nothing more than pulling the newest docker image and stop the currently running container and replace it with a container of the pulled image)

Create the web application

So, let us start with the web application. We will take a starter pack from https://vaadin.com/start/latest/project-base-spring which is a Spring Boot application (maven project) consisting of only a single button that displays the time when clicked.

starter

Put the web application into a container (image)

As a next step we will put that web application into a container. Therefore let’s create a Dockerfile (at the top level of the vaadin project) which builds an image that takes the generated jar-File and executes it – it’s pretty straight forward:

FROM openjdk:11-jdk-oracle
RUN useradd --no-log-init -r codinghaus
USER codinghaus
WORKDIR /home/codinghaus
ADD target/my-starter-project.jar .
EXPOSE 8080
CMD java -jar /home/codinghaus/my-starter-project.jar

Before building the image we have to to a maven clean build so that the jar-file is generated (my-starter-project.jar). After a clean build we can generate the image. Navigate to the project and execute:

docker build . -t codinghaus/webgui:1

This will create an image called codinghaus/webgui with the tag 1 (for version 1).

webgui1

Before we start to build our pipeline and automate everything, let us test if the container works:

docker run -d -p 8080:8080 codinghaus/webgui:1

running

After executing that command the container should run in the background and when calling http://localhost:8080/ the web application should be running.

Okay cool, we have a containerized web application now. Time to get it into the cloud.

Create the infrastructure (as code)

So, we want the app to be deployed into the cloud so that it is accessible for other users. The cloud provider of our choice is DigitalOcean. The resources that we want to have:

  • 1 Domain (www.gotcha-app.de)
  • 2 Droplets running our app (one droplet will serve as our production system where the latest version of our app is running. The other droplet will contain the previous version of our app – if an update of our app fails horrible we will be able to easily switch back to the previous version)
  • 1 Droplet which serves as a load balancer
  • 1 Floating IP which will be used in our load balancer configuration

The point of that setup is: We will have a domain http://www.gotcha-app.de. When a user enters http://www.gotcha-app.de the request will be redirected to the load balancer. The load balancer will take the request and forward it to the floating IP.  A DigitalOcean Floating IP is static and we are able to bind one droplet (its ip) to that static IP. This is great because we can configure our load balancer to forward all requests to that static IP, but on the other hand we are able to dynamically switch the target behind that IP so later we can decide if requests to that IP will be forwarded to our droplet with the most current version of our web app running or to the droplet with the previous version.

Think about it: Later when we have a pipeline, which is executed when we updated the code of our web application, we will deploy the newest version of our web app to one of our droplets. During this time all user requests will be forwarded to the droplet running the pre-update version. The users won’t recognize that we are deploying an update to the second  droplet. When the update is finished on the second droplet, we can then tell the Floating IP: „Hey, update finished. Stop forwarding user requests to the droplet running the old version and instead forward them to the droplet running the newest version“. As we are only changing the target behind the static Floating IP we don’t have to touch our load balancer’s configuration and so we don’t have to restart the load balancer. The users won’t recognize that their requests are now forwarded to another droplet.

But now it’s time for the infrastructure code. We use terraform to describe our infrastructure as code. There is a great DigitalOcean-Provider for terraform so we can describe everything we want to be created on DigitalOcean as code.

I will keep explanations on that code very short. There are enough sources on the internet if you are interested in learning terraform. Just a few words on how terraform works in general: What you will need (if you try this example yourself) is an account on DigitalOcean where you can create a token. With that token terraform will be able to create resources like droplets, domains, etc. on your account. It therefore will call API-endpoints from DigitalOcean. You will also need to put a ssh key to your DO-Account so that terraform will be able to connect to the created droplets.

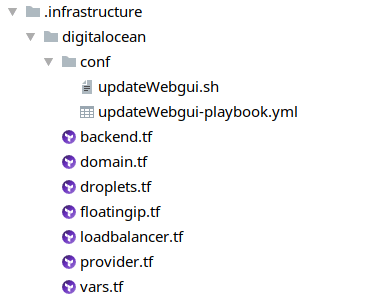
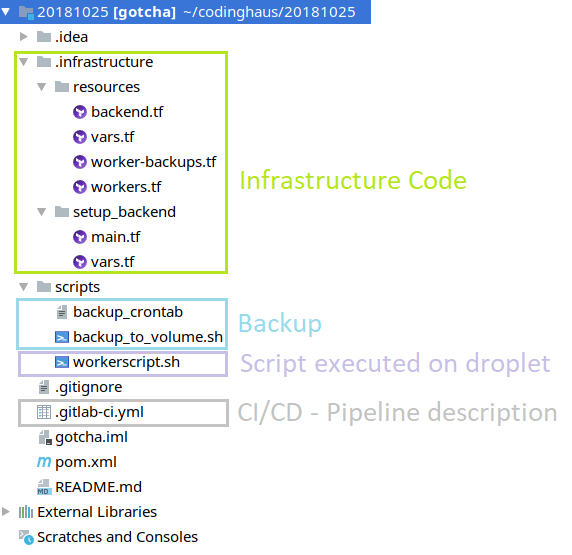
First, let us create an .infrastructure-folder to our project which will contain the complete code describing our wanted infrastructure (in terraform-syntax):

projectstructure

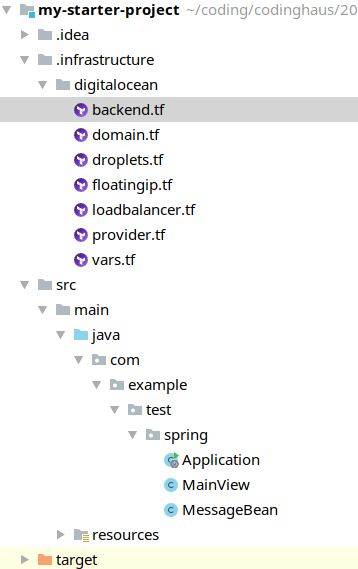
The digitalocean-folder contains everything that should be created on DigitalOcean.

  • domain.tf: contains the domain to create
  • droplets.tf: contains both worker droplets to create
  • floatingip.tf: contains the floating IP to create
  • loadbalancer: contains the droplet to create which will server as a load balancer
  • provider: contains our DigitalOcean-Account-Credentials (our token)
  • vars: defines all variables we need
  • backend: here we define the space where we want terraform to save the current state of our infrastructure

This is really important as a backend serves as a location where terraform puts the current state of the infrastructure that it already created. We want those informations to be saved remotely (and not on our repository) and during each run of our pipeline we want terraform to check the current state so that our infrastructure won’t be created again and again with each pipeline run. Just think of what our idempotent CI/CD-Pipeline should do: Create the infrastructure if not already there, but if already there: only do the updates.

Info: During the creation of that blog post the digitalocean provider for terraform doesn’t support creating spaces programatically with terraform (but it will be possible with probably the next release – see https://github.com/terraform-providers/terraform-provider-digitalocean/pull/77). So – sadly – we have to create that space from the DigitalOcean-GUI but then at least we can use the manually created space in our terraform code and use it as a backend.

Let us have a look at the single files:

vars.tf

This file contains variables which in general contain credential stuff like keys/tokens/passwords that we don’t want to have hardcoded in our code (and in our repository). It also contains some configuration stuff like the number of worker droplets we want to be created, the size of each droplet, the location where to create the droplets, …. . Later when creating our pipeline you will see, that we will fill those variables using environment variables.

variable "DO_TOKEN" {}
variable "DO_SPACES_ACCESS_ID" {}
variable "DO_SPACES_SECRET_KEY" {}

variable "DO_PUBKEY_PLAIN" {}
variable "DO_KEYFINGERPRINT" {}
variable "DO_REGION" {}
variable "DO_SIZE" {}
variable "DO_WORKERCOUNT" {}

variable "DOCKER_REGISTRY_URL" {}
variable "DOCKER_REGISTRY_USERNAME" {}
variable "DOCKER_REGISTRY_PASSWORD" {}

variable "TAGS" {
  type = "list"
  default = ["PROD", "FALLBACK"]
}

provider.tf

In this file we tell terraform which provider to choose, so it knows what API-Endpoints to use to create/modify resources on DigitalOcean and what credentials to use to find and login to our account.

provider "digitalocean" {
  token = "${var.DO_TOKEN}"
}

droplets.tf

This is the first „real“ resource file. Here we describe the two droplets on which we will have our application running later. What we already do here: After creating the resource we connect to it (via ssh) and install docker there so we don’t have to do that later. The only purpose of those droplets is to run our container and therefore a docker installation is required – and why not already do this during the creating process? In the end we already login to our docker registry (we will cover that later during this blog post).

The last block („lifecycle“) is pretty important because we tell terraform here that it should not recognize if a droplet’s tag has changed. If we would not do this: Think of a second pipeline run. We don’t want terraform to do anything here, we just want to create a new image and update the running container. Without that block terraform would recognize (on the second pipeline run, during the deploy-infrastructure stage) that our two worker droplets have changed (their tags) and terraform would reset the tags again. But we want to handle the droplet’s tags without terraform – during our update stage.

resource "digitalocean_droplet" "droplets" {
  image = "ubuntu-16-04-x64"
  name = "${format("droplet%02d", count.index + 1)}"
  count = "${var.DO_WORKERCOUNT}"
  region = "${var.DO_REGION}"
  size = "${var.DO_SIZE}"
  tags = ["${element(var.TAGS, count.index)}"]
  private_networking = true
  ssh_keys = [
    "${var.DO_KEYFINGERPRINT}"
  ]
  connection {
    user = "root"
    type = "ssh"
    private_key = "${file("~/.ssh/id_rsa")}"
    timeout = "2m"
  }

  provisioner "remote-exec" {
    inline = [
      "sleep 10",
      "apt-get update",
      "apt-get install apt-transport-https ca-certificates curl software-properties-common -y",
      "curl -fsSL https://download.docker.com/linux/ubuntu/gpg | sudo apt-key add -",
      "add-apt-repository \"deb [arch=amd64] https://download.docker.com/linux/ubuntu $(lsb_release -cs) stable\"",
      "apt-get update",
      "apt-get install docker-ce -y",
      "usermod -aG docker `whoami`",
      "docker login ${var.DOCKER_REGISTRY_URL} --username ${var.DOCKER_REGISTRY_USERNAME} --password ${var.DOCKER_REGISTRY_PASSWORD}"
    ]
  }

  lifecycle {
    ignore_changes = ["tags"]
  }
}

floatingip.tf

The floating IP will be created after the droplets (have a look at the depends_on-attribute). During the creation process (which will probably only be executed once during our very first pipeline run) we will set the first of our two droplets as the target behind the floating IP (if you think about it: The target doesn’t matter during creation as both droplets are empty/plain and have no web application container running).

Pay attention to the lifecycle block again. Without it terraform would (during the second pipeline run) reattach droplet01 to the floating ip. We don’t want terraform to do anything after creating the infrastructure because we will handle that ourselves during the update stage).

resource "digitalocean_floating_ip" "floatingip" {
  droplet_id = "${element(digitalocean_droplet.droplets.*.id, 0)}"
  region     = "${element(digitalocean_droplet.droplets.*.region, 0)}"
  depends_on = ["digitalocean_droplet.droplets"]

  lifecycle {
    ignore_changes = ["droplet_id"]
  }
}

loadbalancer.tf

The load balancer droplet will be created after the floating IP. This is because we want to use the IP address of the floating IP in our load balancer config, so it must be already existent when creating/configuring the load balancer. As you can see we will use a HAProxy here and modify the haproxy.cfg to route all incoming requests to the IP of the floating IP and do a restart of the HAProxy after that.

resource "digitalocean_droplet" "loadbalancer" {
  image = "ubuntu-16-04-x64"
  name = "loadbalancer"
  region = "${var.DO_REGION}"
  size = "${var.DO_SIZE}"
  private_networking = true
  ssh_keys = [
    "${var.DO_KEYFINGERPRINT}"
  ]
  depends_on = ["digitalocean_floating_ip.floatingip"]

  connection {
    user = "root"
    type = "ssh"
    private_key = "${file("~/.ssh/id_rsa")}"
    timeout = "2m"
  }

  provisioner "remote-exec" {
    inline = [
      "apt-get update",
      "apt-get install jq -y",
      "apt-get update",
      "apt-get install haproxy -y",
      "printf \"\toption forwardfor\" >> /etc/haproxy/haproxy.cfg",
      "printf \"\n\nfrontend http\n\tbind ${self.ipv4_address}:80\n\tdefault_backend web-backend\n\" >> /etc/haproxy/haproxy.cfg",
      "printf \"\nbackend web-backend\n\tserver floatingIP ${digitalocean_floating_ip.floatingip.ip_address}:8080 check\" >> /etc/haproxy/haproxy.cfg",
      "/etc/init.d/haproxy restart"
    ]
  }
}

domain.tf

When the load balancer creation has finished, we are able to create (let terraform create) a domain on DigitalOcean. We will tie requests to that domain to the IP of the created load balancer droplet.

resource "digitalocean_domain" "domain-www" {
  name       = "www.gotcha-app.de"
  ip_address = "${digitalocean_droplet.loadbalancer.ipv4_address}"
  depends_on = ["digitalocean_droplet.loadbalancer"]
}

backend.tf

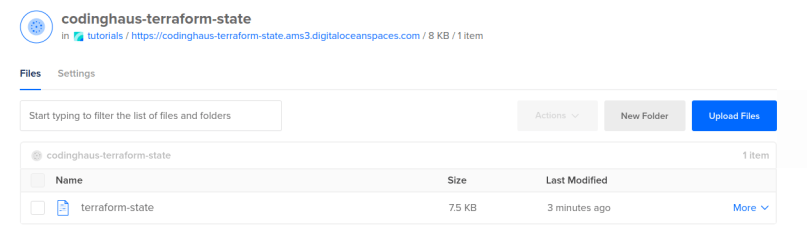
This last file is pretty important. It describes our terraform backend. A terraform backend is a remote location, where terraform saves the state of the created infrastructure. Without a backend terraform would recreate all described resources on each pipeline run because it doesn’t know that it already was created. But of course we want terraform to be idempotent and only create the resources if they don’t exist already. By default terraform saves those information locally in the same folder where it is executed (.infrastructure/digitalocean) but we don’t want it in our code and we don’t want it in our repository. Instead we will use a DigitalOcean Space (which is the same as  AWS S3) for that (I read through https://medium.com/@jmarhee/digitalocean-spaces-as-a-terraform-backend-b761ae426086 to understand how to do that and can absolutely recommend that blog post)

terraform {
  backend "s3" {
    endpoint = "ams3.digitaloceanspaces.com"
    region = "us-west-1"
    key = "terraform-state"
    skip_requesting_account_id = true
    skip_credentials_validation = true
    skip_get_ec2_platforms = true
    skip_metadata_api_check = true
  }
}

Thanks to that code we can then use the following command, which ensures that terraform will always load the current state of our infrastructure before executing any command:

terraform init \
-backend-config="access_key=$TF_VAR_DO_SPACES_ACCESS_ID" \
-backend-config="secret_key=$TF_VAR_DO_SPACES_SECRET_KEY" \
-backend-config="bucket=$TF_VAR_DO_SPACES_BUCKET_NAME"

(taken from the mentioned blog post from @jmarhee, thanks!)

Nice, our infrastructure code seems complete. After creating a space manually on DigitalOcean, we can (for testing purposes) try out if everything works by first initiating the terraform backend:

backendinit

and then let terraform do its work. First we will run a „terraform plan“, to get an overview of what terraform is about to create:

terraform plan -var="DO_TOKEN=<value here>" -var="DO_SPACES_ACCESS_ID=<value here>" -var="DO_SPACES_SECRET_KEY=<value here>" -var="DO_PUBKEY_PLAIN=<value here>" -var="DO_KEYFINGERPRINT=<value here>" -var="DO_REGION=fra1" -var="DO_SIZE=s-1vcpu-1gb" -var="DO_WORKERCOUNT=2"

Seems good, so now let us terraform to do the magic:

terraform apply -var="DO_TOKEN=<value here>" -var="DO_SPACES_ACCESS_ID=<value here>" -var="DO_SPACES_SECRET_KEY=<value here>" -var="DO_PUBKEY_PLAIN=<value here>" -var="DO_KEYFINGERPRINT=<value here>" -var="DO_REGION=fra1" -var="DO_SIZE=s-1vcpu-1gb" -var="DO_WORKERCOUNT=2"


This will take some minutes. The result will then look like:

terraformfinished

And if you have a look into the DigitalOcean-GUI you can see that all three droplets, the floating IP and the domain have been created.

droplets

floatingips

domains

If you have a further look into the bucket in your space, you will see that terraform has automatically uploaded a file there, which contains all informations on the current state of the created infrastructure. This ensures that if you now run a second terraform apply nothing will happen as all resources are already created (if you want to clear your infrastructure / remove all resources you can do a terraform destroy).

space

So let us just try a second terraform apply and ensure that nothing happens:

terraformapply22

Perfect! Now that the automated infrastructure creation works, it is the right time to put the project into a repository and create a pipeline!

Create the CI/CD-Pipeline

We will host our project in a gitlab repository. Why gitlab? It offers everything we want.

  • We will need a docker registry where our web applications image versions are pushed to / pulled from and gitlab has an integrated docker registry that we can use for that (no need to host an own registry on an additional server).
  • We need a system, where our pipeline is executed (the pipeline will consist of different steps like „build the application“, „push the new image to the registry“, „build the infrastructure“, …). Gitlab offers non-cost shared runners which we can use for that. If we create a pipeline file in our repository the pipeline will automatically be triggered and executed on those shared runners (read on).
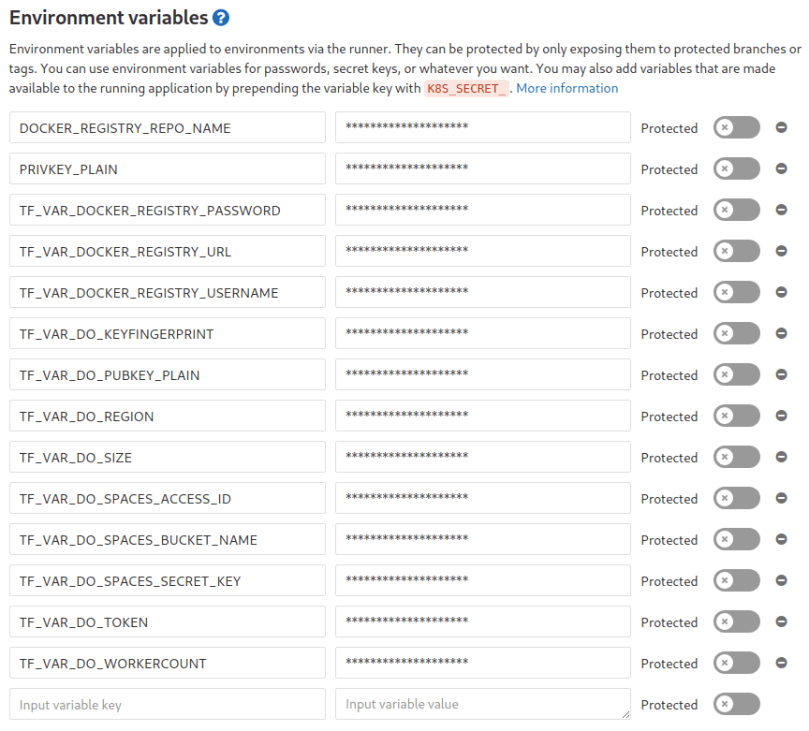
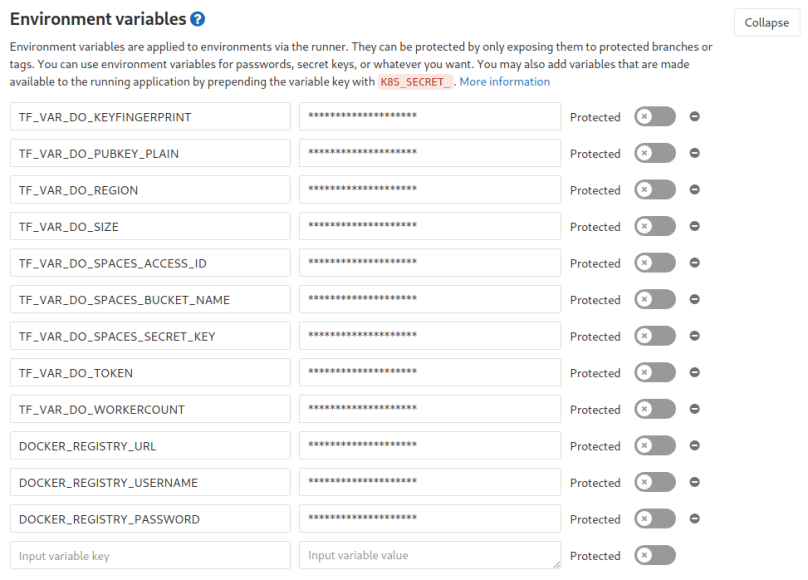
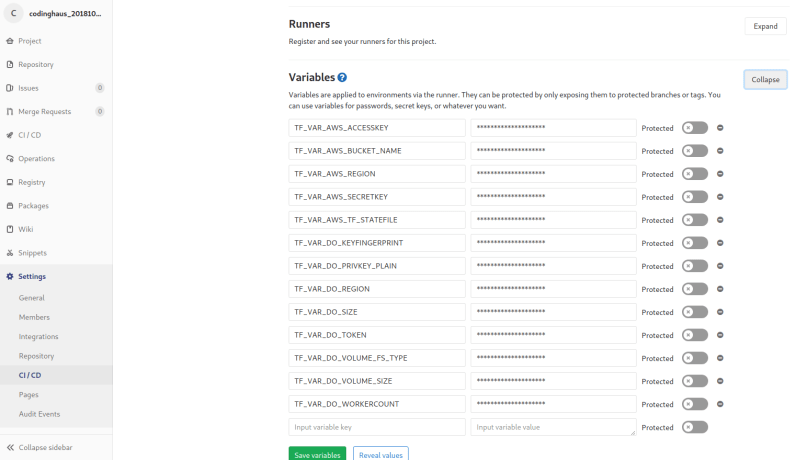
  • I mentioned earlier that we will keep all the stuff we don’t want hardcoded in our repository (credentials, configuration, …) in environment variables: In Gitlab you are able to create environment variables (key/value pairs) that are available during the pipeline run on the shared runners automatically – great!!

I will skip the creation of a repository here and presuppose that you have done that already / will do that on your own.

Now that we have a repository on gitlab, let us first create the environment variables which are needed for terraform. As you could see above when executing the terraform commands we appended lots of -var=“KEY=VALUE“ so that terraform has values for all variables defined in vars.tf. An alternative to that appending approach is to have environment variables which have the same names as the defined variables in vars.tf but with a prepended TF_VAR_. So what we have to do is create those environment variables in gitlab (Settings –> CI/CD –> Environment Variables). It should look like this in the end:

envvars2

Awesome, now that everything is prepared let us finally define the pipeline. This is done by putting a file called „.gitlab-ci.yml“ at the root of our repository. In this file we define what the pipeline should do and when. We will define four stages:

  1. build – where the web application is built and packed
  2. push – where the web application is put into a docker image and pushed into our docker registry
  3. deploy-infrastructure – where all our DigitalOcean-resources are created by terraform if needed (what we did manually / by typing the terraform commands manually in the previous chapter)
  4. update – where we take one of the worker droplets, pull the newest image of our web application image, start a container from that newest image and then modify the Floating IP to point to that updated droplet (running the container with the updated image).

Let us have a look at each single stage and what exactly is done there. You will find the full file in the repository here.

build-stage

build:
  stage: build
  script:
    - mvn clean install
  artifacts:
    paths:
      - target/my-starter-project.jar
  only:
    - master

As we have a maven project in our repository we will use the maven base image for our pipeline (see full file in the example repository) so we can simply run a

mvn clean install

here as the only command in that stage. The „artifacts“ block ensures that the built jar file will be stored for the whole pipeline run so that other stages have access to that file (as we need it to build the docker image etc..). The „only“ block is pretty self explaining. It says that this stage should only be executed when something is pushed to the master branch of the repository.

push-stage

push:
  stage: push
  image: docker:latest
  before_script:
    - docker login $TF_VAR_DOCKER_REGISTRY_URL --username $TF_VAR_DOCKER_REGISTRY_USERNAME --password $TF_VAR_DOCKER_REGISTRY_PASSWORD
  script:
    - until VERSION=`docker run -v $(pwd):/app -w /app maven:3.6.0-jdk-11 mvn org.apache.maven.plugins:maven-help-plugin:3.1.1:evaluate -Dexpression=project.version -q -DforceStdout`; do echo "mvn command timed out...trying again..."; sleep 2; done
    - docker build --tag=$TF_VAR_DOCKER_REGISTRY_URL/$TF_VAR_DOCKER_REGISTRY_USERNAME/$DOCKER_REGISTRY_REPO_NAME/webgui:$VERSION .
    - docker push $TF_VAR_DOCKER_REGISTRY_URL/$TF_VAR_DOCKER_REGISTRY_USERNAME/$DOCKER_REGISTRY_REPO_NAME/webgui:$VERSION
  only:
    - master

The first thing we do here is to use the docker image for that stage instead of the maven image as we will mainly run docker commands here to build our image and push it to our gitlab docker registry. As you can see the first step (in the „before_script“ block) is to log into the docker registry. If you use the gitlab docker registry the URL is registry.gitlab.com and you can log into it with your normal gitlab account credentials. As we don’t wont these hardcoded in our repository we will instead use environment variables here again which we have to add in the CI/CD-Settings in our gitlab project as we did it with the other credential information for our infrastructure code (see above chapters).

envvariables2

Afterwards the first command in the „script“ block is for extracting the version number from our pom.xml to create a docker image tagged with the same version so there is always an image matching the version from our pom.xml (which is 1.0-SNAPSHOT for our current version).  I put that command into a loop because it occasionally  fails (I think because it lasts very long and so it sometimes runs into a timeout – which is bad as our pipeline fails if any command in the pipeline fails). Then we build the image, tag it and push it to the docker registry. No magic here.

deploy-infrastructure-stage

Time to put the terraform commands into our pipeline:

deploy-infrastructure:
  stage: deploy-infrastructure
  image:
    name: hashicorp/terraform:light
    entrypoint:
      - '/usr/bin/env'
      - 'PATH=/usr/local/sbin:/usr/local/bin:/usr/sbin:/usr/bin:/sbin:/bin'
  before_script:
    - mkdir -p ~/.ssh
    - echo "$PRIVKEY_PLAIN" | tr -d '\r' > ~/.ssh/id_rsa
  script:
    - cd .infrastructure/digitalocean
    - terraform init -backend-config="access_key=$TF_VAR_DO_SPACES_ACCESS_ID" -backend-config="secret_key=$TF_VAR_DO_SPACES_SECRET_KEY" -backend-config="bucket=$TF_VAR_DO_SPACES_BUCKET_NAME"
    - terraform plan
    - until terraform apply -auto-approve; do echo "Error while using DO-API..trying again..."; sleep 2; done
  only:
  - master

based on the hashicorp/terraform:light-image we will step into our digitalocean folder including our infrastructure code, init our terraform backend so terraform knows about the current state of our infrastructure (if there were previous pipeline runs) and then plan and apply the code. I put the „terraform apply“ command into a loop as sometimes there occur errors when talking to the DigitalOcean-API. Without the loop the whole pipeline would fail in that case but thanks to the loop it will be retried. Of course this can result in an endless loop if there are „real“ errors and not only „temporary“ ones but most of the times my pipeline runs fail are related to temporary api errors so in most cases that loop is more helpful than harming.

the before_script-block copies our private ssh key onto the gitlab runner so that the remote_exec-blocks of our terraform files are able to ssh connect to our created resources/droplets.

update-stage

update:
  stage: update
  before_script:
    - echo "deb http://ppa.launchpad.net/ansible/ansible/ubuntu trusty main" >> /etc/apt/sources.list
    - apt-key adv --keyserver keyserver.ubuntu.com --recv-keys 93C4A3FD7BB9C367
    - apt-get update
    - apt-get install wget software-properties-common -y
    - apt-get install ansible -y
    - apt-get install jq -y
  script:
    - mkdir -p /root/.ssh
    - echo "$PRIVKEY_PLAIN" | tr -d '\r' > ~/.ssh/id_rsa
    - chmod -R 700 ~/.ssh
    - VERSION=$(mvn help:evaluate -Dexpression=project.version -q -DforceStdout)
    - "FALLBACK_DROPLET_ID=$(curl -sX GET https://api.digitalocean.com/v2/droplets?tag_name=FALLBACK -H \"Authorization: Bearer $TF_VAR_DO_TOKEN\" | jq -c '.droplets[0]'.id)"
    - "FALLBACK_DROPLET_IP=$(curl -sX GET https://api.digitalocean.com/v2/droplets?tag_name=FALLBACK -H \"Authorization: Bearer $TF_VAR_DO_TOKEN\" | jq -c '.droplets[0].networks.v4[0]'.ip_address)"
    - "PROD_DROPLET_ID=$(curl -sX GET https://api.digitalocean.com/v2/droplets?tag_name=PROD -H \"Authorization: Bearer $TF_VAR_DO_TOKEN\" | jq -c '.droplets[0]'.id)"
    - "PROD_DROPLET_IP=$(curl -sX GET https://api.digitalocean.com/v2/droplets?tag_name=PROD -H \"Authorization: Bearer $TF_VAR_DO_TOKEN\" | jq -c '.droplets[0].networks.v4[0]'.ip_address)"
    - "FLOATING_IP=$(curl -sX GET https://api.digitalocean.com/v2/floating_ips -H \"Authorization: Bearer $TF_VAR_DO_TOKEN\" | jq -c '.floating_ips[0]'.ip)"
    - FALLBACK_DROPLET_IP="${FALLBACK_DROPLET_IP%\"}" # cut off leading "
    - FALLBACK_DROPLET_IP="${FALLBACK_DROPLET_IP#\"}" # cut off trailing "
    - PROD_DROPLET_IP="${PROD_DROPLET_IP%\"}" # cut off leading "
    - PROD_DROPLET_IP="${PROD_DROPLET_IP#\"}" # cut off trailing "
    - FLOATING_IP="${FLOATING_IP%\"}" # cut off leading "
    - FLOATING_IP="${FLOATING_IP#\"}" # cut off trailing "
    - echo $FALLBACK_DROPLET_IP > /etc/ansible/hosts
    - sed -i -- 's/#host_key_checking/host_key_checking/g' /etc/ansible/ansible.cfg
    - ansible-playbook .infrastructure/digitalocean/conf/updateWebgui-playbook.yml -e "registry_url=$TF_VAR_DOCKER_REGISTRY_URL username=$TF_VAR_DOCKER_REGISTRY_USERNAME repository=$DOCKER_REGISTRY_REPO_NAME version=$VERSION"
    - "curl -X DELETE -H \"Content-Type: application/json\" -H \"Authorization: Bearer $TF_VAR_DO_TOKEN\" -d '{\"resources\":[{\"resource_id\":\"'$PROD_DROPLET_ID'\",\"resource_type\":\"droplet\"}]}' \"https://api.digitalocean.com/v2/tags/PROD/resources\""
    - "curl -X DELETE -H \"Content-Type: application/json\" -H \"Authorization: Bearer $TF_VAR_DO_TOKEN\" -d '{\"resources\":[{\"resource_id\":\"'$FALLBACK_DROPLET_ID'\",\"resource_type\":\"droplet\"}]}' \"https://api.digitalocean.com/v2/tags/FALLBACK/resources\""
    - "curl -X POST -H \"Content-Type: application/json\" -H \"Authorization: Bearer $TF_VAR_DO_TOKEN\" -d '{\"resources\":[{\"resource_id\":\"'$PROD_DROPLET_ID'\",\"resource_type\":\"droplet\"}]}' \"https://api.digitalocean.com/v2/tags/FALLBACK/resources\""
    - "curl -X POST -H \"Content-Type: application/json\" -H \"Authorization: Bearer $TF_VAR_DO_TOKEN\" -d '{\"resources\":[{\"resource_id\":\"'$FALLBACK_DROPLET_ID'\",\"resource_type\":\"droplet\"}]}' \"https://api.digitalocean.com/v2/tags/PROD/resources\""
    - "curl -X POST -H \"Content-Type: application/json\" -H \"Authorization: Bearer $TF_VAR_DO_TOKEN\" -d '{\"type\":\"assign\",\"droplet_id\":\"'$FALLBACK_DROPLET_ID'\"}' \"https://api.digitalocean.com/v2/floating_ips/$FLOATING_IP/actions\""
  only:
    - master

Our aims for that stage are:

  1. Pull the most current image from the docker registry on the current FALLBACK-droplet
  2. remove the currently running container (with the outdated version) on our FALLBACK-droplet
    1. Yes, through our very first pipeline run there will be no container running
  3. start a new container with the updated version on the FALLBACK-droplet
  4. retag the current FALLBACK-droplet (from FALLBACK to PROD)
  5. retag the current PROD-droplet (from PROD to FALLBACK)
  6. update the floating IP to point to the new PROD-droplet

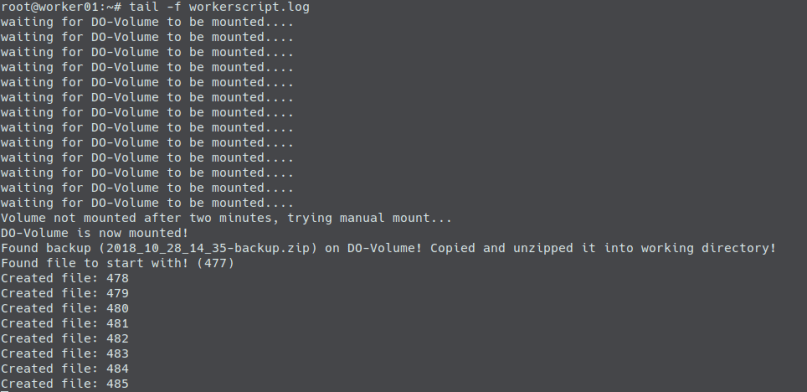
So first we are reading our droplet’s IDs and IPs (via the DigitalOcean-API and jq). Then we are using ansible to call a playbook which copies a script to the droplet that we want to update – which pulls the image, removes the current container and starts a new one.

After that we are updating (switching) the tags on our droplets again with the help of the DigitalOcean-API (because our FALLBACK-droplet becomes the PROD-droplet during the update and then the previous PROD-droplet becomes the FALLBACK-droplet which will be updated when the next pipeline is running).

At the end we update the target behind our floating IP again by using the DigitalOcean-API.

The playbook looks like the following:

- name: Transfer and execute a script.
  hosts: all
  remote_user: root
  vars:
    ansible_python_interpreter: /usr/bin/python3
    registry_url: "{{ registry_url }}"
    username: "{{ username }}"
    repository: "{{ repository }}"
    version: "{{ version }}"
  tasks:
      - name: Copy and Execute the script
        script: updateWebgui.sh {{ registry_url }} {{ username }} {{ repository }} {{ version }}

and the mini script (updateWebgui.sh) looks like:

#!/bin/bash
docker pull $1/$2/$3/webgui:$4
docker rm -f webgui || true
docker run -d -p 8080:8080 --name=webgui $1/$2/$3/webgui:$4

and both are located in the .infrastructure/digitalocean folder (subfolder conf):
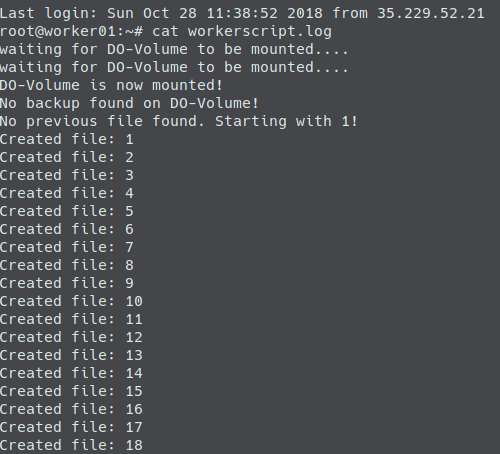
infra

First pipeline run

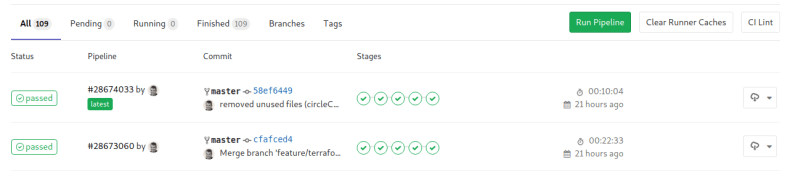
So – we are done – time to let the magic begin. On our initial push the deploy-infrastructure stage will create our infrastructure (which takes some time). Usually the initial pipeline run takes about 10 minutes.

pipelineruns

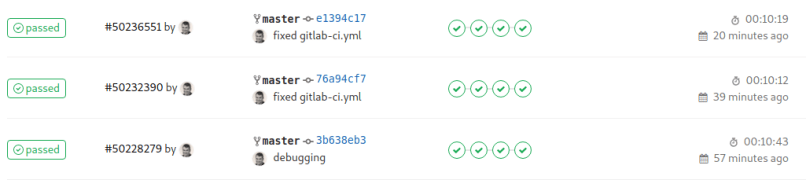
(The three pipeline runs you see in the screenshot were all „first“ / initial runs as I always destroyed the infrastructure after each run)

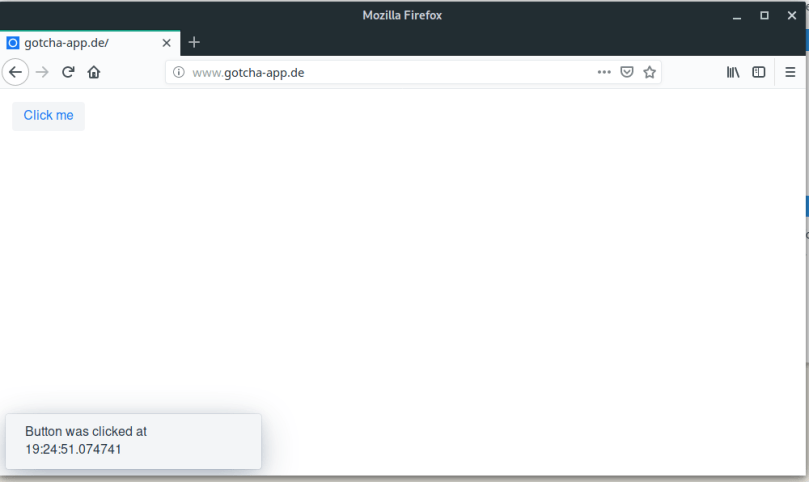
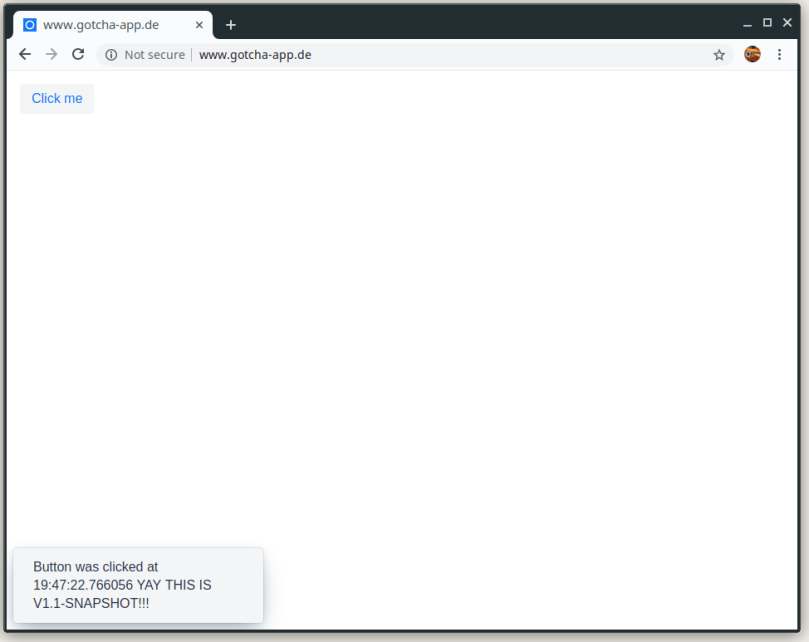
When the pipeline has finished we have a complete setup and are able to open a browser, enter http://www.gotcha-app.de and enjoy the first version of our web application.

version10gui

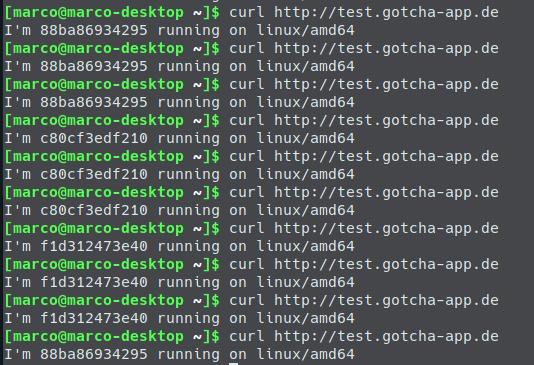
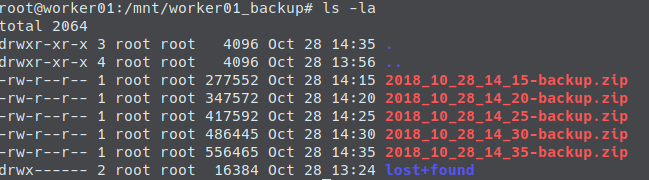
Additionally let us ssh into our PROD-droplet and ensure that the right container is running:

webgui10container

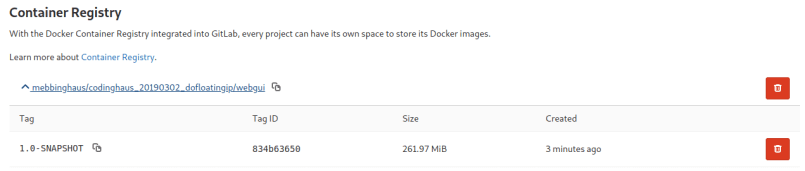
Also we can see that during the pipeline run an image of our web application was pushed to the gitlab container registry:

registry

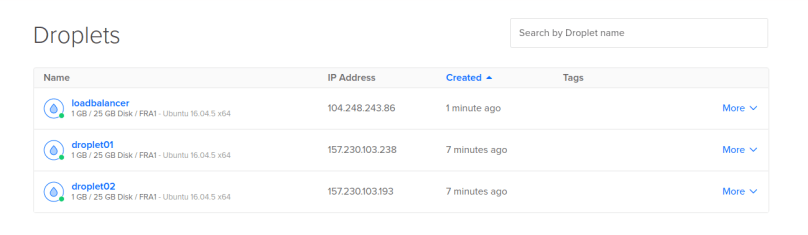
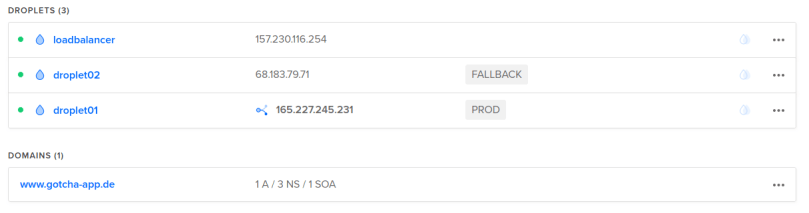
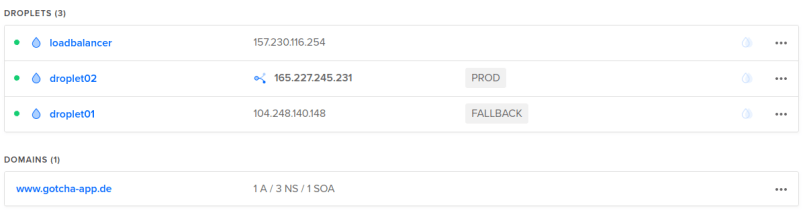
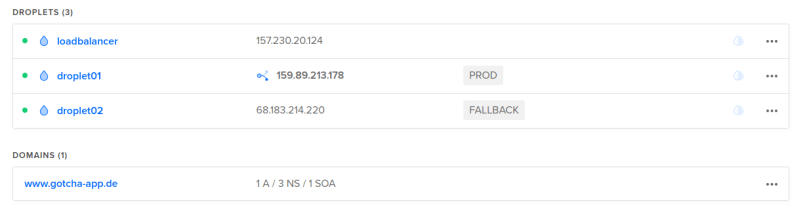
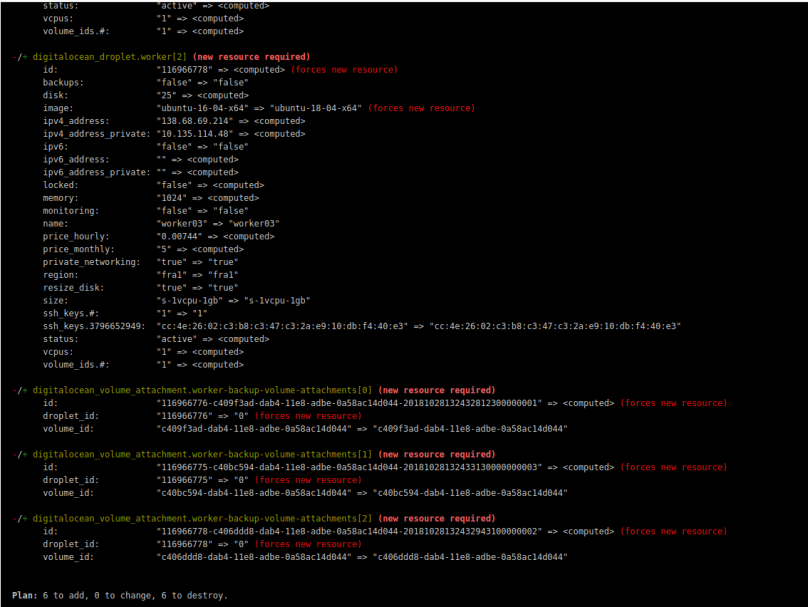
I won’t paste screenshots of all the created resources here again, as I did that already in a previous chapter when we executed the terraform commands by hand. But here is just one screenshot of our droplets in the state right after the infrastructure creation (droplet01 = PROD, droplet02 = FALLBACK, floating IP tied to droplet01) and then right after the update stage (droplet01 switched to FALLBACK, droplet 02 switched to PROD and the floating IP now tied to droplet02).

beforeUpdate

afterupdate

second pipeline run

Now that everything is up and running, let us modify our web application. We will enhance the text displayed when the button is clicked (MainView.java) and update the version in our pom.xml to 1.1-SNAPSHOT (for the complete files please refer to the example repository containing the complete code).

MainView.java

public MainView(@Autowired MessageBean bean) {
    Button button = new Button("Click me",
            e -> Notification.show(bean.getMessage() 
                    + " YAY THIS IS V1.1-SNAPSHOT!!!"));
    add(button);
}

pom.xml

<version>1.1-SNAPSHOT</version>

Cool, let us push that and wait for our pipeline to do its work.

pipeline2

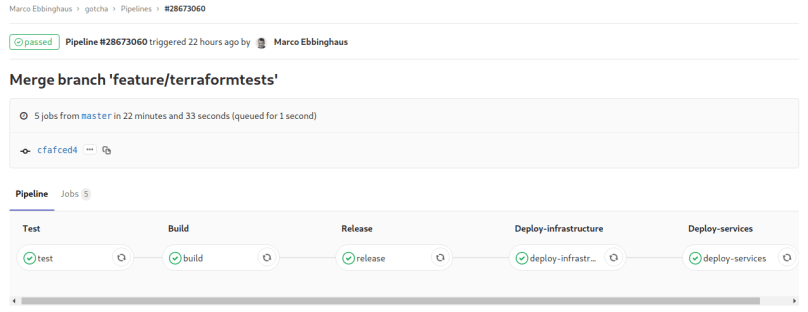
As you can see this time the pipeline only needed ~7 minutes. We saved time because the whole infrastructure was already existing and there was no need for terraform to do anything.

terraformnoneed

As you can see the droplet tags were switched again. This time we updated droplet01 and marked that one as PROD:

prod

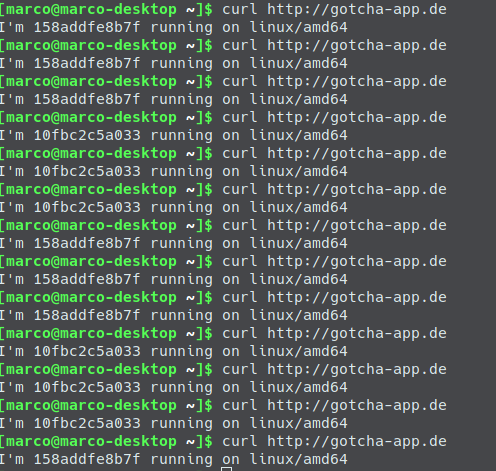
And after the pipeline run we are ready to retry our web application:

version2

Let us have a look at the PROD-droplet again to check that the correct container is running:

11ondroplet

If we had a big bug in our new version we could now just tie the floating IP to the FALLBACK-Droplet and all requests would be forwarded to the pre-update version of our web application.

If you want to try it out yourself and you don’t have a DigitalOcean account yet feel free to use my referral link which gives you 100$ credit to play around a bit 🙂

The full code is available on https://gitlab.com/mebbinghaus/codinghaus_20190302_dofloatingip

If you have any questions or feedback feel free to leave a comment or contact me via the form or email. Thank you for reading.

Use DigitalOcean Volumes to backup your droplet’s data (by example)

In this tutorial we will create an automated pipeline which creates three droplets on DigitalOcean. We will have a script running on each droplet, which will create important files constantly. To backup those file regularly we will extend our infrastructure code to not only create three droplets, but also one DigitalOcean Volume for each droplet. Volumes offer block storage which can simply be mounted to our droplets. Perfect to keep our backups.

When the droplets are destroyed/recreated (when changing the droplet’s infrastructure code) the worker scripts running on our droplets will look for backups in the mounted DigitalOcean Volume so that it can continue from the last backups state.

To let terraform (the tool that will automatically create/manage our infrastructure on AWS and DigitalOcean as we described it in our infrastructure code) always know about the current state of all our infrastructure resources (droplets and volumes) we will use an AWS S3 bucket as a terraform backend to save the terraform.tfstate.

What you need if you want to try out this example for yourself is an account for Amazon AWS (access key and secret key) and a DigitalOcean account. AWS offers a free tier where you are allowed to create S3 buckets without costs as long as you don’t upload more than 5GB. If you don’t have a DigitalOcean account yet, feel free to use my referral link and get 100$ credit for free to try things out without costs:  Create account

So let us directly jump into action. The steps we will do are the following:

  1. Create the infrastructure code which will create our droplets and volumes and mount the volumes onto the corresponding droplets.
  2. create the worker script which will run on each droplet and create the files we want to backup.
  3. create a cronjob which will do the backups in regular intervals
  4. create the gitlab-ci.yml which will contain the code describing what our pipeline should do (execute terraform to build our infrastructure).

Here is an overview of the complete project (you can find the project here on gitlab):

project

Let us start:

Create the infrastructure code

The infrastructure code is split into two folders. First let us have a look at ’setup_backend‘:

provider "aws" {
  region = "${var.AWS_REGION}"
  access_key = "${var.AWS_ACCESSKEY}"
  secret_key = "${var.AWS_SECRETKEY}"
}

resource "aws_s3_bucket" "terraform_state" {
  bucket = "${var.AWS_BUCKET_NAME}"

  versioning {
    enabled = true
  }

  lifecycle {
    prevent_destroy = true
  }
}

It only contains the S3 bucket resource. So the only purpose is to create that bucket. In our pipeline code, we will add an if statement where we will check if the S3 bucket already exists. And only if it doesn’t exist we will tell terraform to create that resource.

You can find the if-statement in the code snippet from our gitlab-ci.yml below. It looks like:

if aws s3api head-bucket --bucket "de.codinghaus.s3" 2>/dev/null ; then echo "Skipping Backend-Creation, S3-Bucket already existing!"; else cd setup_backend && terraform init && terraform plan && terraform apply -auto-approve && cd ..; fi

If you wonder where the variables come from, have a look at vars.tf:

variable "AWS_REGION" {}
variable "AWS_TF_STATEFILE" {}
variable "AWS_BUCKET_NAME" {}
variable "AWS_ACCESSKEY" {}
variable "AWS_SECRETKEY" {}

Yes, they are empty. We do not want our AWS-Keys to appear in our source code. So what we do is the following: We use gitlab CI/CD environment variables which can be found at „Settings“ –> „CI/CD“ –> „Variables“. There we can add environment variables which are available on the pipeline runners, where our pipeline code is executed. terraform will now recognize, that we defined variables in vars.tf. Then it will try to find values for those variables. As we didn’t set values at the definition, terraform will next search for environment variables in the form of TF_VAR_. So e.g. for AWS_REGION terraform will look for an environment variable TF_VAR_AWS_REGION. As terraform is executed on the gitlab runner, we only have to define the needed gitlab environment variables and terraform will find them including their values:

environmentvariables

‚resources‘ is the main folder which contains the code for three droplets, three volumes and the attachments from droplet to volume. It also contains the definition of the backend resource (in our case the S3 bucket).

First let us have a look at the droplet resources in workers.tf:

provider "digitalocean" {
  token = "${var.DO_TOKEN}"
}

/* here we tell terraform to create three droplets (as we defined
the gitlab environment variable TF_VAR_DO_WORKERCOUNT = 3). The names
will be worker0X (worker01, worker02 and worker03).*/
resource "digitalocean_droplet" "worker" {
  image = "ubuntu-16-04-x64"
  name = "${format("worker%02d", count.index + 1)}"
  count = "${var.DO_WORKERCOUNT}"
  region = "${var.DO_REGION}"
  size = "${var.DO_SIZE}"
  private_networking = true
  ssh_keys = [
    "${var.DO_KEYFINGERPRINT}"
  ]
  connection {
    user = "root"
    type = "ssh"
    private_key = "${file("~/.ssh/id_rsa")}"
    timeout = "2m"
  }

/* now we will copy the workerscript and the the backup /cronjob stuff
onto the droplet)
  provisioner "file" {
    source = "../../scripts/workerscript.sh"
    destination = "/workerscript.sh"
  }

  provisioner "file" {
    source = "../../scripts/backup_to_volume.sh"
    destination = "/etc/backup_to_volume.sh"
  }

  provisioner "file" {
    source = "../../scripts/backup_crontab"
    destination = "/etc/cron.d/backup_crontab"
  }

/* as the last step during the droplet creation, we give all scripts
the execute flag, install zip which is needed the create the
backups in zipped form and run the workerscript (see below). /*
provisioner "remote-exec" {
  inline = [
    "sleep 10",

    "chmod +x /workerscript.sh",
    "chmod +x /etc/backup_to_volume.sh",
    "chmod +x /etc/cron.d/backup_crontab",

    "apt-get install zip -y",

    "nohup bash /workerscript.sh &",
    "sleep 2"
  ]
}
}

Now, that the droplets are created, let us have a look at the code describing our volumes:

/* the first resource block describes our volumes. It will be executed
after the droplet creation has finished (see the depends_on attribute).
the name of each volume will be worker0X-backup. */
resource "digitalocean_volume" "worker-backup-volume" {
  count = "${var.DO_WORKERCOUNT}"
  region = "${var.DO_REGION}"
  name = "${format("worker%02d", count.index + 1)}-backup"
  size = "${var.DO_VOLUME_SIZE}"
  initial_filesystem_type = "${var.DO_VOLUME_FS_TYPE}"
  depends_on = ["digitalocean_droplet.worker"]

/* this ensures that terraform will never try to destroy/recreate
our volumes (which contain our importand backups!) /*
  lifecycle {
    prevent_destroy = true
  }
}

/* when the droplets and the volumes exist, it is time to couple
each volume to each droplet. Therefore we can use the
digitalocean_volume_attachment resource type. */
resource "digitalocean_volume_attachment" "worker-backup-volume-attachments" {
  count = "${var.DO_WORKERCOUNT}"
  droplet_id = "${element(digitalocean_droplet.worker.*.id, count.index)}"
  volume_id  = "${element(digitalocean_volume.worker-backup-volume.*.id, count.index)}"
  depends_on = ["digitalocean_volume.worker-backup-volume"]
}

At last, let us have a look at backend.tf

provider "aws" {
  region = "${var.AWS_REGION}"
  access_key = "${var.AWS_ACCESSKEY}"
  secret_key = "${var.AWS_SECRETKEY}"
}

/* this tells terraform where to look for the current state of
our infrastructure (in the form of a terraform.tfstate file).
We are not able to use variable references in the backend definition.
Therefore we have the values hard coded here. But still .. we don't
want sensitive data (aws keys) in the code here. So we will once again
use gitlab environment variables here. We will run the following in
our gitlab pipeline script:
terraform init -backend-config="access_key=$TF_VAR_AWS_ACCESSKEY" -backend-config="secret_key=$TF_VAR_AWS_SECRETKEY"
which will contain the two keys.
*/
terraform {
  backend "s3" {
    bucket = "de.codinghaus.s3"
    key = "dovolumetutorial_terraform.tfstate"
    region = "eu-central-1"
    access_key = ""
    secret_key = ""
  }
}

Create the worker script

#!/bin/bash
mkdir /workdir
touch workerscript.log
# wait until backup volume is mounted
while [ ! -d /mnt/$HOSTNAME\_backup ]
do
    echo "waiting for DO-Volume to be mounted...." >> workerscript.log
    sleep 10
done
echo "DO-Volume is now mounted!" >> workerscript.log
# restore backup from volume to droplet if existing
newestBackup=$(ls -Frt /mnt/$HOSTNAME\_backup | grep "[^/]$" | tail -n 1)
if [ -z "$newestBackup" ]; then
echo "No backup found on DO-Volume!" >> workerscript.log
else
cp /mnt/$HOSTNAME\_backup/$newestBackup /workdir
unzip /workdir/$newestBackup -d /workdir
rm -rf /workdir/$newestBackup
echo "Found backup ($newestBackup) on DO-Volume! Copied and unzipped it into working directory!" >> workerscript.log
fi
newestFile=$(ls -Frt /workdir | grep "[^/]$" | tail -n 1)
counter=0
if [ -z "$newestFile" ]; then
echo "No previous file found. Starting with 1!" >> workerscript.log
counter=1
else
echo "Found file to start with! ($newestFile)" >> workerscript.log
((counter+=$newestFile))
((counter+=1))
fi
while [ 1 ]; do
sleep 5
fallocate -l 1M /workdir/$counter
echo "Created file: $counter" >> workerscript.log
((counter+=1))
done

When the script is started (which is the case when our droplets were (re-)created) it checks whether the volume is already mounted and if not waits until it is. This is necessary because the script is executed at the end of the remote-exec block of the worker resource (which are the droplets). The volumes are created AFTER the the worker droplets. So the script will be executed before the volumes are created and therefore before they are mounted onto the droplets.

When the volume is mounted, the script checks if there are backups in the volume mount directory. If so the newest backup is copied to the /workdir and unzipped. The file creation then continues from the backup’s last file. If there is no backup the script will start to create file 0. Whether there was a backup or not, the script will then – in the main loop – create a file every five seconds.

Create a cronjob

Well, this is pretty straight-forward. We need a crontab which is copied to /etc/cron.d (see infrastructure code / worker.tf):

*/5 * * * * root /etc/backup_to_volume.sh

and the script doing the backup:

#!/bin/bash
date=$(date +%s)
timestamp=$(date +"%Y_%m_%d_%H_%M")
if [ ! -d /mnt/$HOSTNAME\_backup ]; then
    echo "----- ZIPPING FILES AND COPYING ZIP TO DO-VOLUME (1/2) -----"
    cd /workdir
    zip -r $timestamp-backup.zip ./*
    mv $timestamp-backup.zip /mnt/$HOSTNAME\_backup

    echo "----- DELETING OUTDATED BACKUPS (2/2) -----"
    cd /mnt/$HOSTNAME\_backup
    ls -tp | grep -v '/$' | tail -n +6 | xargs -I {} rm -- {} #https://stackoverflow.com/questions/25785/delete-all-but-the-most-recent-x-files-in-bash
fi

As you can see the script is divided into two parts.

  1. First we create a zip-file containing all files our worker script created into /workdir. That zip file is then uploaded to the volume (the cool thing is that it seems as if we are just moving the zip file into another directory because we mounted our volume into that directory).
  2. In the second part we delete the most outdated backups (only keeping the 5 newest)

Create the gitlab-ci.yml

stages:
  - deploy-infrastructure

deploy-infrastructure:
  stage: deploy-infrastructure
  image:
    name: hashicorp/terraform:light
    entrypoint:
      - '/usr/bin/env'
      - 'PATH=/usr/local/sbin:/usr/local/bin:/usr/sbin:/usr/bin:/sbin:/bin'
  before_script:
    - apk add --no-cache python3
    - apk add --no-cache curl
    - apk add --no-cache bash
    - mkdir -p ~/.ssh
    - echo "$TF_VAR_DO_PRIVKEY_PLAIN" | tr -d '\r' > ~/.ssh/id_rsa
    - chmod -R 700 ~/.ssh
    - curl -O https://bootstrap.pypa.io/get-pip.py
    - echo "export PATH=~/.local/bin:$PATH" >> ~/.bash_profile
    - python3 get-pip.py --user
    - source ~/.bash_profile
    - pip install awscli --upgrade --user
    - aws configure set aws_access_key_id $TF_VAR_AWS_ACCESSKEY
    - aws configure set aws_secret_access_key $TF_VAR_AWS_SECRETKEY
  script:
    - cd .infrastructure
    - if aws s3api head-bucket --bucket "de.codinghaus.s3" 2>/dev/null ; then echo "Skipping Backend-Creation, S3-Bucket already existing!"; else cd setup_backend && terraform init && terraform plan && terraform apply -auto-approve && cd ..; fi
    - cd resources
    - terraform init -backend-config="access_key=$TF_VAR_AWS_ACCESSKEY" -backend-config="secret_key=$TF_VAR_AWS_SECRETKEY"
    - terraform plan
    - terraform apply -auto-approve
  only:
    - master

We only have one stage here. In the before_script-block we first add our private key to ~/.ssh/id_rsa to be able to connect to the droplets via ssh (from the gitlab runner). After that we install and configure awscli which we need to check if the S3 bucket is already existing or if it has to be created.

After checking (and creating) the S3 bucket we run the three terraform commands: init, plan and apply which will create our infrastructure in the first run, and then recreate (or not) in all future runs. During the init step (with our backend-config given) terraform will look at the terraform.tfstate file in the S3 bucket so it knows what the current state of our infrastructure is and if there is a need to (re-)create resources or not.

Now that we have everything we need, we have to do one more thing: Create the environment variables in gitlab. You can find/add them under „Settings“ –> „CI/CD“ –> „Variables“.

If we push our code the first time the pipeline will start and terraform will create an AWS S3 bucket and then create our infrastructure (left screenshot). From the second pipeline run on there is no need to create the S3 bucket as it already exists. Our pipeline script will recognize this and terraform will initialize the backend to know if our already existing resources need to be recreated (right screenshot).

After the pipeline finishes, let us have a look at the DigitalOcean-GUI and check that everything is there:

Now we will let the infrastructure run some time and see how the backups are created on the volumes.

When we connect to our droplet via ssh and have a look at the workerscript log we will see:

scriptWithoutBackup

After a couple of minutes let us see what’s inside our backup directory. We will find some uploaded backups now:

backupcontent

Okay, as it seems everything works. Now, we want to see if the backup mechanism works. Oh, have a look at our worker droplet’s image in the workers.tf.. it is ubuntu 16.04:

resource "digitalocean_droplet" "worker" {
  image = "ubuntu-16-04-x64"
....

A pretty old ubuntu version! We now want to update that to ubuntu 18.04. So we will change workers.tf to:

resource "digitalocean_droplet" "worker" {
  image = "ubuntu-18-04-x64"
....

Then we will push that change. During the triggered pipeline run, terraform will now recognize that the image for the worker droplets was changed. It will decide, that it has to destroy the three droplets and recreate them. The volumes will stay untouched: Nothing changed here and they are marked as undestroyable anyways. But the attachments for the volumes have to change, because the droplet ids will change. No problem: Terraform will automatically destroy the attachments and recreate them.

recreate2

When the triggered pipeline run is finished after the push we only have one problem:

Yes, the droplets were recreated and the attachments for their volumes, too. But (in contrast to the initial creation) the volumes are not automatically mounted onto our droplets (this was a new insight for me when writing this tutorial, I assumed it would be mounted again automatically). The result: Our workerscript will stay forever in the loop waiting for volume to be mounted:

# wait until backup volume is mounted
while [ ! -d /mnt/$HOSTNAME\_backup ]
do
    echo "waiting for DO-Volume to be mounted...." >> workerscript.log
    sleep 10
done

Well..unexpected.. but let us fix this in a simple (naive) way: We have two cases. The initial creation of our infrastructure (including the automatical mount of our volumes onto the droplets), and recreation of our droplets (not including the automatical mount of our volumes). We will extend the loop and assume, that if after two minutes no volume is mounted, we are in the latter case. And so we will then try to mount the volume manually:

# wait until backup volume is mounted
loopCount=0
while [ ! -d /mnt/$HOSTNAME\_backup ]
do
    echo "waiting for DO-Volume to be mounted...." >> workerscript.log
    sleep 10
    ((loopCount+=10))
    if (( loopCount > 120 )); then
        echo "Volume not mounted after two minutes, trying manual mount..."  >> workerscript.log
        mkdir -p /mnt/$HOSTNAME\_backup; mount -o discard,defaults /dev/disk/by-id/scsi-0DO_Volume_$HOSTNAME-backup /mnt/$HOSTNAME\_backup; echo /dev/disk/by-id/scsi-0DO_Volume_$HOSTNAME-backup /mnt/$HOSTNAME\_backup ext4 defaults,nofail,discard 0 0 | sudo tee -a /etc/fstab
    fi
done

The one liner for the manual mount was copied from the DigitalOcean-GUI (see screenshot below). I just replaced the hard coded hostname with the $HOSTNAME environment variable.

do

With that change in our waiting loop, the result of a second run of the pipeline (including the recreation of the droplets / attachments) looks like the following:

result

As you can see, the backups from the volume are now found. The newest is taken and our worker script will continue from the state from the newest backup.

Yay!

As already mentioned you can find the full example code at gitlab on https://gitlab.com/mebbinghaus/codinghaus_20181028_dovolumes_backup

If you have questions or feedback, feel free to leave a comment or contact me via twitter or mail.

Avoid code duplication in docker-compose.yml using extension fields

Did you ever work with a docker-compose.yml that defined multiple services based on the same docker image and with only decent differences (like a different command per service)? I did. And I learned that there is no need to duplicate the code for each service thanks to extension fields. Let us have a look at how that works by example.

In my current search engine project I am working with a docker-compose.yml (used for a docker stack working with docker swarm mode) that defines some crawler services (A crawler is a tool that scans and saves the content of one or multiple web pages to make them searchable later). Now I wanted to create two crawler services. They should behave exactly the same but with two exceptions: Each crawler should crawl a different web page and each crawler should run on a specific host. Therefore I defined two crawler services like the following (I left out secrets/volumes to have a focus on the services):

version: "3.6"
services:
  crawler-one:
    image: docker.gotcha-app.de/gotcha/crawler
    command: -n CrawlerOne - u http://www.google.com
    deploy:
      mode: replicated
      replicas: 1
      placement:
        constraints:
          - node.role == worker
          - node.hostname == crawler-two
    volumes:
     - "crawler-volume:/root/nutch/volume"
    secrets:
     - index-username
     - index-password
     - crawler-api-username
     - crawler-api-password
    networks:
     - gotcha-net
  crawler-two:
    image: docker.gotcha-app.de/gotcha/crawler
    command: -n CrawlerTwo - u http://www.bing.com
    deploy:
      mode: replicated
      replicas: 1
      placement:
        constraints:
          - node.role == worker
          - node.hostname == crawler-two
    volumes:
     - "crawler-volume:/root/nutch/volume"
    secrets:
     - index-username
     - index-password
     - crawler-api-username
     - crawler-api-password
    networks:
     - gotcha-net

Pay attention to the fact that both service definitions only differ in terms of the used command and the constraints (marked bold). The command differs because each crawler should crawl a different web page and the placement constraint says that crawler-one should run on the swarm worker host (node) called crawler-one, and crawler-two should run on node crawler-two.

This is a lot of duplicated code and only few differences.. what is the trick to reuse the code that is equal in both definitions?

The trick is called extension fields and it is described in the docker docs.

Let us have a look straight at how the docker-compose.yml file seems when we use extension fields here to remove the duplicated code:

version: "3.6"
x-defaultcrawler:
  &default-crawler
  image: docker.gotcha-app.de/gotcha/crawler
  deploy:
    mode: replicated
    replicas: 1
    placement:
      constraints:
        - node.role == worker
  volumes:
   - "crawler-volume:/root/nutch/volume"
  secrets:
   - index-username
   - index-password
   - crawler-api-username
   - crawler-api-password
  networks:
   - gotcha-net

services:
  crawler-one:
    <<: *default-crawler
    command: -n CrawlerOne -u http://www.google.com/
    deploy:
      placement:
        constraints:
          - node.hostname == crawler-one
  crawler-two:
    <<: *default-crawler
    command: -n CrawlerTwo -u http://www.bing.com/
    deploy:
      placement:
        constraints:
          - node.hostname == crawler-two

In the first part we are defining a default-Crawler fragment. The first line with the prepended x- says that we are defining a reusable fragment here. The second line with the prepended & defines the name we will use to import that fragment where ever we want. And then follows all the code, that was exactly the same in the crawler-one and the crawler-two service.

After that fragment we define our services crawler-one and crawler-two. The first line after the service name (<<: *default-crawler) says „For that service take the fragment with the name default-crawler, and after that add everything that follows and merge it into the fragment“.

So using the docker-compose.yml with the extension fields will behave exactly like the one above. But now we no longer have that ugly code duplication containing elements that are completely equal in both services.

How-To: Use Traefik as reverse proxy for your Docker Swarm Mode cluster on DigitalOcean (fully automated with GitLab CI, terraform, ansible)

In my last blog post I wrote about how to put a load balancer (HAProxy) in front of a docker swarm cluster with multiple manager nodes automatically. That blog post was using the reverse proxy traefik inside the docker swarm mode to dispatch user requests (forwarded by the HAProxy) to one of the existing worker nodes ( the corresponding container on that worker node). I left out information on how traefik works and left the code for those who were interested in the full picture on github to not let the posting explode.

In this posting we will have a closer look on how to create that swarm mode cluster automatically with a gitlab CI pipeline. We will walk through the code that describes our infrastructure, the code that describes our pipeline, the code that deploys our services and the code that configures traefik. I will cut out the HAProxy in front of the cluster in this setup so that we can concentrate on the cluster itself (when interested in the HAProxy-Part have a look at my last blog post). So, first let’s look what we will have after working through that post:

We will have an automated CI/CD-Pipeline on GitLab that will create six droplets on DigitalOcean. Three of those working as manager nodes, three as workers. During our pipeline we will also create three sub domains for the domain we own (gotcha-app.de in this example). As a last step in our pipeline we will deploy traefik on the manager nodes and three services for the worker nodes (each service running on each worker, so on each worker node we will have three running containers).

If you are interested in a complete working code example: Here you go

The end result (that our pipeline will create for us automatically) will look like in the following diagram:

codinghaus_20181609

Things we have to do:

  • Let DigitalOcean manage our domain (by entering the DO Namespace Records for our domain – using e.g. the GUI of our domain registrar (where we bought the domain)
  • implement the code that will create our infrastructure (droplets and domains with records) and install everything that is needed on the droplets (docker, …). We will use terraform for that.
  • implement the code that will describe our docker stack (including traefik and three small services for our workers). We will create a docker-compose.yml for that.
  • implement the code that will deploy our docker stack. We will use ansible for that – even though it is just a single command that will be executed on one of our swarm mode managers.
  • implement the code that will describe our gitlab CI/CD pipeline (executing our infrastructure as code / docker stack deploy).

What we will leave out:

To keep the example short and concise, we will leave out the testing stage(s) which should always be part of a CI/CD-pipeline (but we are using third party images for testing purposes here anyway – so we don’t have any productive code here to test) and as already mentioned we won’t put a load balancer in front of our docker swarm cluster (as we did in the last posting).

So here we go!

Let DigitalOcean manage our domain

If you read my last blog post you will find nothing new here. I bought my domain at strato and the GUI where I added DigitalOcean’s three NS entries looks like the following:

strato 
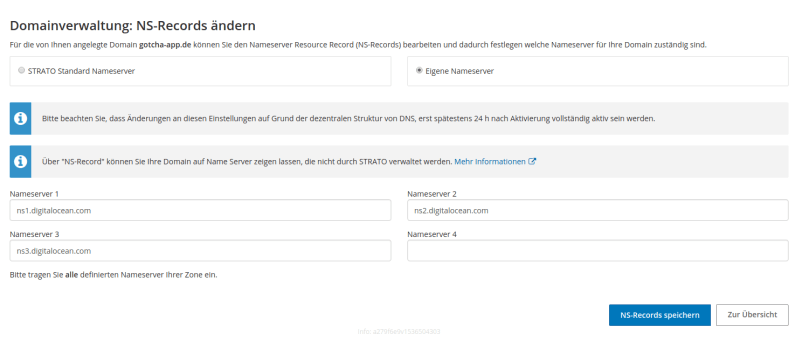
You only have to do that once (and then wait up to 48 hours) and so this task is not part of our automated pipeline. After this, when creating sub domains via the DigitalOcean API, every created sub domain will automatically contain the three needed NS entries.

implement the code that will create our infrastructure („Infrastructure as code“)

All files that describe our infrastructure as code are located in the .infrastructure folder. We have four files that describe our different components. For the full files have a look into the gitlab repository as I will explain the most important parts here. Let’s start with the code that creates our first swarm mode manager node (droplet):

# this part describes what droplet to create. region and size are
# filled by using environment variables. If you are using gitlab CI
# you can add those environment variables under Settings - CI / CD -
# Variables. Make sure to prepend TF_VAR before the name. DO_REGION
# for example must be created as TF_VAR_DO_REGION.
resource "digitalocean_droplet" "gotchamaster-first" {
  image = "ubuntu-16-04-x64"
  name = "gotchamaster00"
  region = "${var.DO_REGION}"
  size = "${var.DO_SIZE}"
  private_networking = true
  ssh_keys = [
    "${var.DO_KEYFINGERPRINT}"
  ]

# this part describes how terraform will connect to the created 
# droplet. We will use ssh here.
  connection {
    user = "root"
    type = "ssh"
    private_key = "${file("~/.ssh/id_rsa")}"
    timeout = "2m"
  }

# this will copy the docker-compose.yml file from the repository 
# to the droplet (location: /root/docker-compose.yml). We need it
# there to deploy the docker swarm stack.
  provisioner "file" {
    source = "../../../docker-compose.yml"
    destination = "/root/docker-compose.yml"
  }

# this will copy the configuration file for traefik from the 
# repository to the droplet (location: /root/traefik.toml). 
  provisioner "file" {
    source = "../../../traefik.toml"
    destination = "/root/traefik.toml"
  }

# remote-exec will execute commands on the created droplet. Here,
# we first install some needed software like docker and 
# docker-compose. Then we init a swarm and create tokens for our 
# managers and workers to be able to join the swarm cluster. We are
# putting those tokens into the files /root/gotchamaster-token and 
# /root/gotchaworker-token. 
  provisioner "remote-exec" {
    inline = [
      #docker
      "apt-get install apt-transport-https ca-certificates curl software-properties-common python3 -y",
      "curl -fsSL https://download.docker.com/linux/ubuntu/gpg | sudo apt-key add -",
      "add-apt-repository \"deb [arch=amd64] https://download.docker.com/linux/ubuntu $(lsb_release -cs) stable\"",
      "apt-get update",
      "apt-get install docker-ce -y",
      "usermod -aG docker `whoami`",
      "curl -L https://github.com/docker/compose/releases/download/1.22.0/docker-compose-$(uname -s)-$(uname -m) -o /usr/local/bin/docker-compose",
      "chmod +x /usr/local/bin/docker-compose",

      "docker swarm init --advertise-addr ${self.ipv4_address}",
      "docker swarm join-token --quiet manager > /root/gotchamaster-token",
      "docker swarm join-token --quiet worker > /root/gotchaworker-token",

      "docker network create --driver=overlay gotcha-net"
    ]
  }

# After creating files containing the swarm tokens, we copy download
# those files to our local machine (which is in fact the 
# gitlab ci runner). Why are we doing this? When creating the other
# cluster nodes, we will upload those files onto those droplets so
# they know the token and are able to join the swarm.
  provisioner "local-exec" {
    command = "scp -o StrictHostKeyChecking=no root@${self.ipv4_address}:/root/gotchamaster-token ./gotchamaster-token"
  }

  provisioner "local-exec" {
    command = "scp -o StrictHostKeyChecking=no root@${self.ipv4_address}:/root/gotchaworker-token ./gotchaworker-token"
  }

}

This was the file which creates the first manager mode. Now we need a second file which creates all other manager nodes. We have to split the manager node creation into to files because the first manager node is doing things the other manager nodes won’t do (like initializing the swarm and creating tokens for other nodes to join the swarm).

Now we can use one file, to create all other manager nodes:

gotcha-master.tf

# As you will see this file looks nearly the same as
# gotcha-master-first.tf. But the first difference is that we are 
# using the count-attribute here. We tell terraform to create
# var.DO_MASTERCOUNT - 1 droplets here. DO_MASTERCOUNT is once again
# an environment variable and we are subtracting 1 here as we already
# created the first manager node. Terraform will create those droplets
# parallel instead of one after another which is pretty cool.
resource "digitalocean_droplet" "gotchamaster" {
  image = "ubuntu-16-04-x64"
  name = "${format("gotchamaster%02d", count.index + 1)}"
  count = "${var.DO_MASTERCOUNT - 1}"
  region = "${var.DO_REGION}"
  size = "${var.DO_SIZE}"
  private_networking = true
  ssh_keys = [
    "${var.DO_KEYFINGERPRINT}"
  ]
  connection {
    user = "root"
    type = "ssh"
    private_key = "${file("~/.ssh/id_rsa")}"
    timeout = "2m"
  }

# during the creation of the first manager node we initialized the
# swarm, created tokens for other managers / workers to join the swarm,
# saved those tokens to files, and download those files from the
# droplet to the gitlab ci runner. Now, we will upload those files
# from the gitlab ci runner to the newly created droplet(s).
  provisioner "file" {
    source = "./gotchamaster-token"
    destination = "/tmp/swarm-token"
  }

  provisioner "file" {
    source = "../../../docker-compose.yml"
    destination = "/root/docker-compose.yml"
  }

  provisioner "file" {
    source = "../../../traefik.toml"
    destination = "/root/traefik.toml"
  }

# We install and configure docker and docker-compose on the manager
# nodes and make them join the swarm by reading out the join token.
  provisioner "remote-exec" {
    inline = [
      #docker / docker-compose
      "apt-get install apt-transport-https ca-certificates curl software-properties-common -y",
      "curl -fsSL https://download.docker.com/linux/ubuntu/gpg | sudo apt-key add -",
      "add-apt-repository \"deb [arch=amd64] https://download.docker.com/linux/ubuntu $(lsb_release -cs) stable\"",
      "apt-get update",
      "apt-get install docker-ce -y",
      "usermod -aG docker `whoami`",
      "curl -L https://github.com/docker/compose/releases/download/1.22.0/docker-compose-$(uname -s)-$(uname -m) -o /usr/local/bin/docker-compose",
      "chmod +x /usr/local/bin/docker-compose",

      #docker swarm
      "docker swarm join --token `cat /tmp/swarm-token` ${digitalocean_droplet.gotchamaster-first.ipv4_address}:2377"
    ]
  }

}

gotcha-domain.tf

This file will create all our sub domains (web.gotcha-app.de, http://www.gotcha-app.de, test.gotcha-app.de and traefik.gotcha-app.de). Every sub domain will have three A-records pointing to each manager node IP. Lets only have a look at the http://www.gotcha-app.de sub domain here:

resource "digitalocean_domain" "gotchadomain-www" {
  name       = "www.gotcha-app.de"
  ip_address = "${digitalocean_droplet.gotchamaster-first.ipv4_address}"
  depends_on = ["digitalocean_droplet.gotchamaster-first"]
}

We are defining a resource of type digitalocean_domain here.

  • name: the name of the sub domain
  • ip_address: this attribute (which is required in terraform, but optional in the DigitalOcean API – see https://github.com/terraform-providers/terraform-provider-digitalocean/issues/112) will create an initial A record. We use the IP-address of our first swarm mode manager here.
  • depends_on: To be able to use the IP-address of our first swarm mode manager, that manager has to exist. So we are telling terraform here not to create that domain before the first manager droplet has been created.
resource "digitalocean_record" "record-master-www" {
  count = "${var.DO_MASTERCOUNT - 1}"
  domain = "${digitalocean_domain.gotchadomain-www.name}"
  type   = "A"
  name   = "@"
  value = "${element(digitalocean_droplet.gotchamaster.*.ipv4_address, count.index)}"
  depends_on = ["digitalocean_droplet.gotchamaster"]
}

Then we have to create two more A-Records (remember we have 3 manager nodes, and we want the domain to dispatch requests to one of those 3 manager nodes). So now that our sub domain exists the resource type changes to digitalocean_record. 

  • count: this kind of works as a loop. We can tell terraform how much managers to create by setting the environment variable DO_MASTERCOUNT (TF_VAR_DO_MASTERCOUNT). As we already created one A-record in the domain-resource, we now have to crate DO_MASTERCOUNT – 1 more A-records.
  • domain: tells which (sub) domain should that A-record belong to
  • type: the type of the record (A, NS, AAAA, …)
  • name: @ will use the sub domain as the hostname (www.gotcha-app.de in our case), some other string would be prepended to the sub domain (e.g. „bob“ would generate an A-record for bob.www.gotcha-app.de)
  • value: this is the tricky bit. An A-record is nothing more than the link between a domain and an IP-address. value tells the A-record which IP to use. We are in a loop here (remember the count-attribute). By using the element function, we can iterate through our gotchamaster-resources and use the IP address of each manager node here.
  • depends_on: before creating the missing A-records all manager nodes must exists (because we are iterating over their IP-addresses), so we tell terraform to not build those records until all manager nodes exist.

The finished sub domain will look like this in the DigitalOcean GUI (the NS-records were created automatically):

do_domain

Now at last let us have a look at the code, which creates our three worker nodes:

gotcha-worker.tf

# nothing new here. We tell terraform to create DO_WORKERCOUNT 
# droplets here.
resource "digitalocean_droplet" "gotchaworker" {
  image = "ubuntu-16-04-x64"
  name = "${format("gotchaworker%02d", count.index + 1)}"
  count = "${var.DO_WORKERCOUNT}"
  region = "${var.DO_REGION}"
  size = "${var.DO_SIZE}"
  depends_on = ["digitalocean_droplet.gotchamaster"]
  private_networking = true
  ssh_keys = [
    "${var.DO_KEYFINGERPRINT}"
  ]
  connection {
    user = "root"
    type = "ssh"
    private_key = "${file("~/.ssh/id_rsa")}"
    timeout = "2m"
  }

# We need the file containing the token which is needed to join the
# swarm as a worker so we copy it from the gitlab ci runner to the
# droplet as we did on the manager droplets.
  provisioner "file" {
    source = "./gotchaworker-token"
    destination = "/tmp/swarm-token"
  }

# We once again install and configure docker stuff and then join the
# swarm
  provisioner "remote-exec" {
    inline = [
      #docker
      "apt-get install apt-transport-https ca-certificates curl software-properties-common -y",
      "curl -fsSL https://download.docker.com/linux/ubuntu/gpg | sudo apt-key add -",
      "add-apt-repository \"deb [arch=amd64] https://download.docker.com/linux/ubuntu $(lsb_release -cs) stable\"",
      "apt-get update",
      "apt-get install docker-ce -y",
      "usermod -aG docker `whoami`",
      "curl -L https://github.com/docker/compose/releases/download/1.22.0/docker-compose-$(uname -s)-$(uname -m) -o /usr/local/bin/docker-compose",
      "chmod +x /usr/local/bin/docker-compose",

      "docker swarm join --token `cat /tmp/swarm-token` ${digitalocean_droplet.gotchamaster-first.ipv4_address}:2377"
    ]
  }

}

When the infrastructure stage has finished we have a running (but still empty) swarm mode cluster consisting of multiple manager- and worker nodes. Your DigitalOcean Dashboard should now look like:

Cool stuff!! Now that we have a prepared swarm, let us define the stack (what services should run on that cluster).

implement the code that will describe our docker stack (docker-compose.yml)

We are creating four services – traefik, test, web, and www. As test, web and www are just random services which work as example backends here I will concentrate on the traefik service and the test service (as an example) here. If you have questions regarding the other services please feel free to ask.

  • traefik: This is – of course – our reverse proxy. It will take requests from the internet and dispatch those requests to a worker node, on which a corresponding service is running.
    • ports: we publish port 80 as we will fetch incoming requests on port 80.
    • volumes:
      • we bind mount the docker.sock to be able to observe when new services are deployed to the stack.
      • we bind mount traefik.toml which contains the configuration we want to use.
    • deploy:
      • mode: global means we want the service to run on every node in our cluster.
      • placement: but not on every cluster – only on every manager node.
    • labels:
      • labels are where we define frontends and backends for traefik. Here, we tell traefik to take requests from traefik.gotcha-app.de dispatch them to the traefik backend (which is the service itself) on port 8081 (as defined in traefik.toml). This is where the GUI-Dashboard of all configured traefik backends and frontends will be displayed. We tell the service to use the created network gotcha-net (see gotcha-master-first.tf) and to explicitly be enabled (because we defined exposedbydefault = false in traefik.toml).
  • test:
    • deploy:
      • This time we swarm to only deploy this service onto worker nodes in our swarm.
    • labels
      • We tell traefik to listen to requests on test.gotcha-app.de:80 and dispatch those requests to a node where the test service is running and use port 8080 on that node. Pay attention to the fact that we don’t have to publish any port here as we are using the same network for all our services.
version: "3.6"
services:
  traefik:
    image: traefik:v1.6.6
    ports:
      - "80:80"
    volumes:
      - "/var/run/docker.sock:/var/run/docker.sock"
      - "/root/traefik.toml:/traefik.toml"
    deploy:
      mode: global
      placement:
        constraints:
          - node.role == manager
      labels:
        - "traefik.frontend.rule=Host:traefik.gotcha-app.de"
        - "traefik.frontend.rule.type: PathPrefixStrip"
        - "traefik.port=8081"
        - "traefik.backend=traefik"
        - "traefik.backend.loadbalancer.sticky=true"
        - "traefik.docker.network=gotcha-net"
        - "traefik.enable=true"
    networks:
      - gotcha-net
  test:
    image: stefanscherer/whoami
    deploy:
      mode: global
      placement:
        constraints:
        - node.role == worker
      labels:
        - "traefik.port=8080"
        - "traefik.backend=test"
        - "traefik.frontend.rule=Host:test.gotcha-app.de"
        - "traefik.docker.network=gotcha-net"
        - "traefik.enable=true"
    depends_on:
    - traefik
    networks:
    - gotcha-net
  web:
    image: nginxdemos/hello
    ports:
      - "8082:80"
    deploy:
      mode: global
      placement:
        constraints:
          - node.role == worker
      labels:
        - "traefik.frontend.rule=Host:web.gotcha-app.de"
        - "traefik.port=8082"
        - "traefik.backend=web"
        - "traefik.docker.network=gotcha-net"
        - "traefik.enable=true"
    networks:
      - gotcha-net
  www:
    image: hashicorp/http-echo
    ports:
      - "8083:5678"
    command: -text="hello world"
    deploy:
      mode: global
      placement:
        constraints:
          - node.role == worker
      labels:
        - "traefik.frontend.rule=Host:www.gotcha-app.de"
        - "traefik.port=8083"
        - "traefik.backend=www"
        - "traefik.docker.network=gotcha-net"
        - "traefik.enable=true"
    networks:
      - gotcha-net
    depends_on:
      - traefik
networks:
  gotcha-net:
    external: true

As the docker-compose.yml is pretty straight forward, let’s have a look at the configuration file for traefik (only to see that it’s pretty straight forward, too).

traefik.toml

defaultEntryPoints = ["http"]
[web]
  address = ":8085"
[entryPoints]
  [entryPoints.http]
    address = ":80"
[docker]
  endpoint = "unix:///var/run/docker.sock"
  domain = "gotcha-app.de"
  watch = true
  swarmmode = true
  exposedbydefault = false
  • defaultEntryPoints: We tell traefik that we will use http requests as default (not https)
  • web: this tells traefik to serve a web gui dashboard on port 8085
  • entryPoints: we link the http entrypoint to port 80 here
  • docker: this section describes that we are using traefik in a swarm mode setup.
    • endpoint: the endpoint of the docker.sock
    • domain: our domain
    • watch: traefik should watch the services and recognize new services
    • swarmmode: yes, we are using traefik in a swarm mode setup
    • exposedbydefault: We tell traefik to have no backends published by default. We have to expose every backend explicitly by defining a label „traefik.enable=true“ in the corresponding service definition in docker-compose.yml.

implement the code that will deploy our docker stack

Now that we have everything we need, let us – at last – create the pipeline which will (on every push to master) create the defined swarm mode cluster (via terraform) and deploy our defined services (the stack) on that cluster (via ansible).

As we are using gitlab ci, we need a .gitlab-ci.yml. Here it is:

# you can use any image you want. I am using the maven image as my
# main project has some more stages containing maven commands.
image: maven:latest

services:
  - docker:dind

cache:
  paths:
    - .m2/repository

variables:
  DOCKER_HOST: tcp://docker:2375
  DOCKER_DRIVER: overlay2
  MAVEN_OPTS: "-Dmaven.repo.local=.m2/repository"

# these are our two stages. deploy-infrastructure will create or 
# cluster and deploy-services will deploy the stack on the created
# cluster.
stages:
  - deploy-infrastructure
  - deploy-services

# we are using terraform to create the cluster. Before anything else
# we put our private key onto the gitlab runner (because the
# terraform commands will connect to the DigitalOcean droplets via ssh)
# Then we move to the location where our .tf-files are and the we run
# terraform init, plan and apply to let terraform do the magic.
# I am using a loop on the final terraform apply command here which
# is not optimal as it will end in an endless loop if anything goes
# wrong. I only use(d) this as a workaround as the DigitalOcean API
# sometimes answered with 503 errors which resulted in failing pipe
# lines. But this was temporary and normally you shouldn't need that
# loop.
deploy-infrastructure:
  stage: deploy-infrastructure
  image:
    name: hashicorp/terraform:light
    entrypoint:
      - '/usr/bin/env'
      - 'PATH=/usr/local/sbin:/usr/local/bin:/usr/sbin:/usr/bin:/sbin:/bin'
  before_script:
    - mkdir -p ~/.ssh
    - echo "$TF_VAR_DO_PRIVKEY" | tr -d '\r' > ~/.ssh/id_rsa
    - chmod -R 700 ~/.ssh
  script:
    - cd .infrastructure
    - cd live/cluster
    - terraform init
    - terraform plan
    - until terraform apply -auto-approve; do echo "Error while using DO-API..trying again..."; sleep 2; done
  only:
    - master

# This stage will deploy the stack on our swarm. Before anything we
# are installing ansible and jq here. Then we copy our ssh key onto
# the gitlab runner as we will use ansible (which uses ssh) to run
# the docker stack deploy - command on our gotchamaster-first
# manager node.
# To find that node we are using the DigitalOcean API to find it by 
# its name. Then we use jq to parse its IP out of the JSON-response.
# After cutting of the "" we write its IP into the /etc/ansible/hosts
# so ansible knows where to connect to. After setting HostKeyChecking
# to false (by uncommenting the line #host_key_checking = false in
# /etc/ansible/ansible.cfg) we run one single ansible command to
# deploy the stack using the docker-compose.yml on gotchamaster00.
deploy-services:
  stage: deploy-services
  before_script:
    - echo "deb http://ppa.launchpad.net/ansible/ansible/ubuntu trusty main" >> /etc/apt/sources.list
    - apt-key adv --keyserver keyserver.ubuntu.com --recv-keys 93C4A3FD7BB9C367
    - apt-get update
    - apt-get install ansible -y
    - apt-get install jq -y
  script:
    - mkdir -p ~/.ssh
    - echo "$TF_VAR_DO_PRIVKEY" | tr -d '\r' > ~/.ssh/id_rsa
    - chmod -R 700 ~/.ssh
    - "GOTCHA_MASTER_IP=$(curl -sX GET https://api.digitalocean.com/v2/droplets -H \"Authorization: Bearer $TF_VAR_DO_TOKEN\" | jq -c '.droplets[] | select(.name | contains(\"gotchamaster00\")).networks.v4[0]'.ip_address)" # extrahieren der IP-Adresse von gotchamaster00 via DO-API und jq anhand des dropletnamens
    - GOTCHA_MASTER_IP="${GOTCHA_MASTER_IP%\"}"
    - GOTCHA_MASTER_IP="${GOTCHA_MASTER_IP#\"}"
    - export GOTCHA_MASTER_IP
    - echo $GOTCHA_MASTER_IP > /etc/ansible/hosts
    - sed -i -- 's/#host_key_checking/host_key_checking/g' /etc/ansible/ansible.cfg
    - ansible all --user=root -a "docker stack deploy --compose-file docker-compose.yml gotcha"
  only:
    - master

The only-attribute tells gitlab to trigger the pipeline every time we push something into the master branch.

Now let us try out our deployed services! First let us check traefik.gotcha-app.de to check if the traefik dashboard is working:

traefik

Great! We are seeing four frontends (traefik.gotcha-app.de, http://www.gotcha-app.de, test.gotcha-app.de, web.gotcha-app.de) and four backends – each consisting of three (worker) nodes where our services are running.

Then let us check the nginx- and the adminer-service by browsing web.gotcha-app.de and http://www.gotcha-app.de:

Cool stuff! Last but not least let’s do some curls against the whoami service linked to test.gotcha-app.de:

test

If you want to try everything on gitlab be sure to create the needed environment variables defined in vars.tf (but with prepended TF_VAR_). You can set them on Gitlab under Settings – CI / CD –  Variables. So you will need (in brackets is what I used):

  • TF_VAR_DO_TOKEN – your DigitalOcean token (my DigitalOcean token :P)
  • TF_VAR_DO_PRIVKEY – your private ssh key (my private ssh key :P)
  • TF_VAR_DO_KEYFINGERPRINT – Your public ssh key’s fingerprint. You have to add that public key to DigitalOcean in your DigitalOceans‘ account settings. (my key fingerprint :P)
  • TF_VAR_DO_REGION – the region where you want to create the droplet (fra1, which is Frankfurt Germany)
  • TF_VAR_DO_SIZE – the size your droplets should have (s-1vcpu-1gb, which is the smallest – 5$ per month)
  • TF_VAR_DO_MASTERCOUNT – count of your swarm manager nodes (3)
  • TF_VAR_DO_WORKERCOUNT – count of your swarm worker nodes (3)

Have fun letting the pipeline create your cluster and deploy/update your services automatically to it!

Things I left out

There are some things that I left out, but which you want to do when using stuff for production purposes:

  • You should use HTTPS for communication between the services and between user requests and your cluster.
  • Maybe you even want to put a load balancer in front of your swarm cluster.
  • As the terraform commands are executed on a gitlab runner, all state files will be lost when the pipeline has finished. So the second time the pipeline is running terraform won’t know that the resources already were created and so will duplicate them. What you want to use here is a terraform backend. In my main application I am using an AWS bucket as the backend for terraform. So whenever the pipeline is executed it checks (during the deploy-infrastructure stage) if state files exist in my bucket and if so, it will use the already created resources (and won’t create new ones – unless you make changes to your infrastructure code which require the recreation of a droplet. But even then terraform will destroy the old droplet and create a new one instead.
  • the traefik dashboard is unsecured, you should at least put a basic auth in front of it because otherwise anyone can get information on your server cluster infrastructure.

If you have any questions please feel free to contact me or leave a comment.

If you are interested in the complete code example: Check it out here

Automated load balancer (HAProxy) creation on DigitalOcean

In this blog post I will describe how you can realize a solution that:

  • automatically (by pushing to master) creates a running docker swarm mode cluster with multiple master nodes and multiple worker nodes on DigitalOcean.
  • additionally automatically creates a HAProxy – load balancer in front of your swarm mode cluster to do the load balancing.

Some used frameworks / libraries / tools are:

  • DigitalOcean – where our infrastructure is created
  • gitlab – where the code is hosted and the CI/CD-Pipeline creating the infrastructure and deploying our docker services is running
  • HAProxy as the load balancer
  • terraform – to describe our infrastructure as code and using the DigitalOcean-API to create that infrastructure
  • docker swarm mode as the container orchestrator
  • traefik – as the reverse proxy for our docker services inside the swarm mode cluster

I uploaded an example repository on github which you can clone and try on your own. The things you will have to do to get the github example running are:

  • have/create an account on DigitalOcean
  • have/create an account on Gitlab
  • create the needed environment variables in Gitlab Settings

Please be aware of the fact, that the code will create droplets on DigitalOcean which of course will produce costs.

You can start the magic by navigating to .infrastructure/live/cluster and run the commands terraform init, terraform plan, terraform apply by hand or maybe you want to copy the repository to your own gitlab account – then you can start the automated pipeline simply by using the Gitlab CI tools (have a look at .gitlab-ci.yml where the pipeline elements are configured). Make sure to set all needed environment variables (defined in vars.tf in the github repository) with corresponding values. Those environment variables must start with TF_VAR_ to be recognized by terraform – e.g. DO_TOKEN must be exported as TF_VAR_DO_TOKEN.

I extracted / broke down that minimal example from the main project I am working on right now.

As always I don’t proclaim my solution as the all-time best possible solution ever. It’s more like a documentation for myself and maybe someone who tries something similar gets some inspiration from my approach.

DigitalOcean offers loadbalancers theirselves for 20$ per loadbalancer per month. The GUI looks pretty easy to handle and I am sure it is a great product that just works – as all products that I’ve already tried. But this blog post will show the „do it yourself“ – approach instead.

What will be done:

  • Transfer management of the domain from the original domain registrar to DigitalOcean
  • create terraform code to create (on DigitalOcean):
    • Domain „my-domain.de“
    • Domain-Record of type A with the load balancer droplets IP
    • 5 Droplets (3 docker swarm master nodes, 2 docker swarm worker nodes)
    • Droplet which will work as the load balancer (HAProxy) to route the incoming requests to one of the master nodes, from which the reverse proxy traefik will guide the incoming requests to one of the services running on the worker nodes.

Transfer management of the domain from the original domain registrar to DigitalOcean

DigitalOcean suggests that if you want to manage your DNS records via DigitalOcean (by API / GUI) you’ll need to point to the DigitalOcean name servers from your registrar. I buyed my domain on Strato (german) and the screen where I entered the DO name servers looked like the following:

strato

That’s it! (It might need some time up to two days until that is applied)

Create terraform code

So now that we can use DigitalOcean to manage the domain, let us create the infrastructure code for terraform to create everything we need to get our load balancer running, couple it to the domain and dispatch requests to our swarm master nodes.

So, let’s have a look at the relevant code – two files: domain.tf and loadbalancer.tf.

The code creating the swarm mode cluster with our master- and worker-nodes can be found in the github repository – I will leave it out here to concentrate on the load balancing stuff, but please feel free to ask questions and/or leave comments regarding the swarm cluster infrastructure code.

domain.tf

resource "digitalocean_domain" "gotchadomain-main" {
  name       = "gotcha-app.de"
  ip_address = "127.0.0.1"
}

As you can see there is no special magic in the code for creating our domain. The only thing to mention here is the ip_address attribute. In the current version of terraform the ip_address-attribute is marked as required. But in the DigitalOcean-API the only required field is the „name“.  During the execution of our infrastructure code we don’t even have created the load balancer droplet and so we don’t know its IP yet. Therefore we are creating the domain with a dummy IP (which results in creating an A-Record with that IP) and later (see the following remote-exec block of loadbalancer.tf) we update that created A-Record with the real IP of the load balancer droplet.

loadbalancer.tf

resource "digitalocean_droplet" "gotcha-loadbalancer" {
  image = "ubuntu-16-04-x64"
  name = "gotcha-loadbalancer"
  region = "${var.DO_REGION}"
  size = "${var.DO_SIZE}"
  private_networking = true
  ssh_keys = [
    "${var.DO_KEYFINGERPRINT}"
  ]
  depends_on = [
    "digitalocean_droplet.gotchamaster-final",
    "digitalocean_domain.gotchadomain-main"
  ]

  connection {
    user = "root"
    type = "ssh"
    private_key = "${file(var.DO_PRIVKEY)}"
    timeout = "2m"
  }

  provisioner "remote-exec" {
    inline = [
      "apt-get update",

      # when creating the DigitalOcean domain via terraform (see gotcha-domain.tf), we are forced to enter an ip_address - even though
      # it is not required within the DigitialOcean API. This is a bug in terraform which will be fixed in the upcoming release
      # (see https://github.com/terraform-providers/terraform-provider-digitalocean/pull/122
      # / https://github.com/terraform-providers/terraform-provider-digitalocean/issues/134)
      # here we are updating the dummy 127.0.0.1 - IP-address with the real IP of the load balancer droplet
      "apt-get install jq -y",
      "LOADBALANCER_A_RECORD_ID=$(curl -sX GET https://api.digitalocean.com/v2/domains/${digitalocean_domain.gotchadomain-main.name}/records -H \"Authorization: Bearer ${var.DO_TOKEN}\" | jq -c '.domain_records[] | select(.type | contains(\"A\")) | select(.data | contains(\"127.0.0.1\"))'.id)",
      "curl -X PUT -H \"Content-Type: application/json\" -H \"Authorization: Bearer ${var.DO_TOKEN}\" -d '{\"data\":\"${self.ipv4_address}\"}' \"https://api.digitalocean.com/v2/domains/${digitalocean_domain.gotchadomain-main.name}/records/$LOADBALANCER_A_RECORD_ID\"",
      "apt-get update -y",
      "apt-get install haproxy -y",
      "printf \"\n\nfrontend http\n\tbind ${self.ipv4_address}:80\n\treqadd X-Forwarded-Proto:\\ http\n\tdefault_backend web-backend\n\" >> /etc/haproxy/haproxy.cfg",
      "printf \"\n\nbackend web-backend\" >> /etc/haproxy/haproxy.cfg",
      "printf \"\n\tserver gotchamaster00 ${digitalocean_droplet.gotchamaster-first.ipv4_address}:80 check\" >> /etc/haproxy/haproxy.cfg",
      "printf \"\n\tserver gotchamaster-final ${digitalocean_droplet.gotchamaster-final.ipv4_address}:80 check\" >> /etc/haproxy/haproxy.cfg",
    ]
  }

}

resource "null_resource" "gotcha-master-ips-adder" {
  count = "${var.DO_MASTERCOUNT - 2}"
  triggers {
    loadbalancer_id = "${digitalocean_droplet.gotcha-loadbalancer.id}"
  }
  connection {
    user = "root"
    type = "ssh"
    private_key = "${file(var.DO_PRIVKEY)}"
    timeout = "2m"
    host = "${digitalocean_droplet.gotcha-loadbalancer.ipv4_address}"
  }
  depends_on = ["digitalocean_droplet.gotcha-loadbalancer"]

  provisioner "remote-exec" {
    inline = [
      "printf \"\n\tserver ${format("gotchamaster%02d", count.index + 1)} ${element(digitalocean_droplet.gotchamaster.*.ipv4_address, count.index)}:80 check\" >> /etc/haproxy/haproxy.cfg",
      "/etc/init.d/haproxy restart"
    ]
  }

}

Let’s focus on the remote-exec block which is the relevant part: First we are updating the A-Record of our created domain with the IP of our now created load balancer droplet (using the DigitalOcean-API).

After updating the A-Record, there are two things left to do:

  1. install HAProxy
  2. modify the config file of the HAProxy (/etc/haproxy/haproxy.cfg) to match our needs.

After executing the terraform file the haproxy.cfg file will contain a frontend and a backend as in the following screenshot.

haproxycfg

The frontend says: Take incoming requests against the load balancer machine (138.198.181.146 in this case) and forward them to the backend.

In the backend section you can see, that all our docker swarm mode master nodes are listed with their IPs. So all requests against the load balancer are now forwarded to one of our master nodes.

The null resource part at the end of the gotcha-loadbalancer.tf seems a bit tricky at first, but it’s easy if you know what it is for: We want all our swarm mode master node IPs to be listed in the backend configuration part of haproxy.cfg. If you have a look into the full terraform code on github, you can see, that the first and the last master nodes are static (we will always have at least those two master nodes). But there is a third master node resource called gotcha-master.tf. With that you can configure how much more master nodes we want to create (additionally to the first and the last). And because the count of those additional master nodes is dynamic / configurable, we need to loop over those resources and append one line containing the IP of each additional master droplet to the backend section and then we do a restart of the HAProxy.

Finally, we have a HAProxy – load balancer which takes all the requests from the internet, and forwards the requests to the master nodes of our swarm mode cluster. In the github example I am then using the traefik reverse proxy, which is configured to take the requests sent from the load balancer and forward it to a frontend where a whoami-image is running – which simply responds with the container ID of the worker node, which the requests was forwarded to. If you are interested in that part, have a look at the full example on github – especially the docker-compose.yml.

If you connect to one of your master nodes and inspect what’s going on, you can see that traefik is running on the three master nodes, and the whoami service is running on two worker nodes.

stackservices

When you now curl against your domain, you will see how the requests are forwarded from the load balancer to traefik and from there to a matching container running on the worker nodes.

curls

What’s missing in this example is the SSL part (to keep it short). In my project I am using LetsEncrypt-certificates which I host on my aws S3 bucket and which are downloaded to the loadbalancer droplet during the creation and which then are used in the haproxy.cfg. This results in a secure connection between the user requests and the load balancer. You can then decide if you want to secure the communication between your microservices behind the load balancer, too.

If you are interested in seeing the full code and try it on your own have a look at: https://github.com/marcoebbinghaus/loadbalancerAndSwarmClusterOnDO

CI/CD-Pipeline for a java microservice application running on Docker Swarm mode cluster on DigitalOcean with Maven/Docker/Gitlab/Terraform/Ansible

Hey friends,

I finally finished to implement a continuous delivery/deployment pipeline for my java based microservice architectured application which is hosted on Gitlab and running on a swarm mode cluster on DigitalOcean (created/deployed automatically by Terraform). In this article I want to share an overview of the way I got everything running (I won’t go too deep into details because that would make the article too long, but if you are interested in more informations about any part feel free to contact me). This is not meant to be a best practice or the best way to implement it because I don’t know if it is..quite contrary – I’m pretty sure there are smarter ways to do it and it is still work in progress. But maybe you get some inspiration by the way I did it.

My application is a search engine infrastructure (the gui for the search engine is still missing) and consists (as by now) of three microservices (crawler, index and a gui for configuring the crawler) and four jar-files which are created. I will skip the source code of the application and just tell you how the jar files / microservices relate / work together.

The crawler microservice is for scanning the net and collecting everything that was found. It uses Nutch as the crawl engine. Besides Nutch I created an api-service as a jar file, which is also running in the nutch/crawler-container and which is used by the crawler-gui-microservice for communication (configuration/control of the crawler).

The crawler gui is a vaadin 10 frontend application which uses the crawler api to display informations of the crawler and which offers screens for configuring/controlling the crawler.

The last microservice is the index. When the crawler has finished one crawling cycle (which always repeats via a cronjob) it pushes the crawled data to the index-service (based on solr) which makes the data searchable (so the index will be used by the search engine gui microservice which is about to be implemented next).

Info on persistence: I am using GlusterFS to generate one Gluster-Volume for the crawler and one Gluster-Volume for the index. Those volumes are mounted as bind-mounts on every swarm mode cluster node so that the crawled/indexed data are reachable from every cluster node – so it is not important on which node a service is running.

The application code is hosted on Gitlab and I am using the free gitlab ci runners for my CI/CD-Pipeline. The running application itself is hosted/deployed on droplets from DigitalOcean.

Gitlab CI works by defining a gitlab-ci.yml on the top level of a repository and this is what my file looks like:

image: maven:latest

services:
  - docker:dind

cache:
  paths:
    - .m2/repository

variables:
  DOCKER_HOST: tcp://docker:2375
  DOCKER_DRIVER: overlay2
  MAVEN_OPTS: "-Dmaven.repo.local=.m2/repository"

stages:
  - test
  - build
  - release
  - deploy-infrastructure
  - deploy-services

test:
  stage: test
  script:
    - mvn clean test
  only:
    - master

build:
  stage: build
  script:
    - mvn clean install
  artifacts:
    paths:
      - gotcha-crawler/gotcha-crawler-webgui/target/gotcha-crawler-webgui-0.1-SNAPSHOT.jar
      - gotcha-crawler/gotcha-crawler-api/target/gotcha-crawler-api-0.1-SNAPSHOT.jar
  only:
    - master

release:
  stage: release
  image: docker:latest
  before_script:
    - docker login $TF_VAR_DOCKER_REGISTRY_URL --username $TF_VAR_DOCKER_REGISTRY_USERNAME --password $TF_VAR_DOCKER_REGISTRY_PASSWORD
  script:
    - docker build --tag=gotcha-index ./gotcha-index
    - docker tag gotcha-index docker.gotcha-app.de/gotcha/index:latest
    - docker push docker.gotcha-app.de/gotcha/index
    - docker build --tag=gotcha-crawler ./gotcha-crawler
    - docker tag gotcha-crawler  docker.gotcha-app.de/gotcha/crawler:latest
    - docker push docker.gotcha-app.de/gotcha/crawler
    - docker build --tag=gotcha-crawlergui ./gotcha-crawler/gotcha-crawler-webgui
    - docker tag gotcha-crawlergui docker.gotcha-app.de/gotcha/crawlergui:latest
    - docker push docker.gotcha-app.de/gotcha/crawlergui
  only:
    - master

deploy-infrastructure:
  stage: deploy-infrastructure
  image:
    name: hashicorp/terraform:light
    entrypoint:
      - '/usr/bin/env'
      - 'PATH=/usr/local/sbin:/usr/local/bin:/usr/sbin:/usr/bin:/sbin:/bin'
  before_script:
    - apk add --no-cache python3
    - apk add --no-cache curl
    - mkdir -p ~/.ssh
    - echo "$TF_VAR_DO_PRIVKEY_PLAIN" | tr -d '\r' > ~/.ssh/id_rsa
    - chmod -R 700 ~/.ssh
    - curl -O https://bootstrap.pypa.io/get-pip.py
    - python3 get-pip.py --user
    - touch ~/terraform.log
    - chmod 777 ~/terraform.log
    - echo "export PATH=~/.local/bin:$PATH" >> ~/.bash_profile
    - echo "export TF_LOG_PATH=~/terraform.log" >> ~/.bash_profile
    - echo "export TF_LOG=TRACE" >> ~/.bash_profile
    - source ~/.bash_profile
    - pip install awscli --upgrade --user
    - aws configure set aws_access_key_id $TF_VAR_AWS_ACCESSKEY
    - aws configure set aws_secret_access_key $TF_VAR_AWS_SECRETKEY
  script:
    - cd .infrastructure
    - if aws s3api head-bucket --bucket "de.gotcha-app.s3" 2>/dev/null ; then echo "Skipping Backend-Creation, S3-Bucket already existing!"; else cd setup_backend && terraform init && terraform plan && terraform apply -auto-approve && cd ..; fi
    - cd live/cluster
    - terraform init -backend-config="access_key=$TF_VAR_AWS_ACCESSKEY" -backend-config="secret_key=$TF_VAR_AWS_SECRETKEY"
    - terraform plan
    - until terraform apply -auto-approve; do echo "Error while using DO-API..trying again..."; sleep 2; done
    - ls -la
    - pwd
  artifacts:
    paths:
      - ~/terraform.log
  only:
    - master

deploy-services:
  stage: deploy-services
  before_script:
    - echo "deb http://ppa.launchpad.net/ansible/ansible/ubuntu trusty main" >> /etc/apt/sources.list
    - apt-key adv --keyserver keyserver.ubuntu.com --recv-keys 93C4A3FD7BB9C367
    - apt-get update
    - apt-get install ansible -y
    - apt-get install jq -y
  script:
    - mkdir -p /root/.ssh
    - echo "$TF_VAR_DO_PRIVKEY_PLAIN" | tr -d '\r' > ~/.ssh/id_rsa
    - chmod -R 700 ~/.ssh
    - "GOTCHA_MASTER_IP=$(curl -sX GET https://api.digitalocean.com/v2/droplets -H \"Authorization: Bearer $TF_VAR_DO_TOKEN\" | jq -c '.droplets[] | select(.name | contains(\"gotchamaster00\")).networks.v4[0]'.ip_address)" # extrahieren der IP-Adresse von gotchamaster00 via DO-API und jq anhand des dropletnamens
    - GOTCHA_MASTER_IP="${GOTCHA_MASTER_IP%\"}"
    - GOTCHA_MASTER_IP="${GOTCHA_MASTER_IP#\"}"
    - echo "$GOTCHA_MASTER_IP"
    - export GOTCHA_MASTER_IP
    - echo $GOTCHA_MASTER_IP > /etc/ansible/hosts
    - scp -o StrictHostKeyChecking=no docker-compose.yml root@$GOTCHA_MASTER_IP:/root/docker-compose.yml
    - ansible all --user=root -a "docker stack deploy --compose-file docker-compose.yml --with-registry-auth gotcha"
  only:
    - master

As you can see, it has 5 stages: test, build, release and deploy-infrustructure and deploy-services and they pretty much do, what their names tell:

The test-stage does a mvn clean test.

The build-stage does a mvn clean install and so generates the (spring boot) jar files which are in fact running in the docker containers containing the microservices.

The release-stage builds docker images (based on Dockerfiles) which contain and run the built jar files and pushes them to a SSL-secured docker registry which I installed on a hetzner cloud machine.

The deploy-infrastructure stage is where my server cluster for the docker swarm mode is created. This is done by creating 6 Droplets on DigitalOcean (the smallest ones for 5$ per month each). After creation some tools are installed on those machines (Docker, Docker Compose, GlusterFS Server/Client (for the volumes). When this stage is finished, I have a ready configured swarm mode cluster – but no services running on the swarm. This last step is done in the last stage.

Info on the cluster creation: The pipeline is (of course) idempotent. The server cluster during the deploy-infrastructure code is only created, if it is not already existent. To achieve this, I am using a „remote backend“ for terraform (in fact an aws S3 bucket). When terraform creates a server on e.g. DigitalOcean, a file called terraform.tfstate is created, which contains the information on which servers were created and what their state is. By using a backend for terraform, I tell terraform to save this file on a S3 bucket on aws. So the first time, the deploy-infrastructure stage is run, terraform will create the droplets and save their states in a file terraform.tfstate in the S3 bucket. Every continuing time the terraform stage is triggered, terraform will look into the file saved in the S3 bucket and will skip the creation as the file says, that they were already created.

The deploy-services stage is where my docker images are pulled from the external registry and deployed onto the (in the former stage) created droplets. For that to work, I am requesting the IP of one of the master (docker swarm) droplets via the DigitalOcean API and extracting the IP from the response, containing all created droplets. Then I am using ansible to execute the docker stack deploy command. This command pulls the needed docker images from the external registry and deploys containers on all worker nodes (as configured in the docker-compose.yml). A good thing about that command is, that it can also be used to deploy the services initially into the swarm, and also to update the services already running on the swarm. The docker-compose.yml looks like the following:

version: "3.6"
services:
  index:
    image: docker.gotcha-app.de/gotcha/index
    deploy:
      mode: global
    ports:
     - "8983:8983"
    volumes:
     - "index-volume:/opt/solr/server/solr/backup"
    secrets:
     - index-username
     - index-password
  crawler:
    image: docker.gotcha-app.de/gotcha/crawler
    deploy:
      mode: replicated
      replicas: 1
    volumes:
     - "crawler-volume:/root/nutch/volume"
    secrets:
     - index-username
     - index-password
     - crawler-api-username
     - crawler-api-password
  crawlergui:
     image: docker.gotcha-app.de/gotcha/crawlergui
     deploy:
       mode: global
     ports:
     - "8082:8082"
     secrets:
     - crawler-api-username
     - crawler-api-password
     - crawler-gui-username
     - crawler-gui-password
secrets:
  index-username:
    external: true
  index-password:
    external: true
  crawler-api-username:
    external: true
  crawler-api-password:
    external: true
  crawler-gui-username:
    external: true
  crawler-gui-password:
    external: true
volumes:
  crawler-volume:
    driver: local
    driver_opts:
      type: none
      o: bind
      device: /mnt/crawler-volume
  index-volume:
    driver: local
    driver_opts:
      type: none
      o: bind
      device: /mnt/index-volume

(If you are wondering where the secrets come from: They are creating inside the docker swarm on the deploy-infrastructure stage (during terraform apply) and are using the contents of environment variables which are created / maintained in gitlab. The volumes are also created during the terraform steps in the deploy-infrastructure stage.)

Summary

So what is happening after I push code changes:

The CI/CD-Pipeline of Gitlab starts and one stage is executed after another. If one stage fails, the pipeline fails in general and won’t continue. If everything works well: The jar files are created –>Docker-Images are pushed to my private docker registry –> the latest docker images are pulled from the registry and the running containers on my swarm cluster are updated one after another (or for the very first push: the cluster is created/intialized – which means: The Droplets are created on DigitalOcean and everything that is needed is installed/configured on those droplets (docker / docker compose / GlusterFS-Server/-Client / …)  – all executed automatically by terraform. Then the pushed docker images are pulled and deployed automatically on the created/running cluster. The pipeline duration is about 20 minutes including the server cluster creation, and about 10 minutes if the server cluster is already running.

pipeline

Right now it is already possible to access (for example) the crawler gui by calling <Public-IP-address-of-one-swarm-worker-droplet>:8082/crawlerui. The next steps will be adding a reverse proxy (probably traefik) which then redirects calls to the corresponding services and bind my domain with the swarm cluster nodes.

I like that tech stack a lot and I am looking forward to extend/improve the pipeline and the application. If you have suggestions / comments / questions feel free to leave them – I will appreciate it a lot!

Greetings!

Urlaub (#offtopic)

Hallo!

In den letzten Wochen habe ich – wie man leicht erkennen kann – keine neuen Blogposts mehr veröffentlicht. Das hat hauptsächlich damit zu tun, dass ich ziemlich viel Urlaub hatte und ordentlich rumgekommen bin. Hier eine kurze Zusammenfassung für die, die es interessiert:

Zeitweise war ich mit meiner Freundin in Gran Canaria. Falls jemand eine Hotel-Empfehlung hierfür haben möchte: Salobre Golf Resort

Wir waren 5 Tage dort und es war einfach ein Traum! Das Hotel war der Hammer.. Jetzt wo wir da waren muss ich wirklich sagen: Auch wenn der Preis etwas höher lag: Es hat sich auf jeden Fall gelohnt. Die Buffets, das Zimmer, der Service, die Aussicht! Traumhaft!! Wir konnten sogar (als nicht-Golf-Spieler) mit Golf Buggy über die Straßen düsen. Also abgesehen davon, dass ich mir am Anfang direkt einmal den kompletten Kopf in der Sonne verbrannt habe (lernen durch Schmerz), kann ich über diesen Urlaub nichts schlechtes sagen. Ich würde am liebsten direkt nochmal hin 🙂

Anschließend waren wir noch ein paar Tage im guten, alten Hamburg. Ich war hier im November letzten Jahres schonmal zum Vaadin Dev Day und wollte hier unbedingt im Sommer nochmal zusammen mit meiner Freundin hin. Selbstverständlich war das Wetter Hamburg-typisch unter aller Kanone (ausgerechnet an unserem Sightseeing-Tag), aber es war trotzdem schön. Das König der Löwen Musical haben wir natürlich mitgenommen und auch das kann ich uneingeschränkt weiter empfehlen. Wozu wir nicht mehr gekommen sind, war die Rocketbeans zu besuchen (ich bin ein großer Fan!), welche ja auch in Hamburg ansässig sind. Aber das wird dann beim nächsten mal nachgeholt.

Auf dem Weg zurück von Hamburg sind wir noch zum Heidepark in Soltau gefahren (ungefähr eine Stunde von Hamburg entfernt). Da wollten wir eigentlich schon am Anreisetag vorbei, aber da das Wetter da schlecht war, haben wir das auf den Abreisetag verschoben – welch ein Glück.. denn da war das Wetter wieder bestens. Der Heidepark war auch einfach spitze (Tip: Unbedingt vorher online Ticket kaufen. Die Schlangen vor den Kassen machen keinen Spaß und rauben wertvolle Zeit). Ich kann auf jeden Fall sagen, dass ich den Heidepark viel besser fand als den Movie Park Germany. Was mir jetzt noch fehlt ist ein Besuch im Phantasialand.. mal sehen ob sich hier noch etwas ergibt dieses Jahr.

Es hat sich übrigens noch nicht komplett ausgeurlaubt für dieses Jahr. Denn wie der Zufall es so wollte, habe ich in einem Gewinnspiel zwei Freikarten für das diesjährige Wacken gewonnen \m/ und dank meines Arbeitgebers Sprengnetter durfte ich hierfür auch spontan nochmal Urlaub nehmen. Ich denke das wird auch nochmal richtig geil und freue mich schon ganz besonders auf Ghost und Betontod!

Ja das soll es auch schon gewesen sein. Wer Interesse an mehr Informationen hat kann sich gerne bei mir melden.

Das hier war dann übrigens das letzte Posting auf deutsch. Ich werde ab sofort auf englisch wechseln (insbesondere zwecks größerer Reichweite). Beim nächsten mal geht es dann auch wieder technisch weiter (zwischenzeitlich habe ich für meine in früheren Beiträgen bereits erwähnte Suchmaschinen-App meinen Infrastruktur-Code soweit, dass ich einen kleinen Cluster via Terraform automatisiert hochziehen kann – inklusive Maschinen-übergreifender Docker-Volumes). Anbei noch ein paar Fotos.

Cronjobs in non-root Docker containern

Ich habe mich gerade ungefähr 3 Stunden mit folgendem Problem befasst:

Ich wollte einen cronjob in meinem Solr-Index-Container einrichten.

Nun ist es so, dass ich prinzipiell durchaus weiß wie man cronjobs normalerweise einrichtet und an sich wäre das eine Sache von wenigen Minuten. Im Internet findet man etliche Beschreibungen, wie man cronjobs im Container einrichtet. Problem: Alle Tutorials, die ich gefunden habe, haben sich ausschließlich auf Container bezogen, welche als root ausgeführt werden.

Mein Problem: Mein Cronjob musste in einem Container eingerichtet werden (an sich nicht weiter schlimm) UND dieser Container sollte nicht als root user laufen (!).

Letzteres stellt die Schwierigkeit dar. Doch der Reihe nach:

Wie legt man normalerweise einen cronjob an?

  1. cron muss laufen (als Prozess). Das ist bei vielen Linux-Distributionen standardmäßig der Fall. Ansonsten muss man cron installieren und per cron starten.
  2. man legt den cronjob an. Hierzu gibt man cronjob -e ein und kann dann die gewünschten cronjobs anlegen. Diese werden dann in der entsprechenden crontab des aufrufenden users gespeichert und durch cron ausgeführt.

Wie man sieht, sind beide Punkte im Docker-Kosmos nicht trivial.

Probleme in Bezug auf Punkt 1:

  • Docker-Container sollen normalerweise nur einen Prozess ausführen. Der Index-Container soll den Index-Prozess (also solr) ausführen. Der cron-Prozess ist aber ein zweiter Prozess der parallel im Container laufen soll.
  • Docker-Container sollten aus Sicherheitsgründen nicht als root laufen, sondern als unprivilegierter Benutzer.

Aus einem praktischen Blickwinkel ergeben diese beiden Punkte ein wahres Dilemma: Der Prozess, den der Container ausführen soll wird per ENTRYPOINT oder CMD-Direktive im Dockerfile angegeben. Mein Dockerfile ohne den cronjob sehe beispielsweise so aus:

FROM solr:6.6
COPY wichtigeDatei /opt/solr/wichtigeDatei
... (weitere wichtige Dinge)
CMD solr-start && tail -f /dev/null

Gut soweit. Das funktioniert einwandfrei. Dann fügen wir mal den cronjob ein.

FROM solr:6.6
COPY wichtigeDatei /opt/solr/wichtigeDatei
COPY crontab /opt/solr/crontab
... (weitere wichtige Dinge)
RUN apt-get update \
&& apt-get -y install cron \
&& crontab /opt/solr/server/backup-cron \
&& rm /opt/solr/server/backup-cron \
&& cron
CMD solr-start && tail -f /dev/null

Was ist hier geschehen? In Zeile 3 kopiere ich eine Datei in welcher mein cronjob steht in das Container-Image. Vor der CMD-Direktive installiere ich cron, schreibe per crontab mein cronjob weg (im Gegensatz zu crontab -e welches einen interaktiven Editor startet – was ja im Dockerfile-Kontext schlecht ist – kann man mit crontab <Datei> auch eine Datei angeben, welche den cronjob beinhaltet, sodass man ihn nicht manuell eintippen muss) und führe dann cron aus.

Probleme:

  1. cron wird als solr ausgeführt. Das funktioniert so nicht. cron muss als root ausgeführt werden.
  2. cron wird VOR der CMD-Direktive aufgerufen. Das heißt (angenommen man könnte cron theoretisch per solr user starten): In dem temporären Container, der für die RUN-Zeile im Dockerfile gebaut wird, läuft cron. Aber sobald die Zeile des Dockerfiles abgearbeitet ist, läuft cron nicht mehr! Sobald die CMD-Direktive ausgeführt und der Container gestartet (und durch das tail am laufen gehalten) haben wir also kein laufendes cron mehr.

Was kann man da tun? Cron MUSS im CMD ausgeführt werden, und es MUSS als root ausgeführt werden. Das ergibt einen Widerspruch. Container sollte NIE als root laufen (und beispielsweise der Solr-Container stoppt aus Sicherheitsgründen sogar automatisch, wenn er als root-Benutzer gestartet wird). Wenn ich aber cron in den CMD-Befehl mit einbauen muss, habe ich keine Möglichkeit mehr, anschließend den Container als NICHT-root zu starten. Nach dem CMD kommt ja im Dockerfile nichts mehr.

Lösung:

Nach viel hin und her, bin ich zu folgender Lösung gekommen:

FROM solr:6.6
COPY wichtigeDatei /opt/solr/wichtigeDatei
COPY crontab /opt/solr/crontab
COPY --chown=solr indexStarter.sh /opt/solr/indexStarter.sh
... (weitere wichtige Dinge)
USER root
RUN apt-get update \
&& apt-get -y install cron \
&& crontab /opt/solr/server/backup-cron \
&& rm /opt/solr/server/backup-cron \
&& apt-get -y install sudo \
&& gpasswd -a solr sudo && \
echo "solr\tALL=(ALL:ALL) NOPASSWD: /usr/sbin/cron" >> /etc/sudoers
USER solr
CMD /bin/bash /opt/solr/indexStarter.sh

Vor der Erklärung nochmal kurz eine Rekapitulation des Problems: cron muss als Teil der CMD-Direktive ausgeführt werden. cron muss als root ausgeführt werden. Der Container darf aber nicht als root starten.

Jetzt zur Erklärung des finalen Dockerfiles:

Bevor ich cron installiere und den crontab-Befehl ausführe, wechsle ich zum root Benutzer. Das ist im Rahmen der Abarbeitung des Dockerfiles gar kein Problem – solange vor der CMD/Entrypoint-Direktive der Benutzer wieder gewechselt wird.

sudo to the rescue

Nachdem cron installiert ist, installiere ich auch noch sudo. Anschließend füge ich den solr-Benutzer der sudo-Gruppe hinzu. Das bewirkt, dass ich mit dem Benutzer solr Befehle ausführen kann, als ob dieser der Benutzer root wäre. Zuletzt füge ich eine Zeile ans Ende der Datei /etc/sudoers ein. Ohne diese Zeile wäre es zwar möglich, den cron-Befehl auszuführen. Dann würde aber nach Eingabe des Befehls (sudo cron) eine Passwortabfrage aufpoppen. Da ich diese im Rahmen des Dockerfiles nicht bearbeiten kann, sagt die obige Zeile, dass bei Ausführung des Befehls sudo cron KEINE Passwortabfrage auftaucht und der Befehl stattdessen einfach ausgeführt wird.

Anschließend wechsle ich im Dockerfile zum Benutzer solr zurück bevor die CMD-Direktive ausgeführt wird.

Die CMD-Direktive tut nichts anderes, als ein Script auszuführen. Das mache ich bei meinen Images derzeit ganz gerne. Das Startscript kann dann noch zusätzliche Konfigurationen ausführen (wie beispielsweise Zugangsdaten aus Docker-Secrets auslesen, Index-User konfigurieren, etc…). Das Script sieht dann letztlich wiefolgt aus (die für diesen Artikel irrelevanten Aufgaben innerhalb des Scripts habe ich rausgekürzt):

#!/bin/bash
sudo cron
/opt/solr/bin/solr start
tail -f /dev/null

Wie man sieht: Hier wird nun sudo cron ausgeführt. Anschließend wird solr gestartet und danach gibt es den obligatorischen tail auf /dev/null um den Container am Laufen zu halten.

Kurzzusammenfassung der Lösung (alle Schritte im Dockerfile zu erledigen):

  1. auf Benutzer root wechseln
  2. cron und sudo installieren
  3. gewünschten Benutzer der sudo-Gruppe hinzufügen
  4. cron in /etc/suoders als NOPASSWD deklarieren
  5. zurück auf gewünschten nicht-root-Benutzer wechseln
  6. In der CMD/Entrypoint-Direktive sudo cron ausführen (neben den weiteren benötigten Kommandos) – beispielsweise innerhalb eines Scripts oder auch als Befehlskette innerhalb von CMD.

Docker-Volumes im Cluster: Von Hetzner zu DigitalOcean (Erfahrungsbericht)

Wie in vorherigen Artikeln bereits erwähnt, arbeite ich derzeit privat an einer Applikation, welche aus diversen Microservices besteht. In diesem Beitrag möchte ich etwas näher darauf eingehen, wie diese Applikation (bisher) technisch aufgebaut ist und welche Infrastruktur ich hierfür nutze.

Die Applikation – im Prinzip eine Suchmaschine – besteht aus mehreren Microservices: Crawler, Index, Webgui für die Crawler-Administration. Als Crawler kommt nutch (http://nutch.apache.org/) zum Einsatz, als Index Lucene/Solr (http://lucene.apache.org/solr/) und für die Webgui arbeite ich mit Vaadin 10 (https://vaadin.com/). Vaadin ist übrigens ein ganz grandioses java-basiertes Webframework, welchem ich definitiv auch noch den einen oder anderen Artikel widmen werde. Ich habe schon viele Applikationen/GUIs mit Vaadin entwickelt und es macht einfach unglaublich viel Spaß. Die neue Version 10 gefällt mir wirklich sehr gut.

Zurück zur Infrastruktur:

Die bisher vorhandenen Services betreibe ich derzeit auf einem Single Host System. Hierfür habe ich mir eine Cloud-Maschine bei Hetzner (https://www.hetzner.de/) gemietet. Diese sind wirklich sehr günstig und funktionieren auch einwandfrei. Der Support von Hetzner gefällt mir ebenfalls ausgesprochen gut.

Auf dieser Maschine starte ich meine Services (derzeit noch) via Docker Compose. Der Crawler hat ein Volume gemounted, wohin er seine Crawling-Ergebnisse schreibt. Der Index hat ein Volume gemounted, um dort beim Herunterfahren des Services einen Snapshot des Indexes zu speichern um diesen beim Hochfahren wieder einzulesen). Ansonsten kommuniziert der Crawler direkt mit dem Index. Die Administrations-GUI für den Crawler kommuniziert mit einer API, welche ebenfalls im Container-Service läuft.

Ich habe also bisher: drei Microservices, zwei Volumes, keine Datenbank-Anbindung.

Ich habe auf der Hetzner-Maschine einen apache eingerichtet welcher, je nach eingegebener (sub-)Domain eben auf die Webgui für den Crawler, die Webgui für den Index oder die (noch nicht vorhandene) Webgui für die Suchmaschine an sich weiterleitet.

Mein Plan war eigentlich, als nächstes weitere Maschinen bei Hetzner anzumieten um dort ein Kubernetes-Cluster aufzubauen, in welchem meine Services repliziert laufen. Hierzu hatte ich mir beispielsweise schonmal das Tool Kompose angesehen, mit welchem es möglich ist, den Inhalt einer Docker-Compose-Datei in entsprechende Kubernetes-Konfigurations-Files zu übersetzen. Ich hatte mir auch schon eine zweite Maschine angemietet und tatsächlich einen kleinen Cluster aufgebaut – inkl. rennendem Hello-World-Service.

Nachdem ich nun am DevOps Docker Camp teilgenommen habe und dort erstmalig die Verwendung von Docker Swarm Mode live miterlebt habe, habe ich mich nun dazu entschlossen, als Orchestrierungs-Tool doch erstmal Swarm Mode einzusetzen und meinen bisherigen Stack darauf ans laufen zu bekommen.

Eines der ersten Probleme, die ich in Angriff nehmen wollte: Volumes im Cluster.

Hierzu wollte ich zuerst meinen Crawler-Service dahingehend anpassen, dass dieser im Cluster laufen kann. Problem: Ich arbeite derzeit mit einem Bind Mount (was sowieso eine schlechte Idee ist). Nicht nur wird hierdurch das Volume gelöscht, wenn der Container gelöscht wird, der Service bindet sich auch explizit an ein Verzeichnis innerhalb des Hosts. Das ist Mist. Einem Service im Cluster sollte egal sein auf welchem Rechner er gerade läuft / angesprochen wird. Er sollte nichts über die Verzeichnisstruktur der einzelnen Hosts wissen. Ich möchte dem Service sagen: Hier ist dein Volume, schreibe die Daten da rein. Was hinter diesem Volume steckt, soll der Container gar nicht wissen. Es soll egal sein, ob der Service auf Maschine A, B oder C läuft. Er soll einfach clusterweit immer das selbe Volume zur Verfügung gestellt bekommen, damit er dort seine Daten reinschreiben kann.

Hierfür bieten sich im Docker-Cosmos named Volumes an. Diese haben den Vorteil, containerunabhängig existieren zu können (man kann sie in beliebige Container mounten). Weiterer Vorteil: Mit Hilfe von Volume Plugins kann man einem Volume nicht mehr nur ein bestimmtes Verzeichnis zuordnen, sondern beispielsweise Verzeichnisse, die gar nicht direkt auf dem Host liegen (NFS, …).

Man muss sich das klar machen: Wenn ich für einen Service ein Bindmount-Volume (mit beispielsweise dem Host-Verzeichnis /var/meinvolume und dem Containerverzeichnis /volume) verwende, sage ich dem Service: Lege deine Daten im Container im Verzeichnis /volume ab, sodass diese dann auf dem Host-Rechner (auf dem der Container läuft) im Verzeichnis /var/meinvolume abgelegt werden. Ein Container im Cluster sollte aber gar nicht wissen und es sollte ihn nicht interessieren auf welchem Rechner er gerade läuft. Selbst wenn mein Crawler zeitweise auf Rechner A, zeitweise auf Rechner B und zeitweise auf Rechner C läuft, so möchte ich doch die gecrawlten Daten nicht verteilt auf Rechner A, Rechner B und Rechner C haben. Ich möchte EINEN Ort haben, wo DIE gecrawlten Daten zu finden sind.

Nun habe ich überlegt, wie ich das am besten realisieren kann. Ich muss dazu sagen, ich habe hier keinerlei Vorerfahrung gehabt und da das Thema Docker Plugins / Volume Plugins im DevOps Docker Camp leider nicht bearbeitet wurde, musste ich mich erstmal anderweitig informieren, was ich tun kann. Ich bin hierbei durch ein ziemliches Tal der Schmerzen gegangen – so viel steht fest. Vielleicht kann ich das dem ein oder anderen ersparen indem ich meinen (Irr)-Weg hier festhalte:

Ich wollte also die Crawler-Daten nicht verteilt auf meinen Cluster-Maschinen wissen. Ich wollte eine zentrale Stelle definieren, wo die Daten abgelegt werden sollen. Und ich wollte ein Volume erstellen, welches ich dem Container zur Verfügung stelle, sodass die Daten (egal auf welchem Rechner der Service läuft) immer an der gleichen Stelle abgelegt werden.

Hierbei war meine erste Idee: Beim Anlegen der Hetzner-Maschine hatte ich ausgewählt, dass der Speicherplatz als CEPH angelegt werden soll. Ich wusste, dass es Docker Volume Plugins für CEPH gibt und wollte entsprechend diesen CEPH-Speicher nutzen. Das habe ich schnell aufgegeben, da ich mich mit CEPH gar nicht auskenne, und ich nichtmal herausgefunden habe, wie ich an die Zugangsdaten hierfür komme.

Meine nächste Idee war: Ich nehme ein Amazon S3-Bucket (https://aws.amazon.com/de/s3) und erstelle mit Hilfe eines passenden Volume Plugins ein Volume, welches die Daten dann eben genau in diesem S3-Bucket ablegt. Ich stellte schnell fest, dass S3 nicht das richtige für mich ist. Hierbei handelt es sich meiner Meinung nach eher um Cloud-Speicher oder meinetwegen eine SNAPSHOT/Backup-Ablage.

Ich bin dann auf Amazon EBS (https://aws.amazon.com/de/ebs) gestoßen. Dies schien mir schon eher zu meinem Use Case zu passen, doch: Ich habe kein entsprechendes Volume Plugin zum laufen gebracht. Rexray konnte ich nicht erfolgreich installieren und ich wollte auch nicht mit Docker for AWS arbeiten. Denn ich wollte ja bei Hetzner bleiben und lediglich für mein Volume auf eine Amazon Komponente zugreifen (und nicht etwa mit meinem Cluster zu Amazon EC2 wechseln).

Als nächstes wurde ich auf DigitalOcean aufmerksam. Hier kann man sich sowohl virtuelle Maschinen (Droplets) anlegen, als auch Volumes, welche man (optional) Droplets zuordnen kann. Ich sah, dass es für DigitalOcean Volumes ebenfalls Docker Volume Plugins gab. Also habe ich mir testhalber einen DigitalOcean-Account angelegt und dort ein Volume erstellt (Zufällig hatte ich neulich das Humble Software Bundle gekauft, in welchem unter anderem 50$ DigitalOcean Guthaben enthalten waren :D). Um das Docker Volume Plugin zu testen, habe ich mir testhalber auch eine virtuelle Maschine bei DigitalOcean hochgezogen. Nach Anlage habe ich dort Docker installiert – samt entsprechendem Volume Plugin (https://github.com/omallo/docker-volume-plugin-dostorage) und was soll ich sagen: Es funktionierte einfach! Die Plugin-Installation war schmerzfrei und ich konnte einen Container Starten, ihm das Named Volume zuordnen und Dateien reinschreiben, welche dann im Volume waren. Das hat mich wirklich begeistert.

Ich bin dann zurück zu meiner Hetzner-Maschine, habe dort das DigitalOcean-Volume-Plugin installiert und wollte dort dann auch ein Named Volume anlegen, welches auf das DigitalOcean-Volume verweist. Das hat nicht funktioniert und ohne mich in der Tiefe damit beschäftigt zu haben, so glaube ich, dass das Plugin tatsächlich nur dazu fähig ist, auf Droplets von DigitalOcean korrekt zu funktionieren.

Ich habe mich dann erkundigt, ob es bei Hetzner auch eine Möglichkeit gibt „Volumes“ wie bei DigitalOcean anzulegen: Gibt es nicht. Jedenfalls nicht für die Cloud-Maschinen. Wer sich näher dafür interessiert wie man etwas ähnliches bei Hetzner realisieren kann, dem sei dieser Artikel ans Herz gelegt: http://kartoza.com/en/blog/using-a-sambacifs-mount-as-a-docker-volume/ . Ein Prima-Artikel der mir sehr geholfen hat. Der mich aber auch darin bestärkt hat, Hetzner „Lebe Wohl!“ zu sagen und stattdessen auf DigitalOcean umzusteigen.

Hier sind die Maschinen in der Tat etwas teurer als bei Hetzner (die billigsten gibt es für ~5$/Monat), aber dafür hat man hier auch mehr Optionen. Außerdem arbeitet DigitalOcean gerade an einer Kubernetes-Integration, welche ich gespannt verfolgen werde.

Ich habe heute übrigens ein Terraform-Script eingerichtet, welches mir bei DigitalOcean entsprechend viele Maschinen hochzieht und diese direkt mit Docker, Docker-Compose und dem Docker Volume Plugin für DO bestückt. Ich kann schon jetzt sagen: Ich liebe Terraform (https://www.terraform.io/) und bedanke mich recht herzlich bei Erkan Yanar – dem Trainer des DevOps Docker Camps – für die Inspiration!

Ich ziehe nun also von Hetzner zu DigitalOcean weiter und werde hier weiter berichten, wie meine Erfahrungen dort sind.

UPDATE: Ich habe meine Services inzwischen im Swarm Mode Cluster auf DigitalOcean ans laufen bekommen und habe auch die Volume-Problematik bereits gelöst. Allerdings bin ich nicht bei dem Docker-Volume-Plugin für DigitalOcean-Spaces geblieben (Problem war, dass ein Space jeweils nur einem einzigen Droplet zugeordnet werden konnte..ich hatte es mir eher so vorgestellt, dass wenn ich 3 Swarm Mode Nodes habe, dann allen dreien den selben Space zur Verfügung stellen kann). Stattdessen installiere ich nun auf allen Master-Nodes einen GlusterFS-Server-Verbund mit zwei Volumes (crawler und index) und auf allen Worker-Nodes installiere ich den GlusterFS-Client und mounte dort jeweils die GlusterFS-Volumes, sodass im Endeffekt auf jedem Worker beide Volumes zu jeder Zeit im selben Zustand vorhanden sind. Mehr dazu findet ihr in folgendem Blog-Post: CI/CD-Pipeline for a java microservice application running on Docker Swarm mode cluster on DigitalOcean with Maven/Docker/Gitlab/Terraform/Ansible

DevOps Docker Camp – Fazit

Ich habe vom 05.06 – 07.06 am „DevOps Docker Camp“ in München teilgenommen. Hier möchte ich nun meine Eindrücke schildern.

Es war das erste Seminar der „entwickler akademie“ (Software & Support Media GmbH) an welchem ich teilgenommen habe. Der Preis belief sich auf 1899€ (ohne MwSt.) im Early Bird – Tarif (Normalpreis 1999€ ohne MwSt.). Des Seminar wurde geleitet von Erkan Yanar (http://linsenraum.de/).

Warum ich daran teilnehmen wollte: Ich arbeite derzeit sowohl privat als auch beruflich viel mit Docker. Ich interessiere mich sehr für Microservices, Container und entsprechender Orchestrierung. Damit zusammenhängend beschäftige ich mich derzeit auch viel mit Infrastructure as Code und dynamischen automatisierten CI/CD-Pipelines.

Inhalt des Seminars

Das detaillierte geplante Programm kann auf https://devops-training.de/programm/ eingesehen werden.

Tag 1 – Grundlagen

Im Prinzip sollte laut Planung der erste Tag aus einer Einführung in den Docker-Cosmos bestehen. Was ist ein Container, was ist ein Image, was ist Docker, was ist der Unterschied zur Virtualisierung.. die grundlegenden Dinge eben. Ich finde, das alles wurde ordentlich vom Trainer erklärt. Da ich bereits einige Erfahrung mit Docker habe, konnte ich aus dem ersten Tag leider nur vereinzelt Informationen ziehen die wichtig und für mich neu waren. Um nur ein kleines Beispiel zu nennen: Mir war nicht bewusst, dass Docker für jeden Container einen Ordner auf dem Host anlegt, unter welchem man z.B. auch die Logs des Containers einsehen kann.. wirklich hilfreich.

Tag 2 – Applikationen

Der zweite Tag sollte laut Planung interessanter werden – also auch für diejenigen, welche die Grundlagen bereits beherrschen. Was mich am geplanten Programm besonders reizte waren Buzzwords wie „Stateful/Stateless Container“ (was ich als Datenbankanbindung im Container-Universum interpretierte), Orchestrierung von Microservices, Build-Pipeline. Ich arbeite derzeit selber privat an einer Applikation, welche aus einer Hand voll Microservices besteht, welche bisher aber als Single-Host-Applikation (mit Docker-Compose) läuft.. unter anderem mit diversen Volumes, aber noch ohne Datenbankanbindung. Hier erhoffte ich mir vom Seminar wertvolle neue Erkenntnisse in Bezug auf Persistenzanbindung.  Auch in Bezug auf den Bereich „Build Pipeline“ erhoffte ich mir beispielsweise so etwas wie ein Beispiel, wie man eine dynamische CD-Pipeline aufbaut. Direkt zum Anfang der Schulung hatte ich beispielsweise meinen ersten Aha!-Moment, als der Trainer durchzählte wie viele Teilnehmer wir sind und dementsprechend mittels eines Kommandos (Terraform) entsprechend viele Maschinen im DigitalOcean hochzog (inklusive installiertem Docker, docker-compose, etc…). Leider kamen wir thematisch am zweiten Tag nicht wirklich gut voran. Es gab viele Nachfragen, wodurch der Trainer nur langsam in der Agenda voran kam. Volumes wurden zwar vorgestellt – insbesondere auch der Unterschied zwischen Bind Mount und Named Volumes (und warum Bind Mounts böse sind), jeoch wurde beispielsweise gar nicht auf Docker Plugins in Bezug auf Volumes eingegangen, oder wie man Volumes in einem Cluster handelt (ich hoffte, dies würde am Tag 3 im Rahmen von Docker Swarm Mode thematisiert). Ich muss zugeben – zur Halbzeit des zweiten Tages war ich etwas enttäuscht, weil es nur so langsam voran ging und für mich nicht viel neues dabei war. Das mache ich explizit nicht dem Trainer zum Vorwurf, denn es waren nunmal einige Teilnehmer dabei, die keine Vorerfahrung hatten (welchen ich das auch nicht zum Vorwurf mache). Evtl. wäre es eine Überlegung wert, das Docker Camp aufzuteilen in zwei Versionen – für Anfänger und Fortgeschrittene.

Tag 3 – Docker im Cluster

Am Ende des zweiten Tages versuchte der Trainer dann doch das Tempo anzuziehen, da man nun merkte, dass wir deutlich im Verzug waren was die Agenda anging. Am Ende von Tag 2 waren wir dann allerdings wieder im Plan und so konnte Tag 3 direkt mit den geplanten Themen für Tag 3 beginnen. Vom dritten Tag erhoffte ich mir dann Erkenntnisse / Hilfen in Bezug darauf, wie ich meine Single Host Applikation (docker compose) mittels Docker Swarm Mode in ein Cluster überführen kann. Noch lieber wäre mir stattdessen eine Einführung in Kubernetes gewesen, aber das war eben nicht Teil der Agenda und hierfür gibt es auch ein eigenes Seminar – ebenfalls mit Erkan Yanar. Und es ist natürlich auch utopisch, an einem einzelnen Tag vermitteln zu können wie Kubernetes funktioniert und wie man damit arbeitet. Also eben erstmal Docker Swarm Mode. Was ich hierbei lernte war, dass es angenehm einfach ist diesen zu verwenden und dass es wohl für meine Belange erstmal absolut reicht, diesen zu verwenden. Auch der Trainer war der Meinung, dass man eigentlich nichts falsch macht, wenn man im kleineren Rahmen erstem Docker Swarm Mode verwendet – zum die Lernkurve extrem flach ist und man somit nicht viel Zeit reinstecken muss, um den Cluster ans laufen zu bekommen. Somit habe man auch nicht viel Zeit verloren, wenn man später zum Schluss kommt, dass Kubernetes doch besser geeignet ist. Der dritte Tag war insgesamt vollgepackt mit lehrreichen Informationen. Ich kann übrigens jedem nur empfehlen, wenn man sich in Docker-Cluster einlesen möchte mal ein wenig mit https://labs.play-with-docker.com/ zu spielen. Es ist genial, wie einfach man hier ein paar Maschinen hochziehen und darauf einen Cluster initialisieren kann. Zum Ende des Tages musste der Trainer leider nochmals das Tempo anziehen um uns die Dinge zu zeigen, von denen er der Meinung war, dass wir das unbedingt gesehen haben sollten (ELK-Stack, Prometheus, …). Das war alles interessant, aber zum Schluss war dem Trainer kaum noch zu folgen. Hier werde ich nochmal einiges in Ruhe nacharbeiten müssen.

Und sonst so?

Leistungen die in den Seminarkosten enthalten waren (abgesehen von der Schulung selbst):

  • Tägliches Mittagessen: Drei Gänge mit Suppe, Hauptgang und Dessert (Das Essen war verdammt gut!)
  • Get Together am ersten Tag mit kostenlosen Getränken / Snacks
  • Dauerhafter Zugang (im Schulungszeitraum) zu Kaffee / Wasser / Säften und Snacks
  • Ein Jahr Gratis-Abonnement einer Software & Support-Media-Zeitschrift (Auswahl aus: Java-Magazin / Entwickler Magazin / Windows Entwickler / noch irgendwas). Was ich toll fand, war, dass obwohl ich das Java-Magazin bereits abonniert habe, ich das kostenlose Abo-Jahr quasi an mein derzeitig bezahltes Abo anhängen konnte).

Leistungen die nicht enthalten waren:

  • Unterkunft (es gab einen etwas billigeren Zimmerpreis für Seminarteilnehmer)

Das Camp fand in München statt – genauer gesagt Feldkirchen. Ich muss hier wirklich eine Lanze für den Tagungsort – Das Bauer Hotel Feldkirchen – brechen. Das Zimmer war prima und das Essen äußerst lecker. Schade war, dass der S-Bahnhof genau zum Seminarzeitraum umgebaut wurde und somit außer Betrieb war. Aber es gab eine Busverbindung direkt vom Hotel zur Messestadt Ost, von wo man dann mit der Ubahn weiter nach München Mitte kommt. Das Wetter war abgesehen von einem Gewitter am zweiten Abend ein Traum! Der Pool und die Sauna (im Preis inbegriffen) haben auch sehr gefallen. Das Frühstück war – wie sämtliches Essen dort – richtig gut.

Fazit

Insgesamt hat sich das Seminar für mich gelohnt – auch wenn ich mir ehrlich gesagt ein wenig mehr davon versprochen hatte. Meinerseits hätten die Grundlagen gerne etwas zügiger abgehandelt werden können um dafür mehr Zeit für die fortgeschritteneren Themen zu haben (vielleicht war auch einfach die Teilnehmer-Anzahl von ca. 15 Leuten etwas zu hoch. Bei weniger Teilnehmern gibt es auch weniger Nachfragen). Aber das ist eben ein grundlegendes Problem, wenn man einige fortgeschrittene Teilnehmer hat und einige, die noch gar kein Vorwissen haben. Was ich auch etwas zu viel fand, waren die Pausen. Es gab über den Tag verteilt drei Pausen: Morgens nach 1,5 Stunden eine halbe Stunde. Mittags zum Essen eine Stunde und Nachmittags nochmal eine halbe Stunde. So blieben pro Tag nur maximal 6 Stunden. Was ich super fand: Der Trainer hat am Anfang gefragt, was die Teilnehmer sich von der Schulung genau erhoffen und da einige Teilnehmer auch Interesse an Kubernetes zeigten, versprach der Trainer, immer wenn es sich anbietet, auch Kubernetes einzubeziehen – natürlich nicht praktisch, aber doch zumindest im Gesamtkontext. Das tat er dann auch. Generell hat es viel Spaß gemacht dem Trainer zuzuhören. Man konnte ihm gut folgen und er hat die Dinge gut herübergebracht.

Der Preis liegt mit über 2200€ inkl. MwSt. natürlich extrem hoch. Inklusive dreitägiger Unterkunft kratzt man hier schon an den 3000€. Das muss jeder selber wissen, ob man bereit ist, diesen Preis zu zahlen.

Ich bin zur Zeit am überlegen, ob ich dieses Jahr auch nochmal am DevOps Kubernetes Camp (https://devops-kubernetes-camp.de) teilnehme. Dies ist quasi eine Folge-Veranstaltung vom selben Veranstalter und mit dem selben Trainer (zum selben Preis). Wäre der Preis etwas niedrigerer würde ich gar nicht großartig zögern, da mich der Trainer und auch der Veranstalter wirklich überzeugt haben. Aber so werde ich erst nochmal 1-2 Nächte darüber schlafen. Eine Ermäßigung für das Kubernetes Camp für Teilnehmer des Docker Camps fände ich eine prima Sache.

So viel zu meinen Eindrücken bzgl. des Docker Camps. Vielleicht hilft das ja dem ein oder anderen Leser zu entscheiden ob das auch etwas für ihn / sie sein könnte.

Scan_0001

EINS

Hallo! Wie auch immer du hier her gefunden hast: Sei gegrüßt! Du bist auf dem Blog eines passionierten Softwareentwicklers gelandet. Hier geht es (in der Regel) um Themen rund um die Softwareentwicklung. Zum Zeitpunkt der Veröffentlichung dieses Blogposts ist hier noch nichts zu finden – denn es ist der erste!

Vielleicht nochmal ein paar Worte zu mir: Mein Name ist Marco Ebbinghaus (~30), ich komme ausm Ruhrpott und bin (unter anderem) ein Nerd mit Hang zum programmieren. Was meine Bildungs-Laufbahn angeht: Erstmal habe ich eine Ausbildung zum IT-Assistenten abgeschlossen, dann habe ich den Bachelor of Science für Angewandte Informatik gemacht (inkl. halbjährigem Praxissemester bei einer mittelständischen Softwarebude mit ~8 Leuten in München). Beruflich habe ich einen Ausflug als Consultant (Projektarbeit) hinter mir und war/bin seitdem in 1-2 weiteren mittelständischen Unternehmen als Java-Entwickler tätig. Da ich also viel Zeit mit allen möglichen Themen rund um die Softwareentwicklung verbringe, passieren mir oft Dinge und ich erlebe häufig WTF-Momente, von denen ich denke, dass man sie irgendwie festhalten sollte. Außerdem passiert es mir regelmäßig, dass ich im Netz nach Sachen suche und nichts finde was mir wirklich helfen würde. In der Regel komme ich dann trotzdem irgendwann voran und schon häufig dachte ich mir in solchen Situationen: Das sollte man eigentlich mal ins Netz stellen.. denn es werden bestimmt noch andere außer mir auf dieses Problem stoßen. Und Zeit ist kostbar..reicht ja wenn einer durchs Tal der Tränen muss.

Derzeit beschäftige ich mich viel mit Themen wie Softwarecraftmanship / Clean Code / TDD. Die „Yes, es funktioniert! Was gibts als nächstes?“ – Phase habe ich hinter mir würde ich sagen. Inzwischen interessiere ich mich eher für Dinge wie: Was ist saubere Software-Architektur? Was macht professionelle Softwareentwicklung aus? Was für Entwicklungsformen gibt es? Was wartet hinter dem Tellerrand? Außerdem fröne ich derzeit dem Microservice-Hype der Thematik rund um Microservices, Container-Technologie und allem was dazu gehört. Auch das (sicherlich damit zusammenhängende) Thema DevOps reizt mich sehr.

Ich bin nächsten Monat auf einem dreitägigen Seminar („Intensiv-Training“) bzgl. Docker. Ich bin wirklich gespannt wie das so wird. Wenn es so gut wird, wie es teuer ist, bin ich sehr zufrieden. Derzeit arbeite ich an einer Applikation die ich bewusst als Microservice-Architektur aufziehe und ein paar habe ich sogar schon live – wirklich spannend! Im Umgang mit einzelnen Microservices in Verbindung mit Docker-Compose bin ich also schon ein ordentliches Stückchen weit gekommen. Aber ich denke in die Tiefe gehend, gibt es hier noch viel zu entdecken (Container-Orchestrierung etc. steht dann so als nächstes an). Vielleicht werde ich meinen ersten „richtigen“ Blogpost diesem Seminar widmen.. mal sehen.

Es wird dich hier jedenfalls ein buntes Themen-Potpourri erwarten. Viel Spaß damit! Und falls du aufgrund eines Blogposts via Google hier gelandet sein solltest und eine Lösung für dein Problem gefunden hast – oder falls dir einfach danach ist: „Lass doch ’nen Like und/oder nen Kommi da!“

beggars_o_833625