In this blog post I will describe how you can realize a solution that:
- automatically (by pushing to master) creates a running docker swarm mode cluster with multiple master nodes and multiple worker nodes on DigitalOcean.
- additionally automatically creates a HAProxy – load balancer in front of your swarm mode cluster to do the load balancing.
Some used frameworks / libraries / tools are:
- DigitalOcean – where our infrastructure is created
- gitlab – where the code is hosted and the CI/CD-Pipeline creating the infrastructure and deploying our docker services is running
- HAProxy as the load balancer
- terraform – to describe our infrastructure as code and using the DigitalOcean-API to create that infrastructure
- docker swarm mode as the container orchestrator
- traefik – as the reverse proxy for our docker services inside the swarm mode cluster
I uploaded an example repository on github which you can clone and try on your own. The things you will have to do to get the github example running are:
- have/create an account on DigitalOcean
- have/create an account on Gitlab
- create the needed environment variables in Gitlab Settings
Please be aware of the fact, that the code will create droplets on DigitalOcean which of course will produce costs.
You can start the magic by navigating to .infrastructure/live/cluster and run the commands terraform init, terraform plan, terraform apply by hand or maybe you want to copy the repository to your own gitlab account – then you can start the automated pipeline simply by using the Gitlab CI tools (have a look at .gitlab-ci.yml where the pipeline elements are configured). Make sure to set all needed environment variables (defined in vars.tf in the github repository) with corresponding values. Those environment variables must start with TF_VAR_ to be recognized by terraform – e.g. DO_TOKEN must be exported as TF_VAR_DO_TOKEN.
I extracted / broke down that minimal example from the main project I am working on right now.
As always I don’t proclaim my solution as the all-time best possible solution ever. It’s more like a documentation for myself and maybe someone who tries something similar gets some inspiration from my approach.
DigitalOcean offers loadbalancers theirselves for 20$ per loadbalancer per month. The GUI looks pretty easy to handle and I am sure it is a great product that just works – as all products that I’ve already tried. But this blog post will show the „do it yourself“ – approach instead.
What will be done:
- Transfer management of the domain from the original domain registrar to DigitalOcean
- create terraform code to create (on DigitalOcean):
- Domain „my-domain.de“
- Domain-Record of type A with the load balancer droplets IP
- 5 Droplets (3 docker swarm master nodes, 2 docker swarm worker nodes)
- Droplet which will work as the load balancer (HAProxy) to route the incoming requests to one of the master nodes, from which the reverse proxy traefik will guide the incoming requests to one of the services running on the worker nodes.
Transfer management of the domain from the original domain registrar to DigitalOcean
DigitalOcean suggests that if you want to manage your DNS records via DigitalOcean (by API / GUI) you’ll need to point to the DigitalOcean name servers from your registrar. I buyed my domain on Strato (german) and the screen where I entered the DO name servers looked like the following:
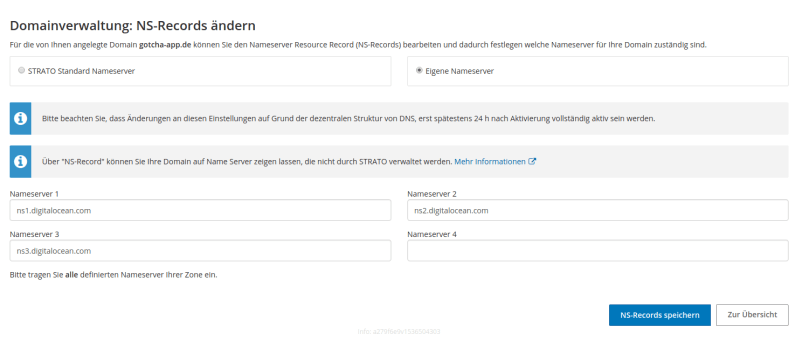
That’s it! (It might need some time up to two days until that is applied)
Create terraform code
So now that we can use DigitalOcean to manage the domain, let us create the infrastructure code for terraform to create everything we need to get our load balancer running, couple it to the domain and dispatch requests to our swarm master nodes.
So, let’s have a look at the relevant code – two files: domain.tf and loadbalancer.tf.
The code creating the swarm mode cluster with our master- and worker-nodes can be found in the github repository – I will leave it out here to concentrate on the load balancing stuff, but please feel free to ask questions and/or leave comments regarding the swarm cluster infrastructure code.
domain.tf
resource "digitalocean_domain" "gotchadomain-main" {
  name       = "gotcha-app.de"
  ip_address = "127.0.0.1"
}
As you can see there is no special magic in the code for creating our domain. The only thing to mention here is the ip_address attribute. In the current version of terraform the ip_address-attribute is marked as required. But in the DigitalOcean-API the only required field is the „name“. During the execution of our infrastructure code we don’t even have created the load balancer droplet and so we don’t know its IP yet. Therefore we are creating the domain with a dummy IP (which results in creating an A-Record with that IP) and later (see the following remote-exec block of loadbalancer.tf) we update that created A-Record with the real IP of the load balancer droplet.
loadbalancer.tf
resource "digitalocean_droplet" "gotcha-loadbalancer" {
  image = "ubuntu-16-04-x64"
  name = "gotcha-loadbalancer"
  region = "${var.DO_REGION}"
  size = "${var.DO_SIZE}"
  private_networking = true
  ssh_keys = [
    "${var.DO_KEYFINGERPRINT}"
  ]
  depends_on = [
    "digitalocean_droplet.gotchamaster-final",
    "digitalocean_domain.gotchadomain-main"
  ]

  connection {
    user = "root"
    type = "ssh"
    private_key = "${file(var.DO_PRIVKEY)}"
    timeout = "2m"
  }

  provisioner "remote-exec" {
    inline = [
      "apt-get update",

      # when creating the DigitalOcean domain via terraform (see gotcha-domain.tf), we are forced to enter an ip_address - even though
      # it is not required within the DigitialOcean API. This is a bug in terraform which will be fixed in the upcoming release
      # (see https://github.com/terraform-providers/terraform-provider-digitalocean/pull/122
      # / https://github.com/terraform-providers/terraform-provider-digitalocean/issues/134)
      # here we are updating the dummy 127.0.0.1 - IP-address with the real IP of the load balancer droplet
      "apt-get install jq -y",
      "LOADBALANCER_A_RECORD_ID=$(curl -sX GET https://api.digitalocean.com/v2/domains/${digitalocean_domain.gotchadomain-main.name}/records -H \"Authorization: Bearer ${var.DO_TOKEN}\" | jq -c '.domain_records[] | select(.type | contains(\"A\")) | select(.data | contains(\"127.0.0.1\"))'.id)",
      "curl -X PUT -H \"Content-Type: application/json\" -H \"Authorization: Bearer ${var.DO_TOKEN}\" -d '{\"data\":\"${self.ipv4_address}\"}' \"https://api.digitalocean.com/v2/domains/${digitalocean_domain.gotchadomain-main.name}/records/$LOADBALANCER_A_RECORD_ID\"",
      "apt-get update -y",
      "apt-get install haproxy -y",
      "printf \"\n\nfrontend http\n\tbind ${self.ipv4_address}:80\n\treqadd X-Forwarded-Proto:\\ http\n\tdefault_backend web-backend\n\" >> /etc/haproxy/haproxy.cfg",
      "printf \"\n\nbackend web-backend\" >> /etc/haproxy/haproxy.cfg",
      "printf \"\n\tserver gotchamaster00 ${digitalocean_droplet.gotchamaster-first.ipv4_address}:80 check\" >> /etc/haproxy/haproxy.cfg",
      "printf \"\n\tserver gotchamaster-final ${digitalocean_droplet.gotchamaster-final.ipv4_address}:80 check\" >> /etc/haproxy/haproxy.cfg",
    ]
  }

}

resource "null_resource" "gotcha-master-ips-adder" {
  count = "${var.DO_MASTERCOUNT - 2}"
  triggers {
    loadbalancer_id = "${digitalocean_droplet.gotcha-loadbalancer.id}"
  }
  connection {
    user = "root"
    type = "ssh"
    private_key = "${file(var.DO_PRIVKEY)}"
    timeout = "2m"
    host = "${digitalocean_droplet.gotcha-loadbalancer.ipv4_address}"
  }
  depends_on = ["digitalocean_droplet.gotcha-loadbalancer"]

  provisioner "remote-exec" {
    inline = [
      "printf \"\n\tserver ${format("gotchamaster%02d", count.index + 1)} ${element(digitalocean_droplet.gotchamaster.*.ipv4_address, count.index)}:80 check\" >> /etc/haproxy/haproxy.cfg",
      "/etc/init.d/haproxy restart"
    ]
  }

}
Let’s focus on the remote-exec block which is the relevant part: First we are updating the A-Record of our created domain with the IP of our now created load balancer droplet (using the DigitalOcean-API).
After updating the A-Record, there are two things left to do:
- install HAProxy
- modify the config file of the HAProxy (/etc/haproxy/haproxy.cfg) to match our needs.
After executing the terraform file the haproxy.cfg file will contain a frontend and a backend as in the following screenshot.

The frontend says: Take incoming requests against the load balancer machine (138.198.181.146 in this case) and forward them to the backend.
In the backend section you can see, that all our docker swarm mode master nodes are listed with their IPs. So all requests against the load balancer are now forwarded to one of our master nodes.
The null resource part at the end of the gotcha-loadbalancer.tf seems a bit tricky at first, but it’s easy if you know what it is for: We want all our swarm mode master node IPs to be listed in the backend configuration part of haproxy.cfg. If you have a look into the full terraform code on github, you can see, that the first and the last master nodes are static (we will always have at least those two master nodes). But there is a third master node resource called gotcha-master.tf. With that you can configure how much more master nodes we want to create (additionally to the first and the last). And because the count of those additional master nodes is dynamic / configurable, we need to loop over those resources and append one line containing the IP of each additional master droplet to the backend section and then we do a restart of the HAProxy.
Finally, we have a HAProxy – load balancer which takes all the requests from the internet, and forwards the requests to the master nodes of our swarm mode cluster. In the github example I am then using the traefik reverse proxy, which is configured to take the requests sent from the load balancer and forward it to a frontend where a whoami-image is running – which simply responds with the container ID of the worker node, which the requests was forwarded to. If you are interested in that part, have a look at the full example on github – especially the docker-compose.yml.
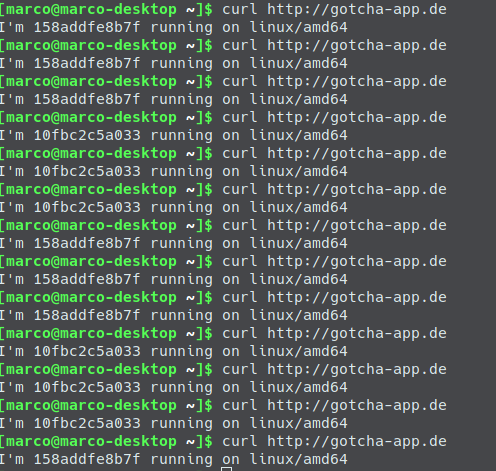
If you connect to one of your master nodes and inspect what’s going on, you can see that traefik is running on the three master nodes, and the whoami service is running on two worker nodes.

When you now curl against your domain, you will see how the requests are forwarded from the load balancer to traefik and from there to a matching container running on the worker nodes.
What’s missing in this example is the SSL part (to keep it short). In my project I am using LetsEncrypt-certificates which I host on my aws S3 bucket and which are downloaded to the loadbalancer droplet during the creation and which then are used in the haproxy.cfg. This results in a secure connection between the user requests and the load balancer. You can then decide if you want to secure the communication between your microservices behind the load balancer, too.
If you are interested in seeing the full code and try it on your own have a look at: https://github.com/marcoebbinghaus/loadbalancerAndSwarmClusterOnDO

[…] my last blog post I wrote about how to put a load balancer (HAProxy) in front of a docker swarm cluster with multiple manager nodes…. That blog post was using the reverse proxy traefik inside the docker swarm mode to dispatch user […]
LikeLike