Use DigitalOcean Volumes to backup your droplet’s data (by example)

In this tutorial we will create an automated pipeline which creates three droplets on DigitalOcean. We will have a script running on each droplet, which will create important files constantly. To backup those file regularly we will extend our infrastructure code to not only create three droplets, but also one DigitalOcean Volume for each droplet. Volumes offer block storage which can simply be mounted to our droplets. Perfect to keep our backups.

When the droplets are destroyed/recreated (when changing the droplet’s infrastructure code) the worker scripts running on our droplets will look for backups in the mounted DigitalOcean Volume so that it can continue from the last backups state.

To let terraform (the tool that will automatically create/manage our infrastructure on AWS and DigitalOcean as we described it in our infrastructure code) always know about the current state of all our infrastructure resources (droplets and volumes) we will use an AWS S3 bucket as a terraform backend to save the terraform.tfstate.

What you need if you want to try out this example for yourself is an account for Amazon AWS (access key and secret key) and a DigitalOcean account. AWS offers a free tier where you are allowed to create S3 buckets without costs as long as you don’t upload more than 5GB. If you don’t have a DigitalOcean account yet, feel free to use my referral link and get 100$ credit for free to try things out without costs:  Create account

So let us directly jump into action. The steps we will do are the following:

  1. Create the infrastructure code which will create our droplets and volumes and mount the volumes onto the corresponding droplets.
  2. create the worker script which will run on each droplet and create the files we want to backup.
  3. create a cronjob which will do the backups in regular intervals
  4. create the gitlab-ci.yml which will contain the code describing what our pipeline should do (execute terraform to build our infrastructure).

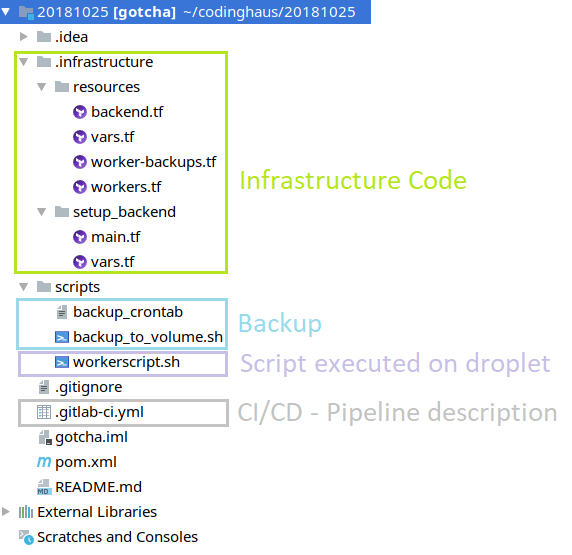
Here is an overview of the complete project (you can find the project here on gitlab):

project

Let us start:

Create the infrastructure code

The infrastructure code is split into two folders. First let us have a look at ’setup_backend‘:

provider "aws" {
  region = "${var.AWS_REGION}"
  access_key = "${var.AWS_ACCESSKEY}"
  secret_key = "${var.AWS_SECRETKEY}"
}

resource "aws_s3_bucket" "terraform_state" {
  bucket = "${var.AWS_BUCKET_NAME}"

  versioning {
    enabled = true
  }

  lifecycle {
    prevent_destroy = true
  }
}

It only contains the S3 bucket resource. So the only purpose is to create that bucket. In our pipeline code, we will add an if statement where we will check if the S3 bucket already exists. And only if it doesn’t exist we will tell terraform to create that resource.

You can find the if-statement in the code snippet from our gitlab-ci.yml below. It looks like:

if aws s3api head-bucket --bucket "de.codinghaus.s3" 2>/dev/null ; then echo "Skipping Backend-Creation, S3-Bucket already existing!"; else cd setup_backend && terraform init && terraform plan && terraform apply -auto-approve && cd ..; fi

If you wonder where the variables come from, have a look at vars.tf:

variable "AWS_REGION" {}
variable "AWS_TF_STATEFILE" {}
variable "AWS_BUCKET_NAME" {}
variable "AWS_ACCESSKEY" {}
variable "AWS_SECRETKEY" {}

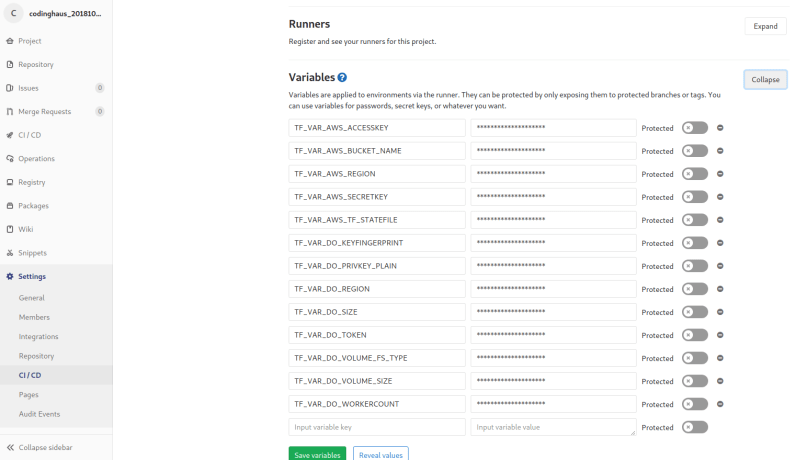
Yes, they are empty. We do not want our AWS-Keys to appear in our source code. So what we do is the following: We use gitlab CI/CD environment variables which can be found at „Settings“ –> „CI/CD“ –> „Variables“. There we can add environment variables which are available on the pipeline runners, where our pipeline code is executed. terraform will now recognize, that we defined variables in vars.tf. Then it will try to find values for those variables. As we didn’t set values at the definition, terraform will next search for environment variables in the form of TF_VAR_. So e.g. for AWS_REGION terraform will look for an environment variable TF_VAR_AWS_REGION. As terraform is executed on the gitlab runner, we only have to define the needed gitlab environment variables and terraform will find them including their values:

environmentvariables

‚resources‘ is the main folder which contains the code for three droplets, three volumes and the attachments from droplet to volume. It also contains the definition of the backend resource (in our case the S3 bucket).

First let us have a look at the droplet resources in workers.tf:

provider "digitalocean" {
  token = "${var.DO_TOKEN}"
}

/* here we tell terraform to create three droplets (as we defined
the gitlab environment variable TF_VAR_DO_WORKERCOUNT = 3). The names
will be worker0X (worker01, worker02 and worker03).*/
resource "digitalocean_droplet" "worker" {
  image = "ubuntu-16-04-x64"
  name = "${format("worker%02d", count.index + 1)}"
  count = "${var.DO_WORKERCOUNT}"
  region = "${var.DO_REGION}"
  size = "${var.DO_SIZE}"
  private_networking = true
  ssh_keys = [
    "${var.DO_KEYFINGERPRINT}"
  ]
  connection {
    user = "root"
    type = "ssh"
    private_key = "${file("~/.ssh/id_rsa")}"
    timeout = "2m"
  }

/* now we will copy the workerscript and the the backup /cronjob stuff
onto the droplet)
  provisioner "file" {
    source = "../../scripts/workerscript.sh"
    destination = "/workerscript.sh"
  }

  provisioner "file" {
    source = "../../scripts/backup_to_volume.sh"
    destination = "/etc/backup_to_volume.sh"
  }

  provisioner "file" {
    source = "../../scripts/backup_crontab"
    destination = "/etc/cron.d/backup_crontab"
  }

/* as the last step during the droplet creation, we give all scripts
the execute flag, install zip which is needed the create the
backups in zipped form and run the workerscript (see below). /*
provisioner "remote-exec" {
  inline = [
    "sleep 10",

    "chmod +x /workerscript.sh",
    "chmod +x /etc/backup_to_volume.sh",
    "chmod +x /etc/cron.d/backup_crontab",

    "apt-get install zip -y",

    "nohup bash /workerscript.sh &",
    "sleep 2"
  ]
}
}

Now, that the droplets are created, let us have a look at the code describing our volumes:

/* the first resource block describes our volumes. It will be executed
after the droplet creation has finished (see the depends_on attribute).
the name of each volume will be worker0X-backup. */
resource "digitalocean_volume" "worker-backup-volume" {
  count = "${var.DO_WORKERCOUNT}"
  region = "${var.DO_REGION}"
  name = "${format("worker%02d", count.index + 1)}-backup"
  size = "${var.DO_VOLUME_SIZE}"
  initial_filesystem_type = "${var.DO_VOLUME_FS_TYPE}"
  depends_on = ["digitalocean_droplet.worker"]

/* this ensures that terraform will never try to destroy/recreate
our volumes (which contain our importand backups!) /*
  lifecycle {
    prevent_destroy = true
  }
}

/* when the droplets and the volumes exist, it is time to couple
each volume to each droplet. Therefore we can use the
digitalocean_volume_attachment resource type. */
resource "digitalocean_volume_attachment" "worker-backup-volume-attachments" {
  count = "${var.DO_WORKERCOUNT}"
  droplet_id = "${element(digitalocean_droplet.worker.*.id, count.index)}"
  volume_id  = "${element(digitalocean_volume.worker-backup-volume.*.id, count.index)}"
  depends_on = ["digitalocean_volume.worker-backup-volume"]
}

At last, let us have a look at backend.tf

provider "aws" {
  region = "${var.AWS_REGION}"
  access_key = "${var.AWS_ACCESSKEY}"
  secret_key = "${var.AWS_SECRETKEY}"
}

/* this tells terraform where to look for the current state of
our infrastructure (in the form of a terraform.tfstate file).
We are not able to use variable references in the backend definition.
Therefore we have the values hard coded here. But still .. we don't
want sensitive data (aws keys) in the code here. So we will once again
use gitlab environment variables here. We will run the following in
our gitlab pipeline script:
terraform init -backend-config="access_key=$TF_VAR_AWS_ACCESSKEY" -backend-config="secret_key=$TF_VAR_AWS_SECRETKEY"
which will contain the two keys.
*/
terraform {
  backend "s3" {
    bucket = "de.codinghaus.s3"
    key = "dovolumetutorial_terraform.tfstate"
    region = "eu-central-1"
    access_key = ""
    secret_key = ""
  }
}

Create the worker script

#!/bin/bash
mkdir /workdir
touch workerscript.log
# wait until backup volume is mounted
while [ ! -d /mnt/$HOSTNAME\_backup ]
do
    echo "waiting for DO-Volume to be mounted...." >> workerscript.log
    sleep 10
done
echo "DO-Volume is now mounted!" >> workerscript.log
# restore backup from volume to droplet if existing
newestBackup=$(ls -Frt /mnt/$HOSTNAME\_backup | grep "[^/]$" | tail -n 1)
if [ -z "$newestBackup" ]; then
echo "No backup found on DO-Volume!" >> workerscript.log
else
cp /mnt/$HOSTNAME\_backup/$newestBackup /workdir
unzip /workdir/$newestBackup -d /workdir
rm -rf /workdir/$newestBackup
echo "Found backup ($newestBackup) on DO-Volume! Copied and unzipped it into working directory!" >> workerscript.log
fi
newestFile=$(ls -Frt /workdir | grep "[^/]$" | tail -n 1)
counter=0
if [ -z "$newestFile" ]; then
echo "No previous file found. Starting with 1!" >> workerscript.log
counter=1
else
echo "Found file to start with! ($newestFile)" >> workerscript.log
((counter+=$newestFile))
((counter+=1))
fi
while [ 1 ]; do
sleep 5
fallocate -l 1M /workdir/$counter
echo "Created file: $counter" >> workerscript.log
((counter+=1))
done

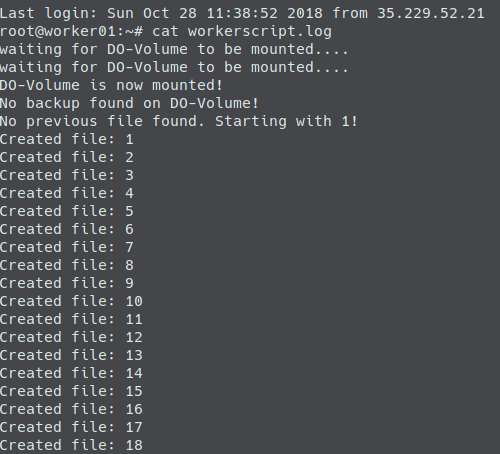
When the script is started (which is the case when our droplets were (re-)created) it checks whether the volume is already mounted and if not waits until it is. This is necessary because the script is executed at the end of the remote-exec block of the worker resource (which are the droplets). The volumes are created AFTER the the worker droplets. So the script will be executed before the volumes are created and therefore before they are mounted onto the droplets.

When the volume is mounted, the script checks if there are backups in the volume mount directory. If so the newest backup is copied to the /workdir and unzipped. The file creation then continues from the backup’s last file. If there is no backup the script will start to create file 0. Whether there was a backup or not, the script will then – in the main loop – create a file every five seconds.

Create a cronjob

Well, this is pretty straight-forward. We need a crontab which is copied to /etc/cron.d (see infrastructure code / worker.tf):

*/5 * * * * root /etc/backup_to_volume.sh

and the script doing the backup:

#!/bin/bash
date=$(date +%s)
timestamp=$(date +"%Y_%m_%d_%H_%M")
if [ ! -d /mnt/$HOSTNAME\_backup ]; then
    echo "----- ZIPPING FILES AND COPYING ZIP TO DO-VOLUME (1/2) -----"
    cd /workdir
    zip -r $timestamp-backup.zip ./*
    mv $timestamp-backup.zip /mnt/$HOSTNAME\_backup

    echo "----- DELETING OUTDATED BACKUPS (2/2) -----"
    cd /mnt/$HOSTNAME\_backup
    ls -tp | grep -v '/$' | tail -n +6 | xargs -I {} rm -- {} #https://stackoverflow.com/questions/25785/delete-all-but-the-most-recent-x-files-in-bash
fi

As you can see the script is divided into two parts.

  1. First we create a zip-file containing all files our worker script created into /workdir. That zip file is then uploaded to the volume (the cool thing is that it seems as if we are just moving the zip file into another directory because we mounted our volume into that directory).
  2. In the second part we delete the most outdated backups (only keeping the 5 newest)

Create the gitlab-ci.yml

stages:
  - deploy-infrastructure

deploy-infrastructure:
  stage: deploy-infrastructure
  image:
    name: hashicorp/terraform:light
    entrypoint:
      - '/usr/bin/env'
      - 'PATH=/usr/local/sbin:/usr/local/bin:/usr/sbin:/usr/bin:/sbin:/bin'
  before_script:
    - apk add --no-cache python3
    - apk add --no-cache curl
    - apk add --no-cache bash
    - mkdir -p ~/.ssh
    - echo "$TF_VAR_DO_PRIVKEY_PLAIN" | tr -d '\r' > ~/.ssh/id_rsa
    - chmod -R 700 ~/.ssh
    - curl -O https://bootstrap.pypa.io/get-pip.py
    - echo "export PATH=~/.local/bin:$PATH" >> ~/.bash_profile
    - python3 get-pip.py --user
    - source ~/.bash_profile
    - pip install awscli --upgrade --user
    - aws configure set aws_access_key_id $TF_VAR_AWS_ACCESSKEY
    - aws configure set aws_secret_access_key $TF_VAR_AWS_SECRETKEY
  script:
    - cd .infrastructure
    - if aws s3api head-bucket --bucket "de.codinghaus.s3" 2>/dev/null ; then echo "Skipping Backend-Creation, S3-Bucket already existing!"; else cd setup_backend && terraform init && terraform plan && terraform apply -auto-approve && cd ..; fi
    - cd resources
    - terraform init -backend-config="access_key=$TF_VAR_AWS_ACCESSKEY" -backend-config="secret_key=$TF_VAR_AWS_SECRETKEY"
    - terraform plan
    - terraform apply -auto-approve
  only:
    - master

We only have one stage here. In the before_script-block we first add our private key to ~/.ssh/id_rsa to be able to connect to the droplets via ssh (from the gitlab runner). After that we install and configure awscli which we need to check if the S3 bucket is already existing or if it has to be created.

After checking (and creating) the S3 bucket we run the three terraform commands: init, plan and apply which will create our infrastructure in the first run, and then recreate (or not) in all future runs. During the init step (with our backend-config given) terraform will look at the terraform.tfstate file in the S3 bucket so it knows what the current state of our infrastructure is and if there is a need to (re-)create resources or not.

Now that we have everything we need, we have to do one more thing: Create the environment variables in gitlab. You can find/add them under „Settings“ –> „CI/CD“ –> „Variables“.

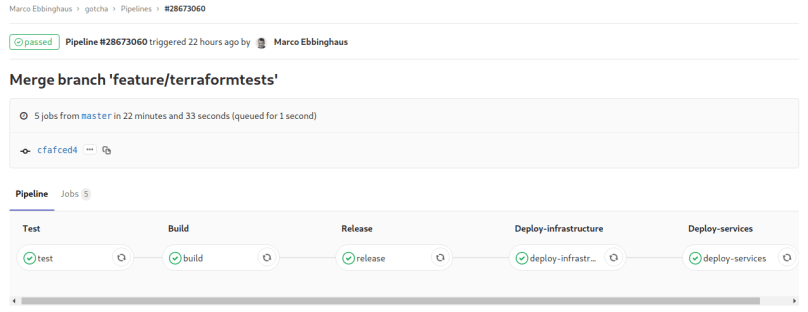
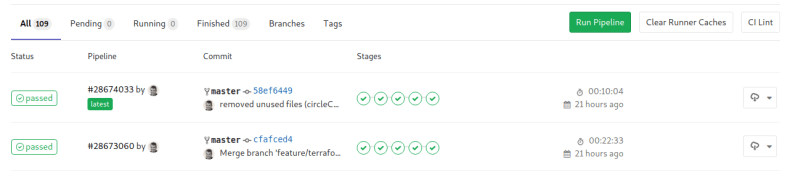
If we push our code the first time the pipeline will start and terraform will create an AWS S3 bucket and then create our infrastructure (left screenshot). From the second pipeline run on there is no need to create the S3 bucket as it already exists. Our pipeline script will recognize this and terraform will initialize the backend to know if our already existing resources need to be recreated (right screenshot).

After the pipeline finishes, let us have a look at the DigitalOcean-GUI and check that everything is there:

Now we will let the infrastructure run some time and see how the backups are created on the volumes.

When we connect to our droplet via ssh and have a look at the workerscript log we will see:

scriptWithoutBackup

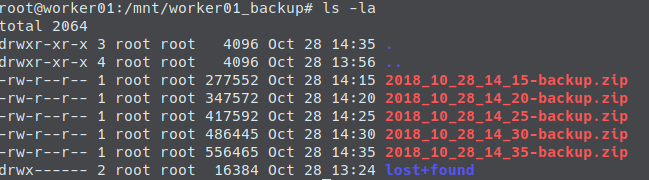
After a couple of minutes let us see what’s inside our backup directory. We will find some uploaded backups now:

backupcontent

Okay, as it seems everything works. Now, we want to see if the backup mechanism works. Oh, have a look at our worker droplet’s image in the workers.tf.. it is ubuntu 16.04:

resource "digitalocean_droplet" "worker" {
  image = "ubuntu-16-04-x64"
....

A pretty old ubuntu version! We now want to update that to ubuntu 18.04. So we will change workers.tf to:

resource "digitalocean_droplet" "worker" {
  image = "ubuntu-18-04-x64"
....

Then we will push that change. During the triggered pipeline run, terraform will now recognize that the image for the worker droplets was changed. It will decide, that it has to destroy the three droplets and recreate them. The volumes will stay untouched: Nothing changed here and they are marked as undestroyable anyways. But the attachments for the volumes have to change, because the droplet ids will change. No problem: Terraform will automatically destroy the attachments and recreate them.

recreate2

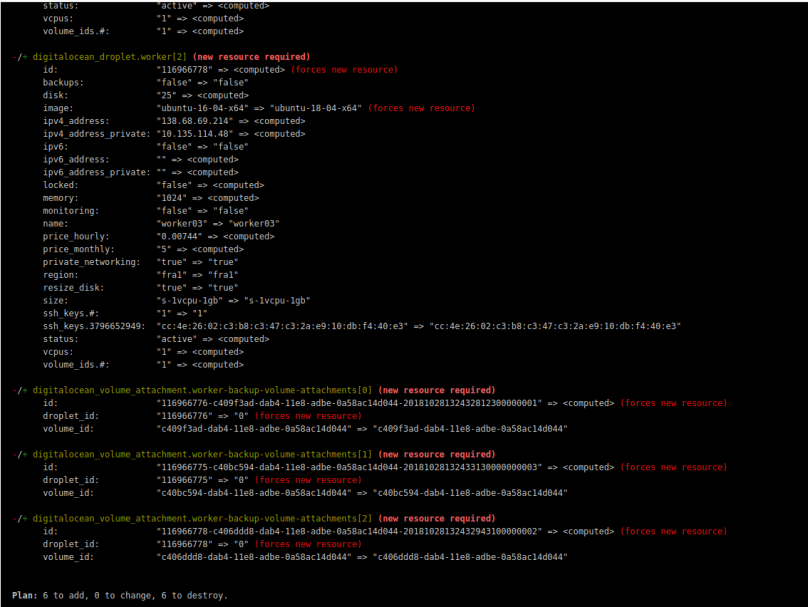
When the triggered pipeline run is finished after the push we only have one problem:

Yes, the droplets were recreated and the attachments for their volumes, too. But (in contrast to the initial creation) the volumes are not automatically mounted onto our droplets (this was a new insight for me when writing this tutorial, I assumed it would be mounted again automatically). The result: Our workerscript will stay forever in the loop waiting for volume to be mounted:

# wait until backup volume is mounted
while [ ! -d /mnt/$HOSTNAME\_backup ]
do
    echo "waiting for DO-Volume to be mounted...." >> workerscript.log
    sleep 10
done

Well..unexpected.. but let us fix this in a simple (naive) way: We have two cases. The initial creation of our infrastructure (including the automatical mount of our volumes onto the droplets), and recreation of our droplets (not including the automatical mount of our volumes). We will extend the loop and assume, that if after two minutes no volume is mounted, we are in the latter case. And so we will then try to mount the volume manually:

# wait until backup volume is mounted
loopCount=0
while [ ! -d /mnt/$HOSTNAME\_backup ]
do
    echo "waiting for DO-Volume to be mounted...." >> workerscript.log
    sleep 10
    ((loopCount+=10))
    if (( loopCount > 120 )); then
        echo "Volume not mounted after two minutes, trying manual mount..."  >> workerscript.log
        mkdir -p /mnt/$HOSTNAME\_backup; mount -o discard,defaults /dev/disk/by-id/scsi-0DO_Volume_$HOSTNAME-backup /mnt/$HOSTNAME\_backup; echo /dev/disk/by-id/scsi-0DO_Volume_$HOSTNAME-backup /mnt/$HOSTNAME\_backup ext4 defaults,nofail,discard 0 0 | sudo tee -a /etc/fstab
    fi
done

The one liner for the manual mount was copied from the DigitalOcean-GUI (see screenshot below). I just replaced the hard coded hostname with the $HOSTNAME environment variable.

do

With that change in our waiting loop, the result of a second run of the pipeline (including the recreation of the droplets / attachments) looks like the following:

result

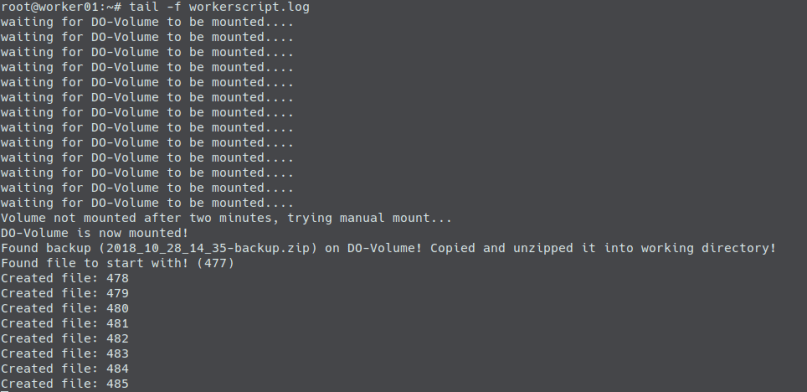
As you can see, the backups from the volume are now found. The newest is taken and our worker script will continue from the state from the newest backup.

Yay!

As already mentioned you can find the full example code at gitlab on https://gitlab.com/mebbinghaus/codinghaus_20181028_dovolumes_backup

If you have questions or feedback, feel free to leave a comment or contact me via twitter or mail.

How-To: Use Traefik as reverse proxy for your Docker Swarm Mode cluster on DigitalOcean (fully automated with GitLab CI, terraform, ansible)

In my last blog post I wrote about how to put a load balancer (HAProxy) in front of a docker swarm cluster with multiple manager nodes automatically. That blog post was using the reverse proxy traefik inside the docker swarm mode to dispatch user requests (forwarded by the HAProxy) to one of the existing worker nodes ( the corresponding container on that worker node). I left out information on how traefik works and left the code for those who were interested in the full picture on github to not let the posting explode.

In this posting we will have a closer look on how to create that swarm mode cluster automatically with a gitlab CI pipeline. We will walk through the code that describes our infrastructure, the code that describes our pipeline, the code that deploys our services and the code that configures traefik. I will cut out the HAProxy in front of the cluster in this setup so that we can concentrate on the cluster itself (when interested in the HAProxy-Part have a look at my last blog post). So, first let’s look what we will have after working through that post:

We will have an automated CI/CD-Pipeline on GitLab that will create six droplets on DigitalOcean. Three of those working as manager nodes, three as workers. During our pipeline we will also create three sub domains for the domain we own (gotcha-app.de in this example). As a last step in our pipeline we will deploy traefik on the manager nodes and three services for the worker nodes (each service running on each worker, so on each worker node we will have three running containers).

If you are interested in a complete working code example: Here you go

The end result (that our pipeline will create for us automatically) will look like in the following diagram:

codinghaus_20181609

Things we have to do:

  • Let DigitalOcean manage our domain (by entering the DO Namespace Records for our domain – using e.g. the GUI of our domain registrar (where we bought the domain)
  • implement the code that will create our infrastructure (droplets and domains with records) and install everything that is needed on the droplets (docker, …). We will use terraform for that.
  • implement the code that will describe our docker stack (including traefik and three small services for our workers). We will create a docker-compose.yml for that.
  • implement the code that will deploy our docker stack. We will use ansible for that – even though it is just a single command that will be executed on one of our swarm mode managers.
  • implement the code that will describe our gitlab CI/CD pipeline (executing our infrastructure as code / docker stack deploy).

What we will leave out:

To keep the example short and concise, we will leave out the testing stage(s) which should always be part of a CI/CD-pipeline (but we are using third party images for testing purposes here anyway – so we don’t have any productive code here to test) and as already mentioned we won’t put a load balancer in front of our docker swarm cluster (as we did in the last posting).

So here we go!

Let DigitalOcean manage our domain

If you read my last blog post you will find nothing new here. I bought my domain at strato and the GUI where I added DigitalOcean’s three NS entries looks like the following:

strato 
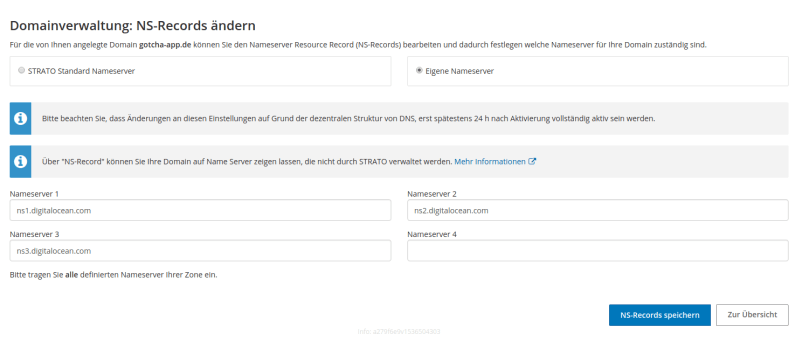
You only have to do that once (and then wait up to 48 hours) and so this task is not part of our automated pipeline. After this, when creating sub domains via the DigitalOcean API, every created sub domain will automatically contain the three needed NS entries.

implement the code that will create our infrastructure („Infrastructure as code“)

All files that describe our infrastructure as code are located in the .infrastructure folder. We have four files that describe our different components. For the full files have a look into the gitlab repository as I will explain the most important parts here. Let’s start with the code that creates our first swarm mode manager node (droplet):

# this part describes what droplet to create. region and size are
# filled by using environment variables. If you are using gitlab CI
# you can add those environment variables under Settings - CI / CD -
# Variables. Make sure to prepend TF_VAR before the name. DO_REGION
# for example must be created as TF_VAR_DO_REGION.
resource "digitalocean_droplet" "gotchamaster-first" {
  image = "ubuntu-16-04-x64"
  name = "gotchamaster00"
  region = "${var.DO_REGION}"
  size = "${var.DO_SIZE}"
  private_networking = true
  ssh_keys = [
    "${var.DO_KEYFINGERPRINT}"
  ]

# this part describes how terraform will connect to the created 
# droplet. We will use ssh here.
  connection {
    user = "root"
    type = "ssh"
    private_key = "${file("~/.ssh/id_rsa")}"
    timeout = "2m"
  }

# this will copy the docker-compose.yml file from the repository 
# to the droplet (location: /root/docker-compose.yml). We need it
# there to deploy the docker swarm stack.
  provisioner "file" {
    source = "../../../docker-compose.yml"
    destination = "/root/docker-compose.yml"
  }

# this will copy the configuration file for traefik from the 
# repository to the droplet (location: /root/traefik.toml). 
  provisioner "file" {
    source = "../../../traefik.toml"
    destination = "/root/traefik.toml"
  }

# remote-exec will execute commands on the created droplet. Here,
# we first install some needed software like docker and 
# docker-compose. Then we init a swarm and create tokens for our 
# managers and workers to be able to join the swarm cluster. We are
# putting those tokens into the files /root/gotchamaster-token and 
# /root/gotchaworker-token. 
  provisioner "remote-exec" {
    inline = [
      #docker
      "apt-get install apt-transport-https ca-certificates curl software-properties-common python3 -y",
      "curl -fsSL https://download.docker.com/linux/ubuntu/gpg | sudo apt-key add -",
      "add-apt-repository \"deb [arch=amd64] https://download.docker.com/linux/ubuntu $(lsb_release -cs) stable\"",
      "apt-get update",
      "apt-get install docker-ce -y",
      "usermod -aG docker `whoami`",
      "curl -L https://github.com/docker/compose/releases/download/1.22.0/docker-compose-$(uname -s)-$(uname -m) -o /usr/local/bin/docker-compose",
      "chmod +x /usr/local/bin/docker-compose",

      "docker swarm init --advertise-addr ${self.ipv4_address}",
      "docker swarm join-token --quiet manager > /root/gotchamaster-token",
      "docker swarm join-token --quiet worker > /root/gotchaworker-token",

      "docker network create --driver=overlay gotcha-net"
    ]
  }

# After creating files containing the swarm tokens, we copy download
# those files to our local machine (which is in fact the 
# gitlab ci runner). Why are we doing this? When creating the other
# cluster nodes, we will upload those files onto those droplets so
# they know the token and are able to join the swarm.
  provisioner "local-exec" {
    command = "scp -o StrictHostKeyChecking=no root@${self.ipv4_address}:/root/gotchamaster-token ./gotchamaster-token"
  }

  provisioner "local-exec" {
    command = "scp -o StrictHostKeyChecking=no root@${self.ipv4_address}:/root/gotchaworker-token ./gotchaworker-token"
  }

}

This was the file which creates the first manager mode. Now we need a second file which creates all other manager nodes. We have to split the manager node creation into to files because the first manager node is doing things the other manager nodes won’t do (like initializing the swarm and creating tokens for other nodes to join the swarm).

Now we can use one file, to create all other manager nodes:

gotcha-master.tf

# As you will see this file looks nearly the same as
# gotcha-master-first.tf. But the first difference is that we are 
# using the count-attribute here. We tell terraform to create
# var.DO_MASTERCOUNT - 1 droplets here. DO_MASTERCOUNT is once again
# an environment variable and we are subtracting 1 here as we already
# created the first manager node. Terraform will create those droplets
# parallel instead of one after another which is pretty cool.
resource "digitalocean_droplet" "gotchamaster" {
  image = "ubuntu-16-04-x64"
  name = "${format("gotchamaster%02d", count.index + 1)}"
  count = "${var.DO_MASTERCOUNT - 1}"
  region = "${var.DO_REGION}"
  size = "${var.DO_SIZE}"
  private_networking = true
  ssh_keys = [
    "${var.DO_KEYFINGERPRINT}"
  ]
  connection {
    user = "root"
    type = "ssh"
    private_key = "${file("~/.ssh/id_rsa")}"
    timeout = "2m"
  }

# during the creation of the first manager node we initialized the
# swarm, created tokens for other managers / workers to join the swarm,
# saved those tokens to files, and download those files from the
# droplet to the gitlab ci runner. Now, we will upload those files
# from the gitlab ci runner to the newly created droplet(s).
  provisioner "file" {
    source = "./gotchamaster-token"
    destination = "/tmp/swarm-token"
  }

  provisioner "file" {
    source = "../../../docker-compose.yml"
    destination = "/root/docker-compose.yml"
  }

  provisioner "file" {
    source = "../../../traefik.toml"
    destination = "/root/traefik.toml"
  }

# We install and configure docker and docker-compose on the manager
# nodes and make them join the swarm by reading out the join token.
  provisioner "remote-exec" {
    inline = [
      #docker / docker-compose
      "apt-get install apt-transport-https ca-certificates curl software-properties-common -y",
      "curl -fsSL https://download.docker.com/linux/ubuntu/gpg | sudo apt-key add -",
      "add-apt-repository \"deb [arch=amd64] https://download.docker.com/linux/ubuntu $(lsb_release -cs) stable\"",
      "apt-get update",
      "apt-get install docker-ce -y",
      "usermod -aG docker `whoami`",
      "curl -L https://github.com/docker/compose/releases/download/1.22.0/docker-compose-$(uname -s)-$(uname -m) -o /usr/local/bin/docker-compose",
      "chmod +x /usr/local/bin/docker-compose",

      #docker swarm
      "docker swarm join --token `cat /tmp/swarm-token` ${digitalocean_droplet.gotchamaster-first.ipv4_address}:2377"
    ]
  }

}

gotcha-domain.tf

This file will create all our sub domains (web.gotcha-app.de, http://www.gotcha-app.de, test.gotcha-app.de and traefik.gotcha-app.de). Every sub domain will have three A-records pointing to each manager node IP. Lets only have a look at the http://www.gotcha-app.de sub domain here:

resource "digitalocean_domain" "gotchadomain-www" {
  name       = "www.gotcha-app.de"
  ip_address = "${digitalocean_droplet.gotchamaster-first.ipv4_address}"
  depends_on = ["digitalocean_droplet.gotchamaster-first"]
}

We are defining a resource of type digitalocean_domain here.

  • name: the name of the sub domain
  • ip_address: this attribute (which is required in terraform, but optional in the DigitalOcean API – see https://github.com/terraform-providers/terraform-provider-digitalocean/issues/112) will create an initial A record. We use the IP-address of our first swarm mode manager here.
  • depends_on: To be able to use the IP-address of our first swarm mode manager, that manager has to exist. So we are telling terraform here not to create that domain before the first manager droplet has been created.
resource "digitalocean_record" "record-master-www" {
  count = "${var.DO_MASTERCOUNT - 1}"
  domain = "${digitalocean_domain.gotchadomain-www.name}"
  type   = "A"
  name   = "@"
  value = "${element(digitalocean_droplet.gotchamaster.*.ipv4_address, count.index)}"
  depends_on = ["digitalocean_droplet.gotchamaster"]
}

Then we have to create two more A-Records (remember we have 3 manager nodes, and we want the domain to dispatch requests to one of those 3 manager nodes). So now that our sub domain exists the resource type changes to digitalocean_record. 

  • count: this kind of works as a loop. We can tell terraform how much managers to create by setting the environment variable DO_MASTERCOUNT (TF_VAR_DO_MASTERCOUNT). As we already created one A-record in the domain-resource, we now have to crate DO_MASTERCOUNT – 1 more A-records.
  • domain: tells which (sub) domain should that A-record belong to
  • type: the type of the record (A, NS, AAAA, …)
  • name: @ will use the sub domain as the hostname (www.gotcha-app.de in our case), some other string would be prepended to the sub domain (e.g. „bob“ would generate an A-record for bob.www.gotcha-app.de)
  • value: this is the tricky bit. An A-record is nothing more than the link between a domain and an IP-address. value tells the A-record which IP to use. We are in a loop here (remember the count-attribute). By using the element function, we can iterate through our gotchamaster-resources and use the IP address of each manager node here.
  • depends_on: before creating the missing A-records all manager nodes must exists (because we are iterating over their IP-addresses), so we tell terraform to not build those records until all manager nodes exist.

The finished sub domain will look like this in the DigitalOcean GUI (the NS-records were created automatically):

do_domain

Now at last let us have a look at the code, which creates our three worker nodes:

gotcha-worker.tf

# nothing new here. We tell terraform to create DO_WORKERCOUNT 
# droplets here.
resource "digitalocean_droplet" "gotchaworker" {
  image = "ubuntu-16-04-x64"
  name = "${format("gotchaworker%02d", count.index + 1)}"
  count = "${var.DO_WORKERCOUNT}"
  region = "${var.DO_REGION}"
  size = "${var.DO_SIZE}"
  depends_on = ["digitalocean_droplet.gotchamaster"]
  private_networking = true
  ssh_keys = [
    "${var.DO_KEYFINGERPRINT}"
  ]
  connection {
    user = "root"
    type = "ssh"
    private_key = "${file("~/.ssh/id_rsa")}"
    timeout = "2m"
  }

# We need the file containing the token which is needed to join the
# swarm as a worker so we copy it from the gitlab ci runner to the
# droplet as we did on the manager droplets.
  provisioner "file" {
    source = "./gotchaworker-token"
    destination = "/tmp/swarm-token"
  }

# We once again install and configure docker stuff and then join the
# swarm
  provisioner "remote-exec" {
    inline = [
      #docker
      "apt-get install apt-transport-https ca-certificates curl software-properties-common -y",
      "curl -fsSL https://download.docker.com/linux/ubuntu/gpg | sudo apt-key add -",
      "add-apt-repository \"deb [arch=amd64] https://download.docker.com/linux/ubuntu $(lsb_release -cs) stable\"",
      "apt-get update",
      "apt-get install docker-ce -y",
      "usermod -aG docker `whoami`",
      "curl -L https://github.com/docker/compose/releases/download/1.22.0/docker-compose-$(uname -s)-$(uname -m) -o /usr/local/bin/docker-compose",
      "chmod +x /usr/local/bin/docker-compose",

      "docker swarm join --token `cat /tmp/swarm-token` ${digitalocean_droplet.gotchamaster-first.ipv4_address}:2377"
    ]
  }

}

When the infrastructure stage has finished we have a running (but still empty) swarm mode cluster consisting of multiple manager- and worker nodes. Your DigitalOcean Dashboard should now look like:

Cool stuff!! Now that we have a prepared swarm, let us define the stack (what services should run on that cluster).

implement the code that will describe our docker stack (docker-compose.yml)

We are creating four services – traefik, test, web, and www. As test, web and www are just random services which work as example backends here I will concentrate on the traefik service and the test service (as an example) here. If you have questions regarding the other services please feel free to ask.

  • traefik: This is – of course – our reverse proxy. It will take requests from the internet and dispatch those requests to a worker node, on which a corresponding service is running.
    • ports: we publish port 80 as we will fetch incoming requests on port 80.
    • volumes:
      • we bind mount the docker.sock to be able to observe when new services are deployed to the stack.
      • we bind mount traefik.toml which contains the configuration we want to use.
    • deploy:
      • mode: global means we want the service to run on every node in our cluster.
      • placement: but not on every cluster – only on every manager node.
    • labels:
      • labels are where we define frontends and backends for traefik. Here, we tell traefik to take requests from traefik.gotcha-app.de dispatch them to the traefik backend (which is the service itself) on port 8081 (as defined in traefik.toml). This is where the GUI-Dashboard of all configured traefik backends and frontends will be displayed. We tell the service to use the created network gotcha-net (see gotcha-master-first.tf) and to explicitly be enabled (because we defined exposedbydefault = false in traefik.toml).
  • test:
    • deploy:
      • This time we swarm to only deploy this service onto worker nodes in our swarm.
    • labels
      • We tell traefik to listen to requests on test.gotcha-app.de:80 and dispatch those requests to a node where the test service is running and use port 8080 on that node. Pay attention to the fact that we don’t have to publish any port here as we are using the same network for all our services.
version: "3.6"
services:
  traefik:
    image: traefik:v1.6.6
    ports:
      - "80:80"
    volumes:
      - "/var/run/docker.sock:/var/run/docker.sock"
      - "/root/traefik.toml:/traefik.toml"
    deploy:
      mode: global
      placement:
        constraints:
          - node.role == manager
      labels:
        - "traefik.frontend.rule=Host:traefik.gotcha-app.de"
        - "traefik.frontend.rule.type: PathPrefixStrip"
        - "traefik.port=8081"
        - "traefik.backend=traefik"
        - "traefik.backend.loadbalancer.sticky=true"
        - "traefik.docker.network=gotcha-net"
        - "traefik.enable=true"
    networks:
      - gotcha-net
  test:
    image: stefanscherer/whoami
    deploy:
      mode: global
      placement:
        constraints:
        - node.role == worker
      labels:
        - "traefik.port=8080"
        - "traefik.backend=test"
        - "traefik.frontend.rule=Host:test.gotcha-app.de"
        - "traefik.docker.network=gotcha-net"
        - "traefik.enable=true"
    depends_on:
    - traefik
    networks:
    - gotcha-net
  web:
    image: nginxdemos/hello
    ports:
      - "8082:80"
    deploy:
      mode: global
      placement:
        constraints:
          - node.role == worker
      labels:
        - "traefik.frontend.rule=Host:web.gotcha-app.de"
        - "traefik.port=8082"
        - "traefik.backend=web"
        - "traefik.docker.network=gotcha-net"
        - "traefik.enable=true"
    networks:
      - gotcha-net
  www:
    image: hashicorp/http-echo
    ports:
      - "8083:5678"
    command: -text="hello world"
    deploy:
      mode: global
      placement:
        constraints:
          - node.role == worker
      labels:
        - "traefik.frontend.rule=Host:www.gotcha-app.de"
        - "traefik.port=8083"
        - "traefik.backend=www"
        - "traefik.docker.network=gotcha-net"
        - "traefik.enable=true"
    networks:
      - gotcha-net
    depends_on:
      - traefik
networks:
  gotcha-net:
    external: true

As the docker-compose.yml is pretty straight forward, let’s have a look at the configuration file for traefik (only to see that it’s pretty straight forward, too).

traefik.toml

defaultEntryPoints = ["http"]
[web]
  address = ":8085"
[entryPoints]
  [entryPoints.http]
    address = ":80"
[docker]
  endpoint = "unix:///var/run/docker.sock"
  domain = "gotcha-app.de"
  watch = true
  swarmmode = true
  exposedbydefault = false
  • defaultEntryPoints: We tell traefik that we will use http requests as default (not https)
  • web: this tells traefik to serve a web gui dashboard on port 8085
  • entryPoints: we link the http entrypoint to port 80 here
  • docker: this section describes that we are using traefik in a swarm mode setup.
    • endpoint: the endpoint of the docker.sock
    • domain: our domain
    • watch: traefik should watch the services and recognize new services
    • swarmmode: yes, we are using traefik in a swarm mode setup
    • exposedbydefault: We tell traefik to have no backends published by default. We have to expose every backend explicitly by defining a label „traefik.enable=true“ in the corresponding service definition in docker-compose.yml.

implement the code that will deploy our docker stack

Now that we have everything we need, let us – at last – create the pipeline which will (on every push to master) create the defined swarm mode cluster (via terraform) and deploy our defined services (the stack) on that cluster (via ansible).

As we are using gitlab ci, we need a .gitlab-ci.yml. Here it is:

# you can use any image you want. I am using the maven image as my
# main project has some more stages containing maven commands.
image: maven:latest

services:
  - docker:dind

cache:
  paths:
    - .m2/repository

variables:
  DOCKER_HOST: tcp://docker:2375
  DOCKER_DRIVER: overlay2
  MAVEN_OPTS: "-Dmaven.repo.local=.m2/repository"

# these are our two stages. deploy-infrastructure will create or 
# cluster and deploy-services will deploy the stack on the created
# cluster.
stages:
  - deploy-infrastructure
  - deploy-services

# we are using terraform to create the cluster. Before anything else
# we put our private key onto the gitlab runner (because the
# terraform commands will connect to the DigitalOcean droplets via ssh)
# Then we move to the location where our .tf-files are and the we run
# terraform init, plan and apply to let terraform do the magic.
# I am using a loop on the final terraform apply command here which
# is not optimal as it will end in an endless loop if anything goes
# wrong. I only use(d) this as a workaround as the DigitalOcean API
# sometimes answered with 503 errors which resulted in failing pipe
# lines. But this was temporary and normally you shouldn't need that
# loop.
deploy-infrastructure:
  stage: deploy-infrastructure
  image:
    name: hashicorp/terraform:light
    entrypoint:
      - '/usr/bin/env'
      - 'PATH=/usr/local/sbin:/usr/local/bin:/usr/sbin:/usr/bin:/sbin:/bin'
  before_script:
    - mkdir -p ~/.ssh
    - echo "$TF_VAR_DO_PRIVKEY" | tr -d '\r' > ~/.ssh/id_rsa
    - chmod -R 700 ~/.ssh
  script:
    - cd .infrastructure
    - cd live/cluster
    - terraform init
    - terraform plan
    - until terraform apply -auto-approve; do echo "Error while using DO-API..trying again..."; sleep 2; done
  only:
    - master

# This stage will deploy the stack on our swarm. Before anything we
# are installing ansible and jq here. Then we copy our ssh key onto
# the gitlab runner as we will use ansible (which uses ssh) to run
# the docker stack deploy - command on our gotchamaster-first
# manager node.
# To find that node we are using the DigitalOcean API to find it by 
# its name. Then we use jq to parse its IP out of the JSON-response.
# After cutting of the "" we write its IP into the /etc/ansible/hosts
# so ansible knows where to connect to. After setting HostKeyChecking
# to false (by uncommenting the line #host_key_checking = false in
# /etc/ansible/ansible.cfg) we run one single ansible command to
# deploy the stack using the docker-compose.yml on gotchamaster00.
deploy-services:
  stage: deploy-services
  before_script:
    - echo "deb http://ppa.launchpad.net/ansible/ansible/ubuntu trusty main" >> /etc/apt/sources.list
    - apt-key adv --keyserver keyserver.ubuntu.com --recv-keys 93C4A3FD7BB9C367
    - apt-get update
    - apt-get install ansible -y
    - apt-get install jq -y
  script:
    - mkdir -p ~/.ssh
    - echo "$TF_VAR_DO_PRIVKEY" | tr -d '\r' > ~/.ssh/id_rsa
    - chmod -R 700 ~/.ssh
    - "GOTCHA_MASTER_IP=$(curl -sX GET https://api.digitalocean.com/v2/droplets -H \"Authorization: Bearer $TF_VAR_DO_TOKEN\" | jq -c '.droplets[] | select(.name | contains(\"gotchamaster00\")).networks.v4[0]'.ip_address)" # extrahieren der IP-Adresse von gotchamaster00 via DO-API und jq anhand des dropletnamens
    - GOTCHA_MASTER_IP="${GOTCHA_MASTER_IP%\"}"
    - GOTCHA_MASTER_IP="${GOTCHA_MASTER_IP#\"}"
    - export GOTCHA_MASTER_IP
    - echo $GOTCHA_MASTER_IP > /etc/ansible/hosts
    - sed -i -- 's/#host_key_checking/host_key_checking/g' /etc/ansible/ansible.cfg
    - ansible all --user=root -a "docker stack deploy --compose-file docker-compose.yml gotcha"
  only:
    - master

The only-attribute tells gitlab to trigger the pipeline every time we push something into the master branch.

Now let us try out our deployed services! First let us check traefik.gotcha-app.de to check if the traefik dashboard is working:

traefik

Great! We are seeing four frontends (traefik.gotcha-app.de, http://www.gotcha-app.de, test.gotcha-app.de, web.gotcha-app.de) and four backends – each consisting of three (worker) nodes where our services are running.

Then let us check the nginx- and the adminer-service by browsing web.gotcha-app.de and http://www.gotcha-app.de:

Cool stuff! Last but not least let’s do some curls against the whoami service linked to test.gotcha-app.de:

test

If you want to try everything on gitlab be sure to create the needed environment variables defined in vars.tf (but with prepended TF_VAR_). You can set them on Gitlab under Settings – CI / CD –  Variables. So you will need (in brackets is what I used):

  • TF_VAR_DO_TOKEN – your DigitalOcean token (my DigitalOcean token :P)
  • TF_VAR_DO_PRIVKEY – your private ssh key (my private ssh key :P)
  • TF_VAR_DO_KEYFINGERPRINT – Your public ssh key’s fingerprint. You have to add that public key to DigitalOcean in your DigitalOceans‘ account settings. (my key fingerprint :P)
  • TF_VAR_DO_REGION – the region where you want to create the droplet (fra1, which is Frankfurt Germany)
  • TF_VAR_DO_SIZE – the size your droplets should have (s-1vcpu-1gb, which is the smallest – 5$ per month)
  • TF_VAR_DO_MASTERCOUNT – count of your swarm manager nodes (3)
  • TF_VAR_DO_WORKERCOUNT – count of your swarm worker nodes (3)

Have fun letting the pipeline create your cluster and deploy/update your services automatically to it!

Things I left out

There are some things that I left out, but which you want to do when using stuff for production purposes:

  • You should use HTTPS for communication between the services and between user requests and your cluster.
  • Maybe you even want to put a load balancer in front of your swarm cluster.
  • As the terraform commands are executed on a gitlab runner, all state files will be lost when the pipeline has finished. So the second time the pipeline is running terraform won’t know that the resources already were created and so will duplicate them. What you want to use here is a terraform backend. In my main application I am using an AWS bucket as the backend for terraform. So whenever the pipeline is executed it checks (during the deploy-infrastructure stage) if state files exist in my bucket and if so, it will use the already created resources (and won’t create new ones – unless you make changes to your infrastructure code which require the recreation of a droplet. But even then terraform will destroy the old droplet and create a new one instead.
  • the traefik dashboard is unsecured, you should at least put a basic auth in front of it because otherwise anyone can get information on your server cluster infrastructure.

If you have any questions please feel free to contact me or leave a comment.

If you are interested in the complete code example: Check it out here

Automated load balancer (HAProxy) creation on DigitalOcean

In this blog post I will describe how you can realize a solution that:

  • automatically (by pushing to master) creates a running docker swarm mode cluster with multiple master nodes and multiple worker nodes on DigitalOcean.
  • additionally automatically creates a HAProxy – load balancer in front of your swarm mode cluster to do the load balancing.

Some used frameworks / libraries / tools are:

  • DigitalOcean – where our infrastructure is created
  • gitlab – where the code is hosted and the CI/CD-Pipeline creating the infrastructure and deploying our docker services is running
  • HAProxy as the load balancer
  • terraform – to describe our infrastructure as code and using the DigitalOcean-API to create that infrastructure
  • docker swarm mode as the container orchestrator
  • traefik – as the reverse proxy for our docker services inside the swarm mode cluster

I uploaded an example repository on github which you can clone and try on your own. The things you will have to do to get the github example running are:

  • have/create an account on DigitalOcean
  • have/create an account on Gitlab
  • create the needed environment variables in Gitlab Settings

Please be aware of the fact, that the code will create droplets on DigitalOcean which of course will produce costs.

You can start the magic by navigating to .infrastructure/live/cluster and run the commands terraform init, terraform plan, terraform apply by hand or maybe you want to copy the repository to your own gitlab account – then you can start the automated pipeline simply by using the Gitlab CI tools (have a look at .gitlab-ci.yml where the pipeline elements are configured). Make sure to set all needed environment variables (defined in vars.tf in the github repository) with corresponding values. Those environment variables must start with TF_VAR_ to be recognized by terraform – e.g. DO_TOKEN must be exported as TF_VAR_DO_TOKEN.

I extracted / broke down that minimal example from the main project I am working on right now.

As always I don’t proclaim my solution as the all-time best possible solution ever. It’s more like a documentation for myself and maybe someone who tries something similar gets some inspiration from my approach.

DigitalOcean offers loadbalancers theirselves for 20$ per loadbalancer per month. The GUI looks pretty easy to handle and I am sure it is a great product that just works – as all products that I’ve already tried. But this blog post will show the „do it yourself“ – approach instead.

What will be done:

  • Transfer management of the domain from the original domain registrar to DigitalOcean
  • create terraform code to create (on DigitalOcean):
    • Domain „my-domain.de“
    • Domain-Record of type A with the load balancer droplets IP
    • 5 Droplets (3 docker swarm master nodes, 2 docker swarm worker nodes)
    • Droplet which will work as the load balancer (HAProxy) to route the incoming requests to one of the master nodes, from which the reverse proxy traefik will guide the incoming requests to one of the services running on the worker nodes.

Transfer management of the domain from the original domain registrar to DigitalOcean

DigitalOcean suggests that if you want to manage your DNS records via DigitalOcean (by API / GUI) you’ll need to point to the DigitalOcean name servers from your registrar. I buyed my domain on Strato (german) and the screen where I entered the DO name servers looked like the following:

strato

That’s it! (It might need some time up to two days until that is applied)

Create terraform code

So now that we can use DigitalOcean to manage the domain, let us create the infrastructure code for terraform to create everything we need to get our load balancer running, couple it to the domain and dispatch requests to our swarm master nodes.

So, let’s have a look at the relevant code – two files: domain.tf and loadbalancer.tf.

The code creating the swarm mode cluster with our master- and worker-nodes can be found in the github repository – I will leave it out here to concentrate on the load balancing stuff, but please feel free to ask questions and/or leave comments regarding the swarm cluster infrastructure code.

domain.tf

resource "digitalocean_domain" "gotchadomain-main" {
  name       = "gotcha-app.de"
  ip_address = "127.0.0.1"
}

As you can see there is no special magic in the code for creating our domain. The only thing to mention here is the ip_address attribute. In the current version of terraform the ip_address-attribute is marked as required. But in the DigitalOcean-API the only required field is the „name“.  During the execution of our infrastructure code we don’t even have created the load balancer droplet and so we don’t know its IP yet. Therefore we are creating the domain with a dummy IP (which results in creating an A-Record with that IP) and later (see the following remote-exec block of loadbalancer.tf) we update that created A-Record with the real IP of the load balancer droplet.

loadbalancer.tf

resource "digitalocean_droplet" "gotcha-loadbalancer" {
  image = "ubuntu-16-04-x64"
  name = "gotcha-loadbalancer"
  region = "${var.DO_REGION}"
  size = "${var.DO_SIZE}"
  private_networking = true
  ssh_keys = [
    "${var.DO_KEYFINGERPRINT}"
  ]
  depends_on = [
    "digitalocean_droplet.gotchamaster-final",
    "digitalocean_domain.gotchadomain-main"
  ]

  connection {
    user = "root"
    type = "ssh"
    private_key = "${file(var.DO_PRIVKEY)}"
    timeout = "2m"
  }

  provisioner "remote-exec" {
    inline = [
      "apt-get update",

      # when creating the DigitalOcean domain via terraform (see gotcha-domain.tf), we are forced to enter an ip_address - even though
      # it is not required within the DigitialOcean API. This is a bug in terraform which will be fixed in the upcoming release
      # (see https://github.com/terraform-providers/terraform-provider-digitalocean/pull/122
      # / https://github.com/terraform-providers/terraform-provider-digitalocean/issues/134)
      # here we are updating the dummy 127.0.0.1 - IP-address with the real IP of the load balancer droplet
      "apt-get install jq -y",
      "LOADBALANCER_A_RECORD_ID=$(curl -sX GET https://api.digitalocean.com/v2/domains/${digitalocean_domain.gotchadomain-main.name}/records -H \"Authorization: Bearer ${var.DO_TOKEN}\" | jq -c '.domain_records[] | select(.type | contains(\"A\")) | select(.data | contains(\"127.0.0.1\"))'.id)",
      "curl -X PUT -H \"Content-Type: application/json\" -H \"Authorization: Bearer ${var.DO_TOKEN}\" -d '{\"data\":\"${self.ipv4_address}\"}' \"https://api.digitalocean.com/v2/domains/${digitalocean_domain.gotchadomain-main.name}/records/$LOADBALANCER_A_RECORD_ID\"",
      "apt-get update -y",
      "apt-get install haproxy -y",
      "printf \"\n\nfrontend http\n\tbind ${self.ipv4_address}:80\n\treqadd X-Forwarded-Proto:\\ http\n\tdefault_backend web-backend\n\" >> /etc/haproxy/haproxy.cfg",
      "printf \"\n\nbackend web-backend\" >> /etc/haproxy/haproxy.cfg",
      "printf \"\n\tserver gotchamaster00 ${digitalocean_droplet.gotchamaster-first.ipv4_address}:80 check\" >> /etc/haproxy/haproxy.cfg",
      "printf \"\n\tserver gotchamaster-final ${digitalocean_droplet.gotchamaster-final.ipv4_address}:80 check\" >> /etc/haproxy/haproxy.cfg",
    ]
  }

}

resource "null_resource" "gotcha-master-ips-adder" {
  count = "${var.DO_MASTERCOUNT - 2}"
  triggers {
    loadbalancer_id = "${digitalocean_droplet.gotcha-loadbalancer.id}"
  }
  connection {
    user = "root"
    type = "ssh"
    private_key = "${file(var.DO_PRIVKEY)}"
    timeout = "2m"
    host = "${digitalocean_droplet.gotcha-loadbalancer.ipv4_address}"
  }
  depends_on = ["digitalocean_droplet.gotcha-loadbalancer"]

  provisioner "remote-exec" {
    inline = [
      "printf \"\n\tserver ${format("gotchamaster%02d", count.index + 1)} ${element(digitalocean_droplet.gotchamaster.*.ipv4_address, count.index)}:80 check\" >> /etc/haproxy/haproxy.cfg",
      "/etc/init.d/haproxy restart"
    ]
  }

}

Let’s focus on the remote-exec block which is the relevant part: First we are updating the A-Record of our created domain with the IP of our now created load balancer droplet (using the DigitalOcean-API).

After updating the A-Record, there are two things left to do:

  1. install HAProxy
  2. modify the config file of the HAProxy (/etc/haproxy/haproxy.cfg) to match our needs.

After executing the terraform file the haproxy.cfg file will contain a frontend and a backend as in the following screenshot.

haproxycfg

The frontend says: Take incoming requests against the load balancer machine (138.198.181.146 in this case) and forward them to the backend.

In the backend section you can see, that all our docker swarm mode master nodes are listed with their IPs. So all requests against the load balancer are now forwarded to one of our master nodes.

The null resource part at the end of the gotcha-loadbalancer.tf seems a bit tricky at first, but it’s easy if you know what it is for: We want all our swarm mode master node IPs to be listed in the backend configuration part of haproxy.cfg. If you have a look into the full terraform code on github, you can see, that the first and the last master nodes are static (we will always have at least those two master nodes). But there is a third master node resource called gotcha-master.tf. With that you can configure how much more master nodes we want to create (additionally to the first and the last). And because the count of those additional master nodes is dynamic / configurable, we need to loop over those resources and append one line containing the IP of each additional master droplet to the backend section and then we do a restart of the HAProxy.

Finally, we have a HAProxy – load balancer which takes all the requests from the internet, and forwards the requests to the master nodes of our swarm mode cluster. In the github example I am then using the traefik reverse proxy, which is configured to take the requests sent from the load balancer and forward it to a frontend where a whoami-image is running – which simply responds with the container ID of the worker node, which the requests was forwarded to. If you are interested in that part, have a look at the full example on github – especially the docker-compose.yml.

If you connect to one of your master nodes and inspect what’s going on, you can see that traefik is running on the three master nodes, and the whoami service is running on two worker nodes.

stackservices

When you now curl against your domain, you will see how the requests are forwarded from the load balancer to traefik and from there to a matching container running on the worker nodes.

curls

What’s missing in this example is the SSL part (to keep it short). In my project I am using LetsEncrypt-certificates which I host on my aws S3 bucket and which are downloaded to the loadbalancer droplet during the creation and which then are used in the haproxy.cfg. This results in a secure connection between the user requests and the load balancer. You can then decide if you want to secure the communication between your microservices behind the load balancer, too.

If you are interested in seeing the full code and try it on your own have a look at: https://github.com/marcoebbinghaus/loadbalancerAndSwarmClusterOnDO

CI/CD-Pipeline for a java microservice application running on Docker Swarm mode cluster on DigitalOcean with Maven/Docker/Gitlab/Terraform/Ansible

Hey friends,

I finally finished to implement a continuous delivery/deployment pipeline for my java based microservice architectured application which is hosted on Gitlab and running on a swarm mode cluster on DigitalOcean (created/deployed automatically by Terraform). In this article I want to share an overview of the way I got everything running (I won’t go too deep into details because that would make the article too long, but if you are interested in more informations about any part feel free to contact me). This is not meant to be a best practice or the best way to implement it because I don’t know if it is..quite contrary – I’m pretty sure there are smarter ways to do it and it is still work in progress. But maybe you get some inspiration by the way I did it.

My application is a search engine infrastructure (the gui for the search engine is still missing) and consists (as by now) of three microservices (crawler, index and a gui for configuring the crawler) and four jar-files which are created. I will skip the source code of the application and just tell you how the jar files / microservices relate / work together.

The crawler microservice is for scanning the net and collecting everything that was found. It uses Nutch as the crawl engine. Besides Nutch I created an api-service as a jar file, which is also running in the nutch/crawler-container and which is used by the crawler-gui-microservice for communication (configuration/control of the crawler).

The crawler gui is a vaadin 10 frontend application which uses the crawler api to display informations of the crawler and which offers screens for configuring/controlling the crawler.

The last microservice is the index. When the crawler has finished one crawling cycle (which always repeats via a cronjob) it pushes the crawled data to the index-service (based on solr) which makes the data searchable (so the index will be used by the search engine gui microservice which is about to be implemented next).

Info on persistence: I am using GlusterFS to generate one Gluster-Volume for the crawler and one Gluster-Volume for the index. Those volumes are mounted as bind-mounts on every swarm mode cluster node so that the crawled/indexed data are reachable from every cluster node – so it is not important on which node a service is running.

The application code is hosted on Gitlab and I am using the free gitlab ci runners for my CI/CD-Pipeline. The running application itself is hosted/deployed on droplets from DigitalOcean.

Gitlab CI works by defining a gitlab-ci.yml on the top level of a repository and this is what my file looks like:

image: maven:latest

services:
  - docker:dind

cache:
  paths:
    - .m2/repository

variables:
  DOCKER_HOST: tcp://docker:2375
  DOCKER_DRIVER: overlay2
  MAVEN_OPTS: "-Dmaven.repo.local=.m2/repository"

stages:
  - test
  - build
  - release
  - deploy-infrastructure
  - deploy-services

test:
  stage: test
  script:
    - mvn clean test
  only:
    - master

build:
  stage: build
  script:
    - mvn clean install
  artifacts:
    paths:
      - gotcha-crawler/gotcha-crawler-webgui/target/gotcha-crawler-webgui-0.1-SNAPSHOT.jar
      - gotcha-crawler/gotcha-crawler-api/target/gotcha-crawler-api-0.1-SNAPSHOT.jar
  only:
    - master

release:
  stage: release
  image: docker:latest
  before_script:
    - docker login $TF_VAR_DOCKER_REGISTRY_URL --username $TF_VAR_DOCKER_REGISTRY_USERNAME --password $TF_VAR_DOCKER_REGISTRY_PASSWORD
  script:
    - docker build --tag=gotcha-index ./gotcha-index
    - docker tag gotcha-index docker.gotcha-app.de/gotcha/index:latest
    - docker push docker.gotcha-app.de/gotcha/index
    - docker build --tag=gotcha-crawler ./gotcha-crawler
    - docker tag gotcha-crawler  docker.gotcha-app.de/gotcha/crawler:latest
    - docker push docker.gotcha-app.de/gotcha/crawler
    - docker build --tag=gotcha-crawlergui ./gotcha-crawler/gotcha-crawler-webgui
    - docker tag gotcha-crawlergui docker.gotcha-app.de/gotcha/crawlergui:latest
    - docker push docker.gotcha-app.de/gotcha/crawlergui
  only:
    - master

deploy-infrastructure:
  stage: deploy-infrastructure
  image:
    name: hashicorp/terraform:light
    entrypoint:
      - '/usr/bin/env'
      - 'PATH=/usr/local/sbin:/usr/local/bin:/usr/sbin:/usr/bin:/sbin:/bin'
  before_script:
    - apk add --no-cache python3
    - apk add --no-cache curl
    - mkdir -p ~/.ssh
    - echo "$TF_VAR_DO_PRIVKEY_PLAIN" | tr -d '\r' > ~/.ssh/id_rsa
    - chmod -R 700 ~/.ssh
    - curl -O https://bootstrap.pypa.io/get-pip.py
    - python3 get-pip.py --user
    - touch ~/terraform.log
    - chmod 777 ~/terraform.log
    - echo "export PATH=~/.local/bin:$PATH" >> ~/.bash_profile
    - echo "export TF_LOG_PATH=~/terraform.log" >> ~/.bash_profile
    - echo "export TF_LOG=TRACE" >> ~/.bash_profile
    - source ~/.bash_profile
    - pip install awscli --upgrade --user
    - aws configure set aws_access_key_id $TF_VAR_AWS_ACCESSKEY
    - aws configure set aws_secret_access_key $TF_VAR_AWS_SECRETKEY
  script:
    - cd .infrastructure
    - if aws s3api head-bucket --bucket "de.gotcha-app.s3" 2>/dev/null ; then echo "Skipping Backend-Creation, S3-Bucket already existing!"; else cd setup_backend && terraform init && terraform plan && terraform apply -auto-approve && cd ..; fi
    - cd live/cluster
    - terraform init -backend-config="access_key=$TF_VAR_AWS_ACCESSKEY" -backend-config="secret_key=$TF_VAR_AWS_SECRETKEY"
    - terraform plan
    - until terraform apply -auto-approve; do echo "Error while using DO-API..trying again..."; sleep 2; done
    - ls -la
    - pwd
  artifacts:
    paths:
      - ~/terraform.log
  only:
    - master

deploy-services:
  stage: deploy-services
  before_script:
    - echo "deb http://ppa.launchpad.net/ansible/ansible/ubuntu trusty main" >> /etc/apt/sources.list
    - apt-key adv --keyserver keyserver.ubuntu.com --recv-keys 93C4A3FD7BB9C367
    - apt-get update
    - apt-get install ansible -y
    - apt-get install jq -y
  script:
    - mkdir -p /root/.ssh
    - echo "$TF_VAR_DO_PRIVKEY_PLAIN" | tr -d '\r' > ~/.ssh/id_rsa
    - chmod -R 700 ~/.ssh
    - "GOTCHA_MASTER_IP=$(curl -sX GET https://api.digitalocean.com/v2/droplets -H \"Authorization: Bearer $TF_VAR_DO_TOKEN\" | jq -c '.droplets[] | select(.name | contains(\"gotchamaster00\")).networks.v4[0]'.ip_address)" # extrahieren der IP-Adresse von gotchamaster00 via DO-API und jq anhand des dropletnamens
    - GOTCHA_MASTER_IP="${GOTCHA_MASTER_IP%\"}"
    - GOTCHA_MASTER_IP="${GOTCHA_MASTER_IP#\"}"
    - echo "$GOTCHA_MASTER_IP"
    - export GOTCHA_MASTER_IP
    - echo $GOTCHA_MASTER_IP > /etc/ansible/hosts
    - scp -o StrictHostKeyChecking=no docker-compose.yml root@$GOTCHA_MASTER_IP:/root/docker-compose.yml
    - ansible all --user=root -a "docker stack deploy --compose-file docker-compose.yml --with-registry-auth gotcha"
  only:
    - master

As you can see, it has 5 stages: test, build, release and deploy-infrustructure and deploy-services and they pretty much do, what their names tell:

The test-stage does a mvn clean test.

The build-stage does a mvn clean install and so generates the (spring boot) jar files which are in fact running in the docker containers containing the microservices.

The release-stage builds docker images (based on Dockerfiles) which contain and run the built jar files and pushes them to a SSL-secured docker registry which I installed on a hetzner cloud machine.

The deploy-infrastructure stage is where my server cluster for the docker swarm mode is created. This is done by creating 6 Droplets on DigitalOcean (the smallest ones for 5$ per month each). After creation some tools are installed on those machines (Docker, Docker Compose, GlusterFS Server/Client (for the volumes). When this stage is finished, I have a ready configured swarm mode cluster – but no services running on the swarm. This last step is done in the last stage.

Info on the cluster creation: The pipeline is (of course) idempotent. The server cluster during the deploy-infrastructure code is only created, if it is not already existent. To achieve this, I am using a „remote backend“ for terraform (in fact an aws S3 bucket). When terraform creates a server on e.g. DigitalOcean, a file called terraform.tfstate is created, which contains the information on which servers were created and what their state is. By using a backend for terraform, I tell terraform to save this file on a S3 bucket on aws. So the first time, the deploy-infrastructure stage is run, terraform will create the droplets and save their states in a file terraform.tfstate in the S3 bucket. Every continuing time the terraform stage is triggered, terraform will look into the file saved in the S3 bucket and will skip the creation as the file says, that they were already created.

The deploy-services stage is where my docker images are pulled from the external registry and deployed onto the (in the former stage) created droplets. For that to work, I am requesting the IP of one of the master (docker swarm) droplets via the DigitalOcean API and extracting the IP from the response, containing all created droplets. Then I am using ansible to execute the docker stack deploy command. This command pulls the needed docker images from the external registry and deploys containers on all worker nodes (as configured in the docker-compose.yml). A good thing about that command is, that it can also be used to deploy the services initially into the swarm, and also to update the services already running on the swarm. The docker-compose.yml looks like the following:

version: "3.6"
services:
  index:
    image: docker.gotcha-app.de/gotcha/index
    deploy:
      mode: global
    ports:
     - "8983:8983"
    volumes:
     - "index-volume:/opt/solr/server/solr/backup"
    secrets:
     - index-username
     - index-password
  crawler:
    image: docker.gotcha-app.de/gotcha/crawler
    deploy:
      mode: replicated
      replicas: 1
    volumes:
     - "crawler-volume:/root/nutch/volume"
    secrets:
     - index-username
     - index-password
     - crawler-api-username
     - crawler-api-password
  crawlergui:
     image: docker.gotcha-app.de/gotcha/crawlergui
     deploy:
       mode: global
     ports:
     - "8082:8082"
     secrets:
     - crawler-api-username
     - crawler-api-password
     - crawler-gui-username
     - crawler-gui-password
secrets:
  index-username:
    external: true
  index-password:
    external: true
  crawler-api-username:
    external: true
  crawler-api-password:
    external: true
  crawler-gui-username:
    external: true
  crawler-gui-password:
    external: true
volumes:
  crawler-volume:
    driver: local
    driver_opts:
      type: none
      o: bind
      device: /mnt/crawler-volume
  index-volume:
    driver: local
    driver_opts:
      type: none
      o: bind
      device: /mnt/index-volume

(If you are wondering where the secrets come from: They are creating inside the docker swarm on the deploy-infrastructure stage (during terraform apply) and are using the contents of environment variables which are created / maintained in gitlab. The volumes are also created during the terraform steps in the deploy-infrastructure stage.)

Summary

So what is happening after I push code changes:

The CI/CD-Pipeline of Gitlab starts and one stage is executed after another. If one stage fails, the pipeline fails in general and won’t continue. If everything works well: The jar files are created –>Docker-Images are pushed to my private docker registry –> the latest docker images are pulled from the registry and the running containers on my swarm cluster are updated one after another (or for the very first push: the cluster is created/intialized – which means: The Droplets are created on DigitalOcean and everything that is needed is installed/configured on those droplets (docker / docker compose / GlusterFS-Server/-Client / …)  – all executed automatically by terraform. Then the pushed docker images are pulled and deployed automatically on the created/running cluster. The pipeline duration is about 20 minutes including the server cluster creation, and about 10 minutes if the server cluster is already running.

pipeline

Right now it is already possible to access (for example) the crawler gui by calling <Public-IP-address-of-one-swarm-worker-droplet>:8082/crawlerui. The next steps will be adding a reverse proxy (probably traefik) which then redirects calls to the corresponding services and bind my domain with the swarm cluster nodes.

I like that tech stack a lot and I am looking forward to extend/improve the pipeline and the application. If you have suggestions / comments / questions feel free to leave them – I will appreciate it a lot!

Greetings!