In my last blog post I wrote about how to put a load balancer (HAProxy) in front of a docker swarm cluster with multiple manager nodes automatically. That blog post was using the reverse proxy traefik inside the docker swarm mode to dispatch user requests (forwarded by the HAProxy) to one of the existing worker nodes ( the corresponding container on that worker node). I left out information on how traefik works and left the code for those who were interested in the full picture on github to not let the posting explode.
In this posting we will have a closer look on how to create that swarm mode cluster automatically with a gitlab CI pipeline. We will walk through the code that describes our infrastructure, the code that describes our pipeline, the code that deploys our services and the code that configures traefik. I will cut out the HAProxy in front of the cluster in this setup so that we can concentrate on the cluster itself (when interested in the HAProxy-Part have a look at my last blog post). So, first let’s look what we will have after working through that post:
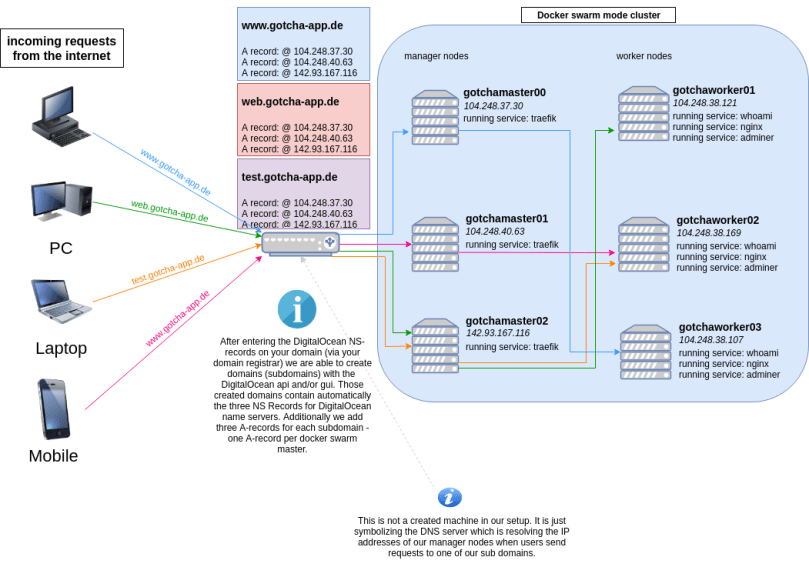
We will have an automated CI/CD-Pipeline on GitLab that will create six droplets on DigitalOcean. Three of those working as manager nodes, three as workers. During our pipeline we will also create three sub domains for the domain we own (gotcha-app.de in this example). As a last step in our pipeline we will deploy traefik on the manager nodes and three services for the worker nodes (each service running on each worker, so on each worker node we will have three running containers).
If you are interested in a complete working code example: Here you go
The end result (that our pipeline will create for us automatically) will look like in the following diagram:
Things we have to do:
- Let DigitalOcean manage our domain (by entering the DO Namespace Records for our domain – using e.g. the GUI of our domain registrar (where we bought the domain)
- implement the code that will create our infrastructure (droplets and domains with records) and install everything that is needed on the droplets (docker, …). We will use terraform for that.
- implement the code that will describe our docker stack (including traefik and three small services for our workers). We will create a docker-compose.yml for that.
- implement the code that will deploy our docker stack. We will use ansible for that – even though it is just a single command that will be executed on one of our swarm mode managers.
- implement the code that will describe our gitlab CI/CD pipeline (executing our infrastructure as code / docker stack deploy).
What we will leave out:
To keep the example short and concise, we will leave out the testing stage(s) which should always be part of a CI/CD-pipeline (but we are using third party images for testing purposes here anyway – so we don’t have any productive code here to test) and as already mentioned we won’t put a load balancer in front of our docker swarm cluster (as we did in the last posting).
So here we go!
Let DigitalOcean manage our domain
If you read my last blog post you will find nothing new here. I bought my domain at strato and the GUI where I added DigitalOcean’s three NS entries looks like the following:
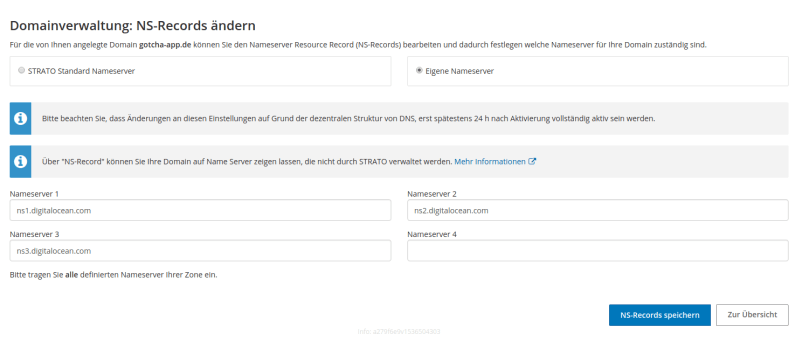 You only have to do that once (and then wait up to 48 hours) and so this task is not part of our automated pipeline. After this, when creating sub domains via the DigitalOcean API, every created sub domain will automatically contain the three needed NS entries.
implement the code that will create our infrastructure („Infrastructure as code“)
All files that describe our infrastructure as code are located in the .infrastructure folder. We have four files that describe our different components. For the full files have a look into the gitlab repository as I will explain the most important parts here. Let’s start with the code that creates our first swarm mode manager node (droplet):
# this part describes what droplet to create. region and size are
# filled by using environment variables. If you are using gitlab CI
# you can add those environment variables under Settings - CI / CD -
# Variables. Make sure to prepend TF_VAR before the name. DO_REGION
# for example must be created as TF_VAR_DO_REGION.
resource "digitalocean_droplet" "gotchamaster-first" {
  image = "ubuntu-16-04-x64"
  name = "gotchamaster00"
  region = "${var.DO_REGION}"
  size = "${var.DO_SIZE}"
  private_networking = true
  ssh_keys = [
    "${var.DO_KEYFINGERPRINT}"
  ]

# this part describes how terraform will connect to the created
# droplet. We will use ssh here.
  connection {
    user = "root"
    type = "ssh"
    private_key = "${file("~/.ssh/id_rsa")}"
    timeout = "2m"
  }

# this will copy the docker-compose.yml file from the repository
# to the droplet (location: /root/docker-compose.yml). We need it
# there to deploy the docker swarm stack.
  provisioner "file" {
    source = "../../../docker-compose.yml"
    destination = "/root/docker-compose.yml"
  }

# this will copy the configuration file for traefik from the
# repository to the droplet (location: /root/traefik.toml).
  provisioner "file" {
    source = "../../../traefik.toml"
    destination = "/root/traefik.toml"
  }

# remote-exec will execute commands on the created droplet. Here,
# we first install some needed software like docker and
# docker-compose. Then we init a swarm and create tokens for our
# managers and workers to be able to join the swarm cluster. We are
# putting those tokens into the files /root/gotchamaster-token and
# /root/gotchaworker-token.
  provisioner "remote-exec" {
    inline = [
      #docker
      "apt-get install apt-transport-https ca-certificates curl software-properties-common python3 -y",
      "curl -fsSL https://download.docker.com/linux/ubuntu/gpg | sudo apt-key add -",
      "add-apt-repository \"deb [arch=amd64] https://download.docker.com/linux/ubuntu $(lsb_release -cs) stable\"",
      "apt-get update",
      "apt-get install docker-ce -y",
      "usermod -aG docker `whoami`",
      "curl -L https://github.com/docker/compose/releases/download/1.22.0/docker-compose-$(uname -s)-$(uname -m) -o /usr/local/bin/docker-compose",
      "chmod +x /usr/local/bin/docker-compose",

      "docker swarm init --advertise-addr ${self.ipv4_address}",
      "docker swarm join-token --quiet manager > /root/gotchamaster-token",
      "docker swarm join-token --quiet worker > /root/gotchaworker-token",

      "docker network create --driver=overlay gotcha-net"
    ]
  }

# After creating files containing the swarm tokens, we copy download
# those files to our local machine (which is in fact the
# gitlab ci runner). Why are we doing this? When creating the other
# cluster nodes, we will upload those files onto those droplets so
# they know the token and are able to join the swarm.
  provisioner "local-exec" {
    command = "scp -o StrictHostKeyChecking=no root@${self.ipv4_address}:/root/gotchamaster-token ./gotchamaster-token"
  }

  provisioner "local-exec" {
    command = "scp -o StrictHostKeyChecking=no root@${self.ipv4_address}:/root/gotchaworker-token ./gotchaworker-token"
  }

}
This was the file which creates the first manager mode. Now we need a second file which creates all other manager nodes. We have to split the manager node creation into to files because the first manager node is doing things the other manager nodes won’t do (like initializing the swarm and creating tokens for other nodes to join the swarm).
Now we can use one file, to create all other manager nodes:
gotcha-master.tf
# As you will see this file looks nearly the same as
# gotcha-master-first.tf. But the first difference is that we are
# using the count-attribute here. We tell terraform to create
# var.DO_MASTERCOUNT - 1 droplets here. DO_MASTERCOUNT is once again
# an environment variable and we are subtracting 1 here as we already
# created the first manager node. Terraform will create those droplets
# parallel instead of one after another which is pretty cool.
resource "digitalocean_droplet" "gotchamaster" {
  image = "ubuntu-16-04-x64"
  name = "${format("gotchamaster%02d", count.index + 1)}"
  count = "${var.DO_MASTERCOUNT - 1}"
  region = "${var.DO_REGION}"
  size = "${var.DO_SIZE}"
  private_networking = true
  ssh_keys = [
    "${var.DO_KEYFINGERPRINT}"
  ]
  connection {
    user = "root"
    type = "ssh"
    private_key = "${file("~/.ssh/id_rsa")}"
    timeout = "2m"
  }

# during the creation of the first manager node we initialized the
# swarm, created tokens for other managers / workers to join the swarm,
# saved those tokens to files, and download those files from the
# droplet to the gitlab ci runner. Now, we will upload those files
# from the gitlab ci runner to the newly created droplet(s).
  provisioner "file" {
    source = "./gotchamaster-token"
    destination = "/tmp/swarm-token"
  }

  provisioner "file" {
    source = "../../../docker-compose.yml"
    destination = "/root/docker-compose.yml"
  }

  provisioner "file" {
    source = "../../../traefik.toml"
    destination = "/root/traefik.toml"
  }

# We install and configure docker and docker-compose on the manager
# nodes and make them join the swarm by reading out the join token.
  provisioner "remote-exec" {
    inline = [
      #docker / docker-compose
      "apt-get install apt-transport-https ca-certificates curl software-properties-common -y",
      "curl -fsSL https://download.docker.com/linux/ubuntu/gpg | sudo apt-key add -",
      "add-apt-repository \"deb [arch=amd64] https://download.docker.com/linux/ubuntu $(lsb_release -cs) stable\"",
      "apt-get update",
      "apt-get install docker-ce -y",
      "usermod -aG docker `whoami`",
      "curl -L https://github.com/docker/compose/releases/download/1.22.0/docker-compose-$(uname -s)-$(uname -m) -o /usr/local/bin/docker-compose",
      "chmod +x /usr/local/bin/docker-compose",

      #docker swarm
      "docker swarm join --token `cat /tmp/swarm-token` ${digitalocean_droplet.gotchamaster-first.ipv4_address}:2377"
    ]
  }

}
gotcha-domain.tf
This file will create all our sub domains (web.gotcha-app.de, http://www.gotcha-app.de, test.gotcha-app.de and traefik.gotcha-app.de). Every sub domain will have three A-records pointing to each manager node IP. Lets only have a look at the http://www.gotcha-app.de sub domain here:
resource "digitalocean_domain" "gotchadomain-www" {
  name       = "www.gotcha-app.de"
  ip_address = "${digitalocean_droplet.gotchamaster-first.ipv4_address}"
  depends_on = ["digitalocean_droplet.gotchamaster-first"]
}
We are defining a resource of type digitalocean_domain here.
- name: the name of the sub domain
- ip_address: this attribute (which is required in terraform, but optional in the DigitalOcean API – see https://github.com/terraform-providers/terraform-provider-digitalocean/issues/112) will create an initial A record. We use the IP-address of our first swarm mode manager here.
- depends_on: To be able to use the IP-address of our first swarm mode manager, that manager has to exist. So we are telling terraform here not to create that domain before the first manager droplet has been created.
resource "digitalocean_record" "record-master-www" {
  count = "${var.DO_MASTERCOUNT - 1}"
  domain = "${digitalocean_domain.gotchadomain-www.name}"
  type   = "A"
  name   = "@"
  value = "${element(digitalocean_droplet.gotchamaster.*.ipv4_address, count.index)}"
  depends_on = ["digitalocean_droplet.gotchamaster"]
}
Then we have to create two more A-Records (remember we have 3 manager nodes, and we want the domain to dispatch requests to one of those 3 manager nodes). So now that our sub domain exists the resource type changes to digitalocean_record.
- count: this kind of works as a loop. We can tell terraform how much managers to create by setting the environment variable DO_MASTERCOUNT (TF_VAR_DO_MASTERCOUNT). As we already created one A-record in the domain-resource, we now have to crate DO_MASTERCOUNT – 1 more A-records.
- domain: tells which (sub) domain should that A-record belong to
- type: the type of the record (A, NS, AAAA, …)
- name: @ will use the sub domain as the hostname (www.gotcha-app.de in our case), some other string would be prepended to the sub domain (e.g. „bob“ would generate an A-record for bob.www.gotcha-app.de)
- value: this is the tricky bit. An A-record is nothing more than the link between a domain and an IP-address. value tells the A-record which IP to use. We are in a loop here (remember the count-attribute). By using the element function, we can iterate through our gotchamaster-resources and use the IP address of each manager node here.
- depends_on: before creating the missing A-records all manager nodes must exists (because we are iterating over their IP-addresses), so we tell terraform to not build those records until all manager nodes exist.
The finished sub domain will look like this in the DigitalOcean GUI (the NS-records were created automatically):

Now at last let us have a look at the code, which creates our three worker nodes:
gotcha-worker.tf
# nothing new here. We tell terraform to create DO_WORKERCOUNT
# droplets here.
resource "digitalocean_droplet" "gotchaworker" {
  image = "ubuntu-16-04-x64"
  name = "${format("gotchaworker%02d", count.index + 1)}"
  count = "${var.DO_WORKERCOUNT}"
  region = "${var.DO_REGION}"
  size = "${var.DO_SIZE}"
  depends_on = ["digitalocean_droplet.gotchamaster"]
  private_networking = true
  ssh_keys = [
    "${var.DO_KEYFINGERPRINT}"
  ]
  connection {
    user = "root"
    type = "ssh"
    private_key = "${file("~/.ssh/id_rsa")}"
    timeout = "2m"
  }

# We need the file containing the token which is needed to join the
# swarm as a worker so we copy it from the gitlab ci runner to the
# droplet as we did on the manager droplets.
  provisioner "file" {
    source = "./gotchaworker-token"
    destination = "/tmp/swarm-token"
  }

# We once again install and configure docker stuff and then join the
# swarm
  provisioner "remote-exec" {
    inline = [
      #docker
      "apt-get install apt-transport-https ca-certificates curl software-properties-common -y",
      "curl -fsSL https://download.docker.com/linux/ubuntu/gpg | sudo apt-key add -",
      "add-apt-repository \"deb [arch=amd64] https://download.docker.com/linux/ubuntu $(lsb_release -cs) stable\"",
      "apt-get update",
      "apt-get install docker-ce -y",
      "usermod -aG docker `whoami`",
      "curl -L https://github.com/docker/compose/releases/download/1.22.0/docker-compose-$(uname -s)-$(uname -m) -o /usr/local/bin/docker-compose",
      "chmod +x /usr/local/bin/docker-compose",

      "docker swarm join --token `cat /tmp/swarm-token` ${digitalocean_droplet.gotchamaster-first.ipv4_address}:2377"
    ]
  }

}
When the infrastructure stage has finished we have a running (but still empty) swarm mode cluster consisting of multiple manager- and worker nodes. Your DigitalOcean Dashboard should now look like:


Cool stuff!! Now that we have a prepared swarm, let us define the stack (what services should run on that cluster).
implement the code that will describe our docker stack (docker-compose.yml)
We are creating four services – traefik, test, web, and www. As test, web and www are just random services which work as example backends here I will concentrate on the traefik service and the test service (as an example) here. If you have questions regarding the other services please feel free to ask.
- traefik: This is – of course – our reverse proxy. It will take requests from the internet and dispatch those requests to a worker node, on which a corresponding service is running.
- ports: we publish port 80 as we will fetch incoming requests on port 80.
- volumes:
- we bind mount the docker.sock to be able to observe when new services are deployed to the stack.
- we bind mount traefik.toml which contains the configuration we want to use.
- deploy:
- mode: global means we want the service to run on every node in our cluster.
- placement: but not on every cluster – only on every manager node.
- labels:
- labels are where we define frontends and backends for traefik. Here, we tell traefik to take requests from traefik.gotcha-app.de dispatch them to the traefik backend (which is the service itself) on port 8081 (as defined in traefik.toml). This is where the GUI-Dashboard of all configured traefik backends and frontends will be displayed. We tell the service to use the created network gotcha-net (see gotcha-master-first.tf) and to explicitly be enabled (because we defined exposedbydefault = false in traefik.toml).
- test:
- deploy:
- This time we swarm to only deploy this service onto worker nodes in our swarm.
- labels
- We tell traefik to listen to requests on test.gotcha-app.de:80 and dispatch those requests to a node where the test service is running and use port 8080 on that node. Pay attention to the fact that we don’t have to publish any port here as we are using the same network for all our services.
- deploy:
version: "3.6"
services:
  traefik:
    image: traefik:v1.6.6
    ports:
      - "80:80"
    volumes:
      - "/var/run/docker.sock:/var/run/docker.sock"
      - "/root/traefik.toml:/traefik.toml"
    deploy:
      mode: global
      placement:
        constraints:
          - node.role == manager
      labels:
        - "traefik.frontend.rule=Host:traefik.gotcha-app.de"
        - "traefik.frontend.rule.type: PathPrefixStrip"
        - "traefik.port=8081"
        - "traefik.backend=traefik"
        - "traefik.backend.loadbalancer.sticky=true"
        - "traefik.docker.network=gotcha-net"
        - "traefik.enable=true"
    networks:
      - gotcha-net
  test:
    image: stefanscherer/whoami
    deploy:
      mode: global
      placement:
        constraints:
        - node.role == worker
      labels:
        - "traefik.port=8080"
        - "traefik.backend=test"
        - "traefik.frontend.rule=Host:test.gotcha-app.de"
        - "traefik.docker.network=gotcha-net"
        - "traefik.enable=true"
    depends_on:
    - traefik
    networks:
    - gotcha-net
  web:
    image: nginxdemos/hello
    ports:
      - "8082:80"
    deploy:
      mode: global
      placement:
        constraints:
          - node.role == worker
      labels:
        - "traefik.frontend.rule=Host:web.gotcha-app.de"
        - "traefik.port=8082"
        - "traefik.backend=web"
        - "traefik.docker.network=gotcha-net"
        - "traefik.enable=true"
    networks:
      - gotcha-net
  www:
    image: hashicorp/http-echo
    ports:
      - "8083:5678"
    command: -text="hello world"
    deploy:
      mode: global
      placement:
        constraints:
          - node.role == worker
      labels:
        - "traefik.frontend.rule=Host:www.gotcha-app.de"
        - "traefik.port=8083"
        - "traefik.backend=www"
        - "traefik.docker.network=gotcha-net"
        - "traefik.enable=true"
    networks:
      - gotcha-net
    depends_on:
      - traefik
networks:
  gotcha-net:
    external: true
As the docker-compose.yml is pretty straight forward, let’s have a look at the configuration file for traefik (only to see that it’s pretty straight forward, too).
traefik.toml
defaultEntryPoints = ["http"]
[web]
  address = ":8085"
[entryPoints]
  [entryPoints.http]
    address = ":80"
[docker]
  endpoint = "unix:///var/run/docker.sock"
  domain = "gotcha-app.de"
  watch = true
  swarmmode = true
  exposedbydefault = false
- defaultEntryPoints: We tell traefik that we will use http requests as default (not https)
- web: this tells traefik to serve a web gui dashboard on port 8085
- entryPoints: we link the http entrypoint to port 80 here
- docker: this section describes that we are using traefik in a swarm mode setup.
- endpoint: the endpoint of the docker.sock
- domain: our domain
- watch: traefik should watch the services and recognize new services
- swarmmode: yes, we are using traefik in a swarm mode setup
- exposedbydefault: We tell traefik to have no backends published by default. We have to expose every backend explicitly by defining a label „traefik.enable=true“ in the corresponding service definition in docker-compose.yml.
implement the code that will deploy our docker stack
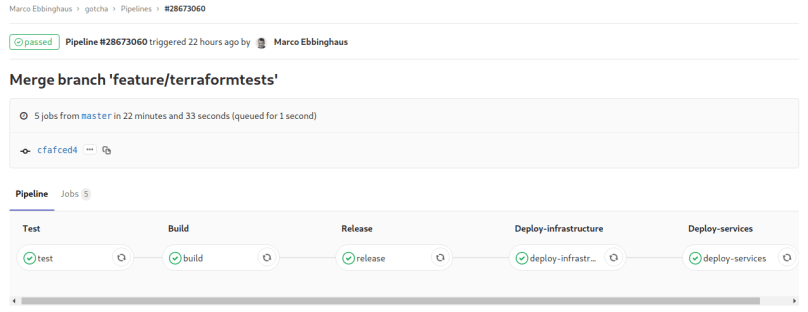
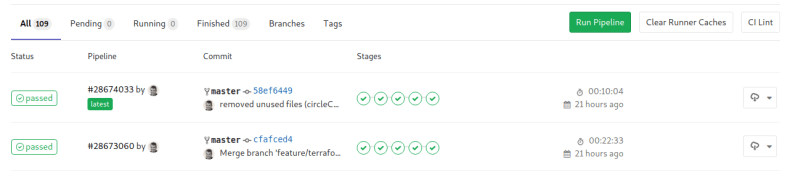
Now that we have everything we need, let us – at last – create the pipeline which will (on every push to master) create the defined swarm mode cluster (via terraform) and deploy our defined services (the stack) on that cluster (via ansible).
As we are using gitlab ci, we need a .gitlab-ci.yml. Here it is:
# you can use any image you want. I am using the maven image as my
# main project has some more stages containing maven commands.
image: maven:latest

services:
  - docker:dind

cache:
  paths:
    - .m2/repository

variables:
  DOCKER_HOST: tcp://docker:2375
  DOCKER_DRIVER: overlay2
  MAVEN_OPTS: "-Dmaven.repo.local=.m2/repository"

# these are our two stages. deploy-infrastructure will create or
# cluster and deploy-services will deploy the stack on the created
# cluster.
stages:
  - deploy-infrastructure
  - deploy-services

# we are using terraform to create the cluster. Before anything else
# we put our private key onto the gitlab runner (because the
# terraform commands will connect to the DigitalOcean droplets via ssh)
# Then we move to the location where our .tf-files are and the we run
# terraform init, plan and apply to let terraform do the magic.
# I am using a loop on the final terraform apply command here which
# is not optimal as it will end in an endless loop if anything goes
# wrong. I only use(d) this as a workaround as the DigitalOcean API
# sometimes answered with 503 errors which resulted in failing pipe
# lines. But this was temporary and normally you shouldn't need that
# loop.
deploy-infrastructure:
  stage: deploy-infrastructure
  image:
    name: hashicorp/terraform:light
    entrypoint:
      - '/usr/bin/env'
      - 'PATH=/usr/local/sbin:/usr/local/bin:/usr/sbin:/usr/bin:/sbin:/bin'
  before_script:
    - mkdir -p ~/.ssh
    - echo "$TF_VAR_DO_PRIVKEY" | tr -d '\r' > ~/.ssh/id_rsa
    - chmod -R 700 ~/.ssh
  script:
    - cd .infrastructure
    - cd live/cluster
    - terraform init
    - terraform plan
    - until terraform apply -auto-approve; do echo "Error while using DO-API..trying again..."; sleep 2; done
  only:
    - master

# This stage will deploy the stack on our swarm. Before anything we
# are installing ansible and jq here. Then we copy our ssh key onto
# the gitlab runner as we will use ansible (which uses ssh) to run
# the docker stack deploy - command on our gotchamaster-first
# manager node.
# To find that node we are using the DigitalOcean API to find it by
# its name. Then we use jq to parse its IP out of the JSON-response.
# After cutting of the "" we write its IP into the /etc/ansible/hosts
# so ansible knows where to connect to. After setting HostKeyChecking
# to false (by uncommenting the line #host_key_checking = false in
# /etc/ansible/ansible.cfg) we run one single ansible command to
# deploy the stack using the docker-compose.yml on gotchamaster00.
deploy-services:
  stage: deploy-services
  before_script:
    - echo "deb http://ppa.launchpad.net/ansible/ansible/ubuntu trusty main" >> /etc/apt/sources.list
    - apt-key adv --keyserver keyserver.ubuntu.com --recv-keys 93C4A3FD7BB9C367
    - apt-get update
    - apt-get install ansible -y
    - apt-get install jq -y
  script:
    - mkdir -p ~/.ssh
    - echo "$TF_VAR_DO_PRIVKEY" | tr -d '\r' > ~/.ssh/id_rsa
    - chmod -R 700 ~/.ssh
    - "GOTCHA_MASTER_IP=$(curl -sX GET https://api.digitalocean.com/v2/droplets -H \"Authorization: Bearer $TF_VAR_DO_TOKEN\" | jq -c '.droplets[] | select(.name | contains(\"gotchamaster00\")).networks.v4[0]'.ip_address)" # extrahieren der IP-Adresse von gotchamaster00 via DO-API und jq anhand des dropletnamens
    - GOTCHA_MASTER_IP="${GOTCHA_MASTER_IP%\"}"
    - GOTCHA_MASTER_IP="${GOTCHA_MASTER_IP#\"}"
    - export GOTCHA_MASTER_IP
    - echo $GOTCHA_MASTER_IP > /etc/ansible/hosts
    - sed -i -- 's/#host_key_checking/host_key_checking/g' /etc/ansible/ansible.cfg
    - ansible all --user=root -a "docker stack deploy --compose-file docker-compose.yml gotcha"
  only:
    - master
The only-attribute tells gitlab to trigger the pipeline every time we push something into the master branch.
Now let us try out our deployed services! First let us check traefik.gotcha-app.de to check if the traefik dashboard is working:
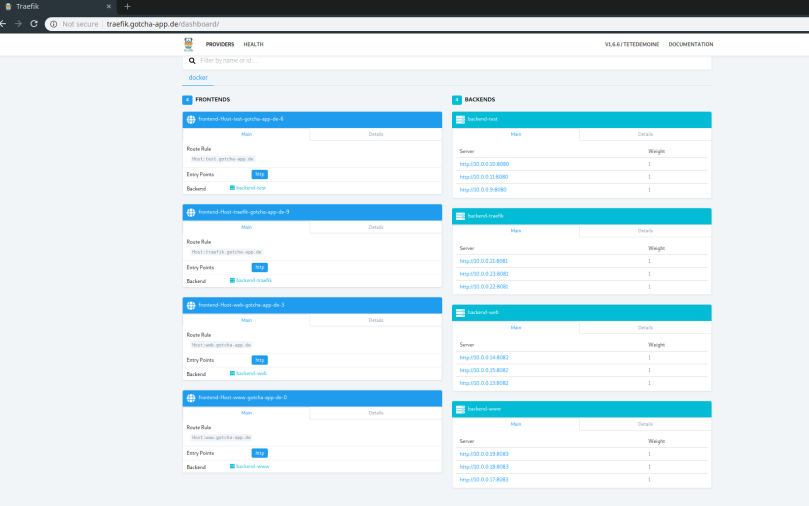
Great! We are seeing four frontends (traefik.gotcha-app.de, http://www.gotcha-app.de, test.gotcha-app.de, web.gotcha-app.de) and four backends – each consisting of three (worker) nodes where our services are running.
Then let us check the nginx- and the adminer-service by browsing web.gotcha-app.de and http://www.gotcha-app.de:


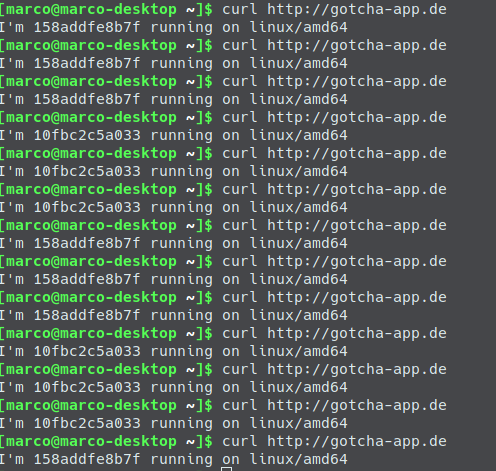
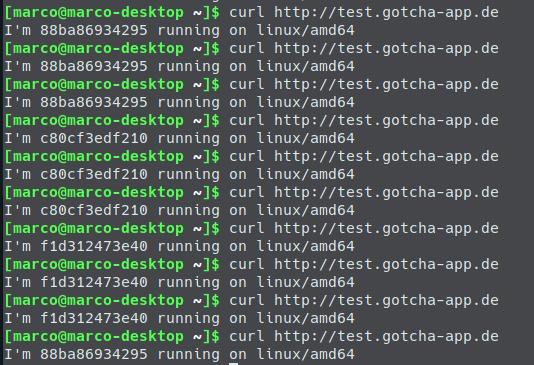
Cool stuff! Last but not least let’s do some curls against the whoami service linked to test.gotcha-app.de:
If you want to try everything on gitlab be sure to create the needed environment variables defined in vars.tf (but with prepended TF_VAR_). You can set them on Gitlab under Settings – CI / CD – Variables. So you will need (in brackets is what I used):
- TF_VAR_DO_TOKEN – your DigitalOcean token (my DigitalOcean token :P)
- TF_VAR_DO_PRIVKEY – your private ssh key (my private ssh key :P)
- TF_VAR_DO_KEYFINGERPRINT – Your public ssh key’s fingerprint. You have to add that public key to DigitalOcean in your DigitalOceans‘ account settings. (my key fingerprint :P)
- TF_VAR_DO_REGION – the region where you want to create the droplet (fra1, which is Frankfurt Germany)
- TF_VAR_DO_SIZE – the size your droplets should have (s-1vcpu-1gb, which is the smallest – 5$ per month)
- TF_VAR_DO_MASTERCOUNT – count of your swarm manager nodes (3)
- TF_VAR_DO_WORKERCOUNT – count of your swarm worker nodes (3)
Have fun letting the pipeline create your cluster and deploy/update your services automatically to it!
Things I left out
There are some things that I left out, but which you want to do when using stuff for production purposes:
- You should use HTTPS for communication between the services and between user requests and your cluster.
- Maybe you even want to put a load balancer in front of your swarm cluster.
- As the terraform commands are executed on a gitlab runner, all state files will be lost when the pipeline has finished. So the second time the pipeline is running terraform won’t know that the resources already were created and so will duplicate them. What you want to use here is a terraform backend. In my main application I am using an AWS bucket as the backend for terraform. So whenever the pipeline is executed it checks (during the deploy-infrastructure stage) if state files exist in my bucket and if so, it will use the already created resources (and won’t create new ones – unless you make changes to your infrastructure code which require the recreation of a droplet. But even then terraform will destroy the old droplet and create a new one instead.
- the traefik dashboard is unsecured, you should at least put a basic auth in front of it because otherwise anyone can get information on your server cluster infrastructure.
If you have any questions please feel free to contact me or leave a comment.
If you are interested in the complete code example: Check it out here